Maw1 How to make an ID picture ( 2x2, 1x1 ) in Adobe Photoshop CS 6 for for 3 to 5 minutes Tue May 14, 2013 8:53 am


 Post : 673
 Points : 985574997
For a complete tutorial of it and more reference you can visit my blogsite to see some of my arts http://artifactors.blogspot.com/
if you have a question you can chat me in my facebook account since im always online there, my email is ialexies@yahoo.com .I'll reply if i do not have any home work and upcoming exam in school hehe.
The only hard part here is part 1 since you are going to setup
everything at first. After you finish part 1 and made the entire
functions needed for the future editing. The only thing you need to do
next time you make an ID pictures is only part 2 which consist of only 5
easy steps and almost all were automated.
I'm not a pro here but I still want to share my own knowledge and a
little bit of experience. If you use this tutorial with shortcut keys
you can make it even faster.
"It's a long tutorial how come we can do it in just 3 to 5 min", maybe
it is what you're thinking right now, but honestly int's not. I only
made it step by step to make beginner understand it as well. and the
only hard to study in it, but not really that hard is the making of
actions that later on that too long process can be shortened in just one
click. So this is not just a simple tutorial of ID picture but also
installation of Portraiture and Actions in Adobe Photoshop
I made it in it's simplest form and even step by step tutorial to make
it still understandable by beginners. So get ready your Photoshop and
dwell with me.
PART 1
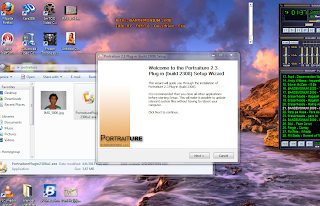
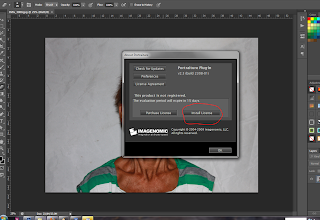
1.) First we need to setup a third party application or filter for adobe
Photoshop CS6 that can make our life easier when it comes to finishing
touches of skin textures. Download Portraiture which is a product of
Imagenomic in this link http://imagenomic.com/pt.aspx
. For educational purposes and for beginners that just want to try it
and not going to use it for commercial purpose, you can download the
crack file of it in this
linkhttp://kat.ph/imagenomic-portraiture-2-3-08-plugin-for-photoshop-chingliu-t7153285.html
. Install it and you can see it like the image below.
*I'm not telling that you should use the crack software. hehe I'm just
saying that you can still try it if you've got no money in your pocket.
hehehe ("I am a poor BSIT student and a self taught graphic artist
that's why i usually use crack software")
*Please excuse mo about those annoying lyrics that is floating in my
desktop. I always sing everytime i work that's why there is a floating
lyrics and winamp to reduce my boredom and i believe that at some part
it increase my creativity and helm in my mind alertness. hehehe :P
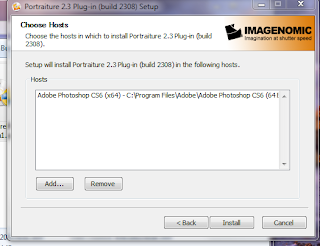
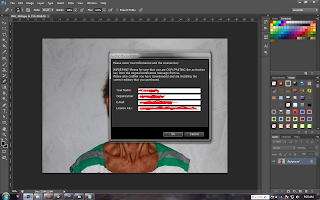
2.) When you are installing it, you are going to see this part. It
just prompt you if you have any other software that would like to use
the portraiture or if you have another version of Photoshop just click
the add and locate the Directory (folder) for filters.
3.) Now that you have already installed portraiture. Open Adobe
Photoshop or if it's running restart Photoshop to regenerate the
changes in its resources including filters.
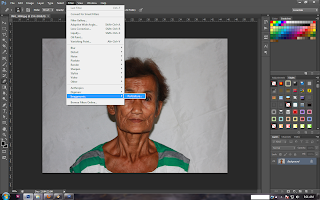
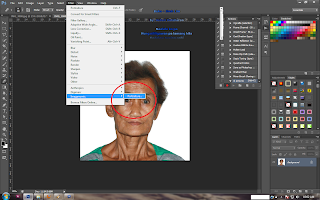
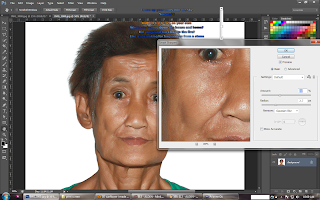
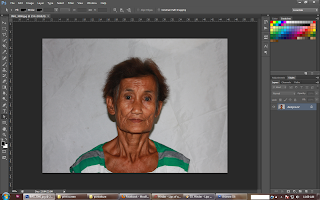
4.) Now open the image you want to use and make an id picture. If you
have successfully installed Portraiture you can see it in filters. Go to
filters - Imagenomic and click portraiture.
5.) Enter the serial if you have it.
*If you don't, it will make an annoying pop up later that will show up
every time you try to use the automation that i will discuss later.
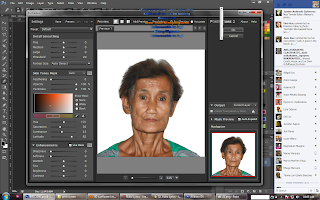
7.) You will see a second window. Don't be afraid of it, It's not a
monster. We are not going to edit the preference of it, we're going to
use the default settings but you can still edit it if you want to study
it's settings and it's easy if you are familiar with some color
management in Photoshop. Now click OK!

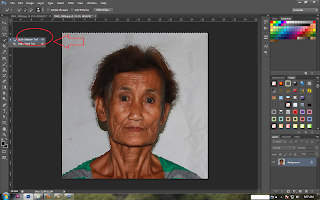
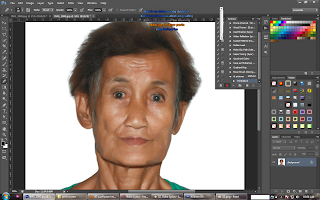
8.) Now the Portraiture is already installed after you had click the ok
button. the effect was applied as you see how the skin became softer.
But we don't need it now so click window at the top and click history or
just click f9. the history will show, click the image at the top of it
to return to it's original state.

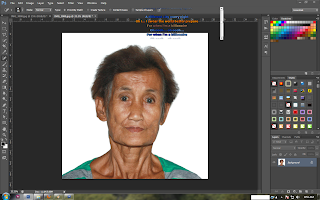
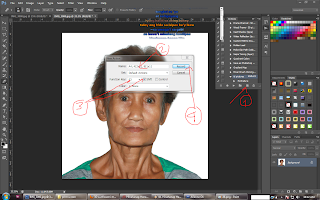
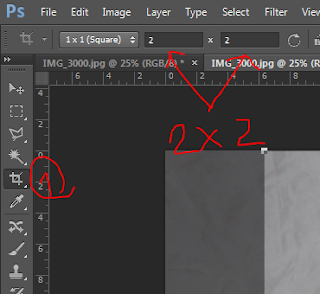
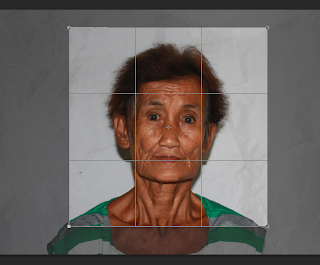
9.) Now crop the image with height and width of 2 inches using the crop tool.


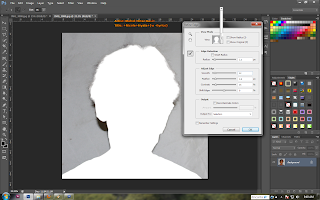
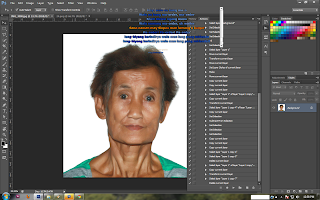
10.) Remove the background using quick selection.
Click the refine edge the top. This button appears every time you make a selection.
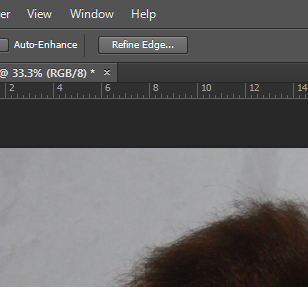
Now brush in places where the hair is mixing with background.
Then click ok. Adjust the settings of radius, smooth and feather to the way you want or use my settings.
Many of these settings of refine edge are not present in previous version of adobe Photoshop. The
upgrade in refine edge is only started at the version of CS 5 so you cannot see those settings in CS 4 and
CS 3 and lower versions.
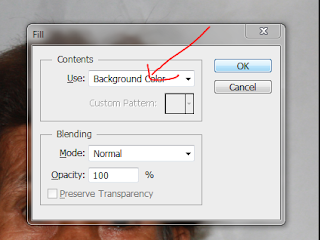
We are now ready to erase the background. We are going to use the bacground color,
so check if it using background color. Be sure that the background color plain white and to make it sure,
press "D" to bring back the default color of foreground and background color which makes the background
plain white.
There are some parts that quick selection tool cannot handle such as the the shadows behind our object.
We need remove them manually using pen tool or lasso.
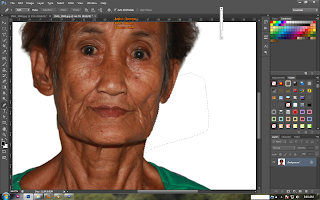
Using your editing skills,edit each visible lines or any patches that
might not remove by the portraiture. Use healing brush or clone stamp or
color balance, contrast, levels and curves to edit the color . We will
not rely on portraiture and manually edit those that should be edited
manually. We are
going to use portraiture just for the finishing touches of the texture
of face. Believe me, it is still better to edit it manually, there is
still some part that do not need to be rush.
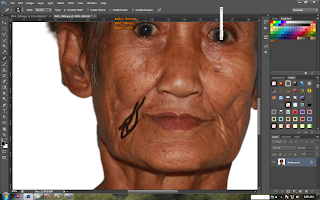
After editing, you should see the difference.
11.) Let's proceed to the most exciting part of this tutorial, the
creation of an Action in Photoshop. Go to widows and click action or
just simply click f9.
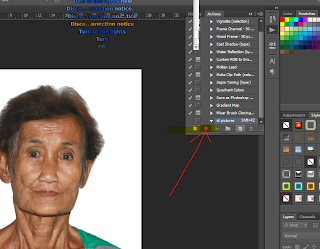
12.) You will see that a panel at the right side will appear. Create a
new action by clicking the 2nd button at the lower left part of the
action panel as you see in the image below. copy the settings i made,
make the name id pictures and select a function key, i used f2 while you
can use anything you want. I also check the button for shift to make it
a combination so that when i need to use the recorded action, i'll only
just need to hit shift + f2
14.) After you created a new action, start it by recording the movement
you do in Photoshop Click the round button at the lower left part of
the panel. After you hit it, anything you do in Photoshop will be
recorded will be saved in action panel
15.) Now, the first thing we need to record is the effect of portraiture. go to filters click imagenomic and then Portraiture.
A new window will appear. It is the settings for portraiture. And since
this is not really a complete tutorial of how to use this plugin and
just on how it can be combine in an action, we are not going to edit the
settings of it and just use the default settings of this plugin. For
now just click ok.
After you hit ok you can immediately see the difference and how the portraiture clean the skin texture.
16.) We are no going to stop recording of an action since what we only
need to do here is to have a complete automation or shortcut of the
effect of portraiture. Click first the stop button at the lower right of
the action panel again if you lost the action panel, click f9 for it
to appear.
17.) I found that the effect of portraiture is a little bit too smooth.
There are many ways to counter this effect and one of it is to adjust
manually in settings of portraiture but since we have already made the
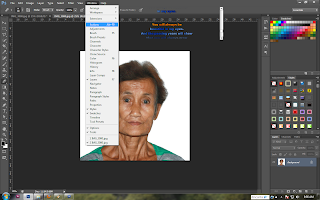
action and it will took an additional steps in in our tutorial, we just
use the sharpen filter to manage it. Go to filters, click sharpen and
then hit smart sharpen. A new window will appear for the settings of
smart sharpen. Adjust amount and radius to what your object needs or you
can copy my settings and then press OK.
18.) Now that you have already change the background, edit the face and
made an action for portraiture, let us proceed to a longer automation.
We are no going to create an action for setting up our ID pictures for
printing. Our target is by just hitting the shortcut key of our action
is automatically plot the image in a canvas with a size of A4 photo
paper (you can change the size of canvas to whatever you want).
Open the action panel and add a new action like what we did in step 12.
Change the name to whatever you want and choose function key you want to
use. Don't forget the function key you used since it is the to be the
shortcut key for our action then click record.
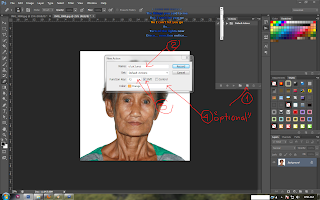
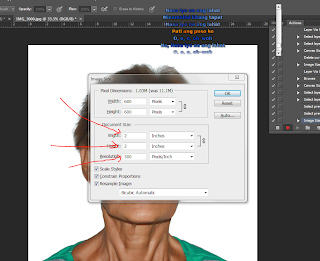
19.) The first thing we need to be sure before recording anything is
that the image size exactly has 600 pixels in height and width. Don't
just rely on pixels, you need to manually to edit the height and width
manually and enter the resolution because for example you can have an
8.333 inches in width and height width a resolution of 72, it will still
generate a 600 pixels in height and width but we need to create a
canvas with 300 resolution so it will not fit to our canvas exactly. so
to remove confusion just enter 2 inches in height and width and 300 for
resolution.
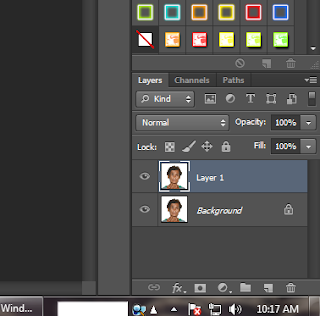
20.) Duplicate our image. Right click the layer background and hit duplicate or just press ctr+j.
21. Literally what some of us will create a new canvas and just and
just drag the 2x2 picture in it. Using an action we cannot do that.
There are a lot of requirement when using action and one of that is that
you cannot use another project if it does not exist or has different
name. What we're going to do is just modify the existing canvas. the
canvas size now is 2x2 inches since it followed the value of the image
size that we made before. I duplicate the image so that the duplicated
layer which Photoshop named layer 1 will retain its height and width of
2x2 inches and will not be affected if the canvas size will be changed.
*Note that the background layer will follow the size of canvas size.
*Even if you change the size of the canvas the resolution will not change.
Go to Image and click canvas size or just hit ctrl+alt+c. Enter the
value of the desired canvas size. For me I use an A4 size photopaper so
the height of it is 11.69 inches and width of 8.27 inches. Press OK.

22.) When we duplicated the image and change the canvas size, the
original image remains at the background layer. we are going to delete
it since we are not going anymore. To avoid confusion select layer 1 and
move at different place. Select the background layer and using any
selection tool select the image in layer 1 and delete. It will make the
background layer pure white.
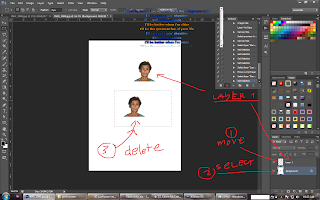
It should look like this
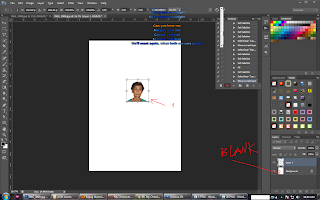
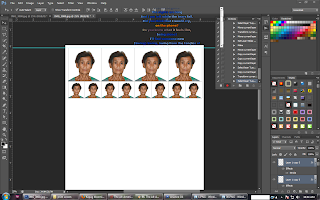
23.) Now duplicate them using ctrl+j or for faster way hold alt and
move it to the desired place then remove the hold in alt button to
confirm the duplication. Make it something like the image below.
24.) Since we already setup up everything you can now stop the recording of the action, click the stop
button.
"Congratulations you finished all the hard step. The next thing is how
to use everthing we made just like making a magic trick."

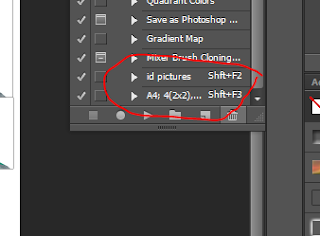
If you followed the everything correctly you can now see that we have 2
actions saved in our action panel, the action for the effect of
portraiture which is named "id pictures" and the action for layout of
id ready for printing which is named "A4; 4(2x2), 8(1x1)". If you use
different name then it that name is what you see here.
PART 2
1.) Everything is ready and we just only need to start from the scratch in an easier way. Open a new document or a new image.
2.) Crop it like in step 9
3.) Now Change the background edit the visible lines like we did before

4.) Click f2 or the shortcut key you made for portraiture. In just 1
click it will generate the finishing blow for the skin texture.
5.) Click f3 or the shortcut key you made for layout for printing. See
in just few click you save a lot of effort. you can now use it
repeatedly in all ID pictures you want. It is now ready to print.

If you cant make the action perfect and some error occurred you can
download the action i made and just load it in action panel and browse
it. Sometimes the shortcut key does not inherit from the downloaded
action, if it happened just click the action you want and just edit the
function key and click ok.
ID actions --- http://www.blogger.com/%C2%A0http://...2h3v7adcs81pj1

if you have a question you can chat me in my facebook account since im always online there, my email is ialexies@yahoo.com .I'll reply if i do not have any home work and upcoming exam in school hehe.
The only hard part here is part 1 since you are going to setup
everything at first. After you finish part 1 and made the entire
functions needed for the future editing. The only thing you need to do
next time you make an ID pictures is only part 2 which consist of only 5
easy steps and almost all were automated.
I'm not a pro here but I still want to share my own knowledge and a
little bit of experience. If you use this tutorial with shortcut keys
you can make it even faster.
"It's a long tutorial how come we can do it in just 3 to 5 min", maybe
it is what you're thinking right now, but honestly int's not. I only
made it step by step to make beginner understand it as well. and the
only hard to study in it, but not really that hard is the making of
actions that later on that too long process can be shortened in just one
click. So this is not just a simple tutorial of ID picture but also
installation of Portraiture and Actions in Adobe Photoshop
I made it in it's simplest form and even step by step tutorial to make
it still understandable by beginners. So get ready your Photoshop and
dwell with me.
PART 1
1.) First we need to setup a third party application or filter for adobe
Photoshop CS6 that can make our life easier when it comes to finishing
touches of skin textures. Download Portraiture which is a product of
Imagenomic in this link http://imagenomic.com/pt.aspx
. For educational purposes and for beginners that just want to try it
and not going to use it for commercial purpose, you can download the
crack file of it in this
linkhttp://kat.ph/imagenomic-portraiture-2-3-08-plugin-for-photoshop-chingliu-t7153285.html
. Install it and you can see it like the image below.
*I'm not telling that you should use the crack software. hehe I'm just
saying that you can still try it if you've got no money in your pocket.
hehehe ("I am a poor BSIT student and a self taught graphic artist
that's why i usually use crack software")
*Please excuse mo about those annoying lyrics that is floating in my
desktop. I always sing everytime i work that's why there is a floating
lyrics and winamp to reduce my boredom and i believe that at some part
it increase my creativity and helm in my mind alertness. hehehe :P
2.) When you are installing it, you are going to see this part. It
just prompt you if you have any other software that would like to use
the portraiture or if you have another version of Photoshop just click
the add and locate the Directory (folder) for filters.
3.) Now that you have already installed portraiture. Open Adobe
Photoshop or if it's running restart Photoshop to regenerate the
changes in its resources including filters.
4.) Now open the image you want to use and make an id picture. If you
have successfully installed Portraiture you can see it in filters. Go to
filters - Imagenomic and click portraiture.
5.) Enter the serial if you have it.
*If you don't, it will make an annoying pop up later that will show up
every time you try to use the automation that i will discuss later.
7.) You will see a second window. Don't be afraid of it, It's not a
monster. We are not going to edit the preference of it, we're going to
use the default settings but you can still edit it if you want to study
it's settings and it's easy if you are familiar with some color
management in Photoshop. Now click OK!
8.) Now the Portraiture is already installed after you had click the ok
button. the effect was applied as you see how the skin became softer.
But we don't need it now so click window at the top and click history or
just click f9. the history will show, click the image at the top of it
to return to it's original state.
9.) Now crop the image with height and width of 2 inches using the crop tool.
10.) Remove the background using quick selection.
Click the refine edge the top. This button appears every time you make a selection.
Now brush in places where the hair is mixing with background.
Then click ok. Adjust the settings of radius, smooth and feather to the way you want or use my settings.
Many of these settings of refine edge are not present in previous version of adobe Photoshop. The
upgrade in refine edge is only started at the version of CS 5 so you cannot see those settings in CS 4 and
CS 3 and lower versions.
We are now ready to erase the background. We are going to use the bacground color,
so check if it using background color. Be sure that the background color plain white and to make it sure,
press "D" to bring back the default color of foreground and background color which makes the background
plain white.
There are some parts that quick selection tool cannot handle such as the the shadows behind our object.
We need remove them manually using pen tool or lasso.
Using your editing skills,edit each visible lines or any patches that
might not remove by the portraiture. Use healing brush or clone stamp or
color balance, contrast, levels and curves to edit the color . We will
not rely on portraiture and manually edit those that should be edited
manually. We are
going to use portraiture just for the finishing touches of the texture
of face. Believe me, it is still better to edit it manually, there is
still some part that do not need to be rush.
After editing, you should see the difference.
11.) Let's proceed to the most exciting part of this tutorial, the
creation of an Action in Photoshop. Go to widows and click action or
just simply click f9.
12.) You will see that a panel at the right side will appear. Create a
new action by clicking the 2nd button at the lower left part of the
action panel as you see in the image below. copy the settings i made,
make the name id pictures and select a function key, i used f2 while you
can use anything you want. I also check the button for shift to make it
a combination so that when i need to use the recorded action, i'll only
just need to hit shift + f2
14.) After you created a new action, start it by recording the movement
you do in Photoshop Click the round button at the lower left part of
the panel. After you hit it, anything you do in Photoshop will be
recorded will be saved in action panel
15.) Now, the first thing we need to record is the effect of portraiture. go to filters click imagenomic and then Portraiture.
A new window will appear. It is the settings for portraiture. And since
this is not really a complete tutorial of how to use this plugin and
just on how it can be combine in an action, we are not going to edit the
settings of it and just use the default settings of this plugin. For
now just click ok.
After you hit ok you can immediately see the difference and how the portraiture clean the skin texture.
16.) We are no going to stop recording of an action since what we only
need to do here is to have a complete automation or shortcut of the
effect of portraiture. Click first the stop button at the lower right of
the action panel again if you lost the action panel, click f9 for it
to appear.
17.) I found that the effect of portraiture is a little bit too smooth.
There are many ways to counter this effect and one of it is to adjust
manually in settings of portraiture but since we have already made the
action and it will took an additional steps in in our tutorial, we just
use the sharpen filter to manage it. Go to filters, click sharpen and
then hit smart sharpen. A new window will appear for the settings of
smart sharpen. Adjust amount and radius to what your object needs or you
can copy my settings and then press OK.
18.) Now that you have already change the background, edit the face and
made an action for portraiture, let us proceed to a longer automation.
We are no going to create an action for setting up our ID pictures for
printing. Our target is by just hitting the shortcut key of our action
is automatically plot the image in a canvas with a size of A4 photo
paper (you can change the size of canvas to whatever you want).
Open the action panel and add a new action like what we did in step 12.
Change the name to whatever you want and choose function key you want to
use. Don't forget the function key you used since it is the to be the
shortcut key for our action then click record.
19.) The first thing we need to be sure before recording anything is
that the image size exactly has 600 pixels in height and width. Don't
just rely on pixels, you need to manually to edit the height and width
manually and enter the resolution because for example you can have an
8.333 inches in width and height width a resolution of 72, it will still
generate a 600 pixels in height and width but we need to create a
canvas with 300 resolution so it will not fit to our canvas exactly. so
to remove confusion just enter 2 inches in height and width and 300 for
resolution.
20.) Duplicate our image. Right click the layer background and hit duplicate or just press ctr+j.
21. Literally what some of us will create a new canvas and just and
just drag the 2x2 picture in it. Using an action we cannot do that.
There are a lot of requirement when using action and one of that is that
you cannot use another project if it does not exist or has different
name. What we're going to do is just modify the existing canvas. the
canvas size now is 2x2 inches since it followed the value of the image
size that we made before. I duplicate the image so that the duplicated
layer which Photoshop named layer 1 will retain its height and width of
2x2 inches and will not be affected if the canvas size will be changed.
*Note that the background layer will follow the size of canvas size.
*Even if you change the size of the canvas the resolution will not change.
Go to Image and click canvas size or just hit ctrl+alt+c. Enter the
value of the desired canvas size. For me I use an A4 size photopaper so
the height of it is 11.69 inches and width of 8.27 inches. Press OK.
22.) When we duplicated the image and change the canvas size, the
original image remains at the background layer. we are going to delete
it since we are not going anymore. To avoid confusion select layer 1 and
move at different place. Select the background layer and using any
selection tool select the image in layer 1 and delete. It will make the
background layer pure white.
It should look like this
23.) Now duplicate them using ctrl+j or for faster way hold alt and
move it to the desired place then remove the hold in alt button to
confirm the duplication. Make it something like the image below.
24.) Since we already setup up everything you can now stop the recording of the action, click the stop
button.
"Congratulations you finished all the hard step. The next thing is how
to use everthing we made just like making a magic trick."
If you followed the everything correctly you can now see that we have 2
actions saved in our action panel, the action for the effect of
portraiture which is named "id pictures" and the action for layout of
id ready for printing which is named "A4; 4(2x2), 8(1x1)". If you use
different name then it that name is what you see here.
PART 2
1.) Everything is ready and we just only need to start from the scratch in an easier way.
Open a new document or a new image. 2.) Crop it like in step 9
3.) Now Change the background edit the visible lines like we did before
4.) Click f2 or the shortcut key you made for portraiture. In just 1
click it will generate the finishing blow for the skin texture.
5.) Click f3 or the shortcut key you made for layout for printing. See
in just few click you save a lot of effort. you can now use it
repeatedly in all ID pictures you want. It is now ready to print.
If you cant make the action perfect and some error occurred you can
download the action i made and just load it in action panel and browse
it. Sometimes the shortcut key does not inherit from the downloaded
action, if it happened just click the action you want and just edit the
function key and click ok.
ID actions --- http://www.blogger.com/%C2%A0http://...2h3v7adcs81pj1