Marquel World Information Technology

We allready update to new theme & 2 GDesign custom theme coming up. Stay tuned for more updates coming soon By: Admin Kosmyn and the rest of the staff of this support forum
ChatBox

You are not connected. Please login or register

Go to page : 1, 2, 3  Next

steves1Hot Symbianize Index of Computer Tutorials, Sun Jan 13, 2013 7:48 am

  • Technician
steves
Technician
Hi Guys, ginawa ko po ang thread na
ito para macompile naten lahat ng computer tweaks, tutorials, tips, and
tricks dito sa'ten sa Symbianize,
para maging guide sa lahat ng Symbianizer at para na rin maiwasan ang
paulit-ulit na pagpopost ng magkakaparehong tutorial na may iisang
nilalaman. Symbianize Index of Computer Tutorials,  Salute


Please post your Computer tutorial, tweaks, tricks, and tips here.

When creating your tutorial please follow these simple guidelines:Symbianize Index of Computer Tutorials,  Honored

1. Search first to find out if a tutorial on a particular subject is
available to write about. You can find out if your subject is available
by using our search engine.

2. All information should be clear and concise with step by step instructions.

3. All information must be worded in such a way that a complete novice can understand it.


Finally, post it here in this format:

Thread Title:

Thread Link:
Ok let's start... Symbianize Index of Computer Tutorials,  Thumbup

Message reputation : 100% (1 vote)

steves2Hot Tweaks To Improved Your Internet Speed [Updated] Sun Jan 13, 2013 7:49 am

  • Technician
steves
Technician
First, go to this site to see your current internet speed:
http://speakeasy.net/speedtest

Select any server, ex: SEATTLE, WA.

Remember the results.

Now let's start...

Download: SG TCP Optimizer here

1. Open TCP Optimizer
2. Choose your maximum Connection Speed from the slider bar (the maximum available bandwidth, in kilobits per second)
3. Choose your Network Interface, or check to Modify All Network Adapters
4. Click "Optimal settings" from the radio-buttons near the bottom of the program
5. Click on the "Apply changes" button and reboot

After reboot do the following:

For Windows XP User Only

- FASTER WEB PAGE LOADING:

This tweak will help web pages load faster, it has no real effect on
download speeds, just helps your pc look up websites faster thereby
speeding up how fast the page loads and making web-surfing more
enjoyable.

Navigate to this registry entry and change the following settings:

For XP & 2K

HKEY_LOCAL_MACHINE\SYSTEM\CurrentControlSet\Servic es\Tcpip\ServiceProvider

For 98, 98SE & ME

HKEY_LOCAL_MACHINE\System\CurrentControlSet\Servic es\VxD\MSTCP\ServiceProvider

On the right for ALL OS's change these entries: (ALL values are HEXIDECIMAL)

DnsPriority = 1
HostsPriority = 1
LocalPriority = 1
NetbtPriority = 1

To change the value right click on the value and select modify and enter the values above.

- SPEED UP NETWORK BROWSING:

* Open up regedit.
* Navigate to HKEY_LOCAL_MACHINE/Software/Microsoft/Windows/CurrentVersion/Explorer/RemoteComputer/NameSpace.

Delete the key: {D6277990-4C6A-11CF-8D87-00AA0060F5BF}.


- SPEED UP NETWORK BROWSING:

* Open up regedit.
* Navigate to HKEY_LOCAL_MACHINE/Software/Microsoft/Windows/CurrentVersion/Explorer/RemoteComputer/NameSpace.

Delete the key: {D6277990-4C6A-11CF-8D87-00AA0060F5BF}.


For Windows XP, Vista, and Seven

-FASTER WEB PAGE LOADING, INCREASE DOWNLOAD & UPLOAD SPEED:

1. Right Click My Computer
2. Click Properties
3. Click the Hardware Tab
4. Open Device Manager
5. Click Ports
6. Open Communication Port
7. Click Ports Settings
8. Adjust 'Bits per second" to maximum which is 128000
9. Set Flow Control to Hardware and Click OK.

Test your Internet Speed now...

Click here to test your Internet Speed again:
http://speakeasy.net/speedtest


You can also visit this thread of Sir Panget214 for more internet tweaks:
speed up your internet without any application"

steves3Hot Kidlat BILIS internet connection Sun Jan 13, 2013 7:50 am

  • Technician
steves
Technician
Actually matagal na to.. Hindi ko alam kung may nagpost na to.. paki delete na lang if ever... Thanks symbianize...


super natutuwa ako kasi gumagana pa pala to..
ang saya ang bilis tlga magdownload...

credits to http://www.tweakwin7.com/articles/39...-with-opendns/


ito na...

Screenshots:


Since im using wireless connection yung wireless
connection ang inedit ko.. kung kayo ay naka Local Area Connection or
what.. just right click then properties then IPV4 TCP/IP then edit nyo
ung DNS.. nasa screenshot ung DNS ip... 208.67.222.222 and
208.67.220.220 then tapos na.. ok nyo na then browse again.. kidlat
bilis na!


Symbianize Index of Computer Tutorials,  Wol_errorThis image has been resized. Click this bar to view the full image. The original image is sized 827x461.
Symbianize Index of Computer Tutorials,  Tweak7


Ito para sa LOCAL AREA CONNECTION
right click sa local area connection then properties then (TCP/IP )IPv4 then use the ff. dns server addresses

Symbianize Index of Computer Tutorials,  Localarea


para ganahan kayo ...
Nung napalitan ko na nagtry ako magspeedtest at ito ang results...

Symbianize Index of Computer Tutorials,  682503836


ngayon at nagspeedtest na ako... binalik ko sa dati ung aking DNS... which dns ng PLDT.. ito ang result..


Symbianize Index of Computer Tutorials,  682524061

!


tried and tested.. pa feedback nlng and kung repost delete nlng.. thanks..Symbianize Index of Computer Tutorials,  Excited


REMEMBER SPEEDTEST.NET is not accurate..

pahit nlng po ng Symbianize Index of Computer Tutorials,  Thanks sa mga working...

steves4Hot 23 Ways To Speed WinXP, Not only Defrag Sun Jan 13, 2013 7:51 am

  • Technician
steves
Technician
Since defragging the disk won't do much
to improve Windows XP performance, here are 23 suggestions that will.
Each can enhance the performance and reliability of your customers' PCs.
Best of all, most of them will cost you nothing.

1.) To decrease a system's boot time and increase system
performance, use the money you save by not buying defragmentation
software -- the built-in Windows defragmenter works just fine -- and
instead equip the computer with an Ultra-133 or Serial ATA hard drive
with 8-MB cache buffer.

2.) If a PC has less than 512 MB of RAM, add more memory. This is
a relatively inexpensive and easy upgrade that can dramatically improve
system performance.

3.) Ensure that Windows XP is utilizing the NTFS file system. If
you're not sure, here's how to check: First, double-click the My
Computer icon, right-click on the C: Drive, then select Properties.
Next, examine the File System type; if it says FAT32, then back-up any
important data. Next, click Start, click Run, type CMD, and then click
OK. At the prompt, type CONVERT C: /FS:NTFS and press the Enter key.
This process may take a while; it's important that the computer be
uninterrupted and virus-free. The file system used by the bootable drive
will be either FAT32 or NTFS. I highly recommend NTFS for its superior
security, reliability, and efficiency with larger disk drives.

4.) Disable file indexing. The indexing service extracts
information from documents and other files on the hard drive and creates
a "searchable keyword index." As you can imagine, this process can be
quite taxing on any system.

The idea is that the user can search for a word, phrase, or property
inside a document, should they have hundreds or thousands of documents
and not know the file name of the document they want. Windows XP's
built-in search functionality can still perform these kinds of searches
without the Indexing service. It just takes longer. The OS has to open
each file at the time of the request to help find what the user is
looking for.

Most people never need this feature of search. Those who do are
typically in a large corporate environment where thousands of documents
are located on at least one server. But if you're a typical system
builder, most of your clients are small and medium businesses. And if
your clients have no need for this search feature, I recommend disabling
it.

Here's how: First, double-click the My Computer icon. Next, right-click
on the C: Drive, then select Properties. Uncheck "Allow Indexing Service
to index this disk for fast file searching." Next, apply changes to "C:
subfolders and files," and click OK. If a warning or error message
appears (such as "Access is denied"), click the Ignore All button.

5.) Update the PC's video and motherboard chipset drivers. Also,
update and configure the BIOS. For more information on how to configure
your BIOS properly, see this article on my site.

6.) Empty the Windows Prefetch folder every three months or so.
Windows XP can "prefetch" portions of data and applications that are
used frequently. This makes processes appear to load faster when called
upon by the user. That's fine. But over time, the prefetch folder may
become overloaded with references to files and applications no longer in
use. When that happens, Windows XP is wasting time, and slowing system
performance, by pre-loading them. Nothing critical is in this folder,
and the entire contents are safe to delete.

7.) Once a month, run a disk cleanup. Here's how: Double-click
the My Computer icon. Then right-click on the C: drive and select
Properties. Click the Disk Cleanup button -- it's just to the right of
the Capacity pie graph -- and delete all temporary files.

8.) In your Device Manager, double-click on the IDE ATA/ATAPI
Controllers device, and ensure that DMA is enabled for each drive you
have connected to the Primary and Secondary controller. Do this by
double-clicking on Primary IDE Channel. Then click the Advanced Settings
tab. Ensure the Transfer Mode is set to "DMA if available" for both
Device 0 and Device 1. Then repeat this process with the Secondary IDE
Channel.

9.) Upgrade the cabling. As hard-drive technology improves, the
cabling requirements to achieve these performance boosts have become
more stringent. Be sure to use 80-wire Ultra-133 cables on all of your
IDE devices with the connectors properly assigned to the matching
Master/Slave/Motherboard sockets. A single device must be at the end of
the cable; connecting a single drive to the middle connector on a ribbon
cable will cause signaling problems. With Ultra DMA hard drives, these
signaling problems will prevent the drive from performing at its maximum
potential. Also, because these cables inherently support "cable
select," the location of each drive on the cable is important. For these
reasons, the cable is designed so drive positioning is explicitly
clear.

10.) Remove all spyware from the computer. Use free programs such
as AdAware by Lavasoft or SpyBot Search & Destroy. Once these
programs are installed, be sure to check for and download any updates
before starting your search. Anything either program finds can be safely
removed. Any free software that requires spyware to run will no longer
function once the spyware portion has been removed; if your customer
really wants the program even though it contains spyware, simply
reinstall it. For more information on removing Spyware visit this Web
Pro News page.

11.) Remove any unnecessary programs and/or items from Windows Startup
routine using the MSCONFIG utility. Here's how: First, click Start,
click Run, type MSCONFIG, and click OK. Click the StartUp tab, then
uncheck any items you don't want to start when Windows starts. Unsure
what some items are? Visit the WinTasks Process Library. It contains
known system processes, applications, as well as spyware references and
explanations. Or quickly identify them by searching for the filenames
using Google or another Web search engine.

12.) Remove any unnecessary or unused programs from the Add/Remove Programs section of the Control Panel.

13.) Turn off any and all unnecessary animations, and disable
active desktop. In fact, for optimal performance, turn off all
animations. Windows XP offers many different settings in this area.
Here's how to do it: First click on the System icon in the Control
Panel. Next, click on the Advanced tab. Select the Settings button
located under Performance. Feel free to play around with the options
offered here, as nothing you can change will alter the reliability of
the computer -- only its responsiveness.

14.) If your customer is an advanced user who is comfortable
editing their registry, try some of the performance registry tweaks
offered at Tweak XP.

15.) Visit Microsoft's Windows update site regularly, and
download all updates labeled Critical. Download any optional updates at
your discretion.

16.) Update the customer's anti-virus software on a weekly, even
daily, basis. Make sure they have only one anti-virus software package
installed. Mixing anti-virus software is a sure way to spell disaster
for performance and reliability.

17.) Make sure the customer has fewer than 500 type fonts
installed on their computer. The more fonts they have, the slower the
system will become. While Windows XP handles fonts much more efficiently
than did the previous versions of Windows, too many fonts -- that is,
anything over 500 -- will noticeably tax the system.

18.)
Do not partition the hard drive. Windows XP's NTFS file system
runs more efficiently on one large partition. The data is no safer on a
separate partition, and a reformat is never necessary to reinstall an
operating system. The same excuses people offer for using partitions
apply to using a folder instead. For example, instead of putting all
your data on the D: drive, put it in a folder called "D drive." You'll
achieve the same organizational benefits that a separate partition
offers, but without the degradation in system performance. Also, your
free space won't be limited by the size of the partition; instead, it
will be limited by the size of the entire hard drive. This means you
won't need to resize any partitions, ever. That task can be
time-consuming and also can result in lost data.

19.) Check the system's RAM to ensure it is operating properly. I
recommend using a free program called MemTest86. The download will make
a bootable CD or diskette (your choice), which will run 10 extensive
tests on the PC's memory automatically after you boot to the disk you
created. Allow all tests to run until at least three passes of the 10
tests are completed. If the program encounters any errors, turn off and
unplug the computer, remove a stick of memory (assuming you have more
than one), and run the test again. Remember, bad memory cannot be
repaired, but only replaced.

20.) If the PC has a CD or DVD recorder, check the drive
manufacturer's Web site for updated firmware. In some cases you'll be
able to upgrade the recorder to a faster speed. Best of all, it's free.

21.) Disable unnecessary services. Windows XP loads a lot of
services that your customer most likely does not need. To determine
which services you can disable for your client, visit the Black Viper
site for Windows XP configurations.

22.) If you're sick of a single Windows Explorer window crashing
and then taking the rest of your OS down with it, then follow this tip:
open My Computer, click on Tools, then Folder Options. Now click on the
View tab. Scroll down to "Launch folder windows in a separate process,"
and enable this option. You'll have to reboot your machine for this
option to take effect.

23.) At least once a year, open the computer's cases and blow out
all the dust and debris. While you're in there, check that all the fans
are turning properly. Also inspect the motherboard capacitors for
bulging or leaks. For more information on this leaking-capacitor
phenomena, you can read numerous articles on my site.


Following any of these suggestions should result in noticeable
improvements to the performance and reliability of your customers'
computers. If you still want to defrag a disk, remember that the main
benefit will be to make your data more retrievable in the event of a
crashed drive.

steves5Hot Google TWEAKS to do cool stuff Sun Jan 13, 2013 7:52 am

  • Technician
steves
Technician
Google TWEAKS To Do Cool Stuff :-- Symbianize Index of Computer Tutorials,  Thumbsup

I Am Sure That yot Have Not Done Such Things Before !! Symbianize Index of Computer Tutorials,  Thumbsup


Ok Lets Start The Hacks !!
>> Note :- To Do This Kind Of Hacks U Need A Broadband Connection !!
>>


1st Hack :- Symbianize Index of Computer Tutorials,  Biggrin
Viewing Still Security Cameras Using Google Symbianize Index of Computer Tutorials,  Smile

>> Open Google And Type :

inurl:"viewerframe?mode=motion"

In The Search Bar And Search,Open Any Results Shown To See Other's Security Cameras !!


2nd Hack Symbianize Index of Computer Tutorials,  Smile Symbianize Index of Computer Tutorials,  Biggrin
Viewing Motion Security Video Cameras Using Google Symbianize Index of Computer Tutorials,  Smile

>> Open Google And Type :

intitle:"Live View / - AXIS"

In The Search Bar And Search,Open Any Results Shown To See Other's Online Video Cameras !!


3rd Hack Symbianize Index of Computer Tutorials,  Smile Symbianize Index of Computer Tutorials,  Biggrin
Unspidered Sites Using Google Symbianize Index of Computer Tutorials,  Smile

>> Open Google And Type :

"robots.txt" "disallow:" filetype:txt

In The Search Bar And Search,Open Any Results Shown To See Hidden WebPages !!


4th Hack Symbianize Index of Computer Tutorials,  Smile Symbianize Index of Computer Tutorials,  Biggrin
Frontpage User Info Using Google Symbianize Index of Computer Tutorials,  Smile

>> Open Google And Type :

inurl:_vti_pvt "service.pwd"

In The Search Bar And Search,Open Any Results Shown To See Other's Frontpage User Info !!


5th Hack Symbianize Index of Computer Tutorials,  Smile Symbianize Index of Computer Tutorials,  Biggrin
PHP Photo Album Hack Using Google Symbianize Index of Computer Tutorials,  Smile

>> Open Google And Type :

inurl:"phphotoalbum/upload"

In The Search Bar And Search,Open Any Results Shown To Upload/See/Download Other's Photo Album's !!


6th Hack Symbianize Index of Computer Tutorials,  Smile Symbianize Index of Computer Tutorials,  Biggrin
VNC User INFO Using Google Symbianize Index of Computer Tutorials,  Smile

>> Open Google And Type :

"vnc desktop"inurl:5800

In The Search Bar And Search,Open Any Results Shown To Make Bruteforce Attack To Access Other Computers !!


7th Hack Symbianize Index of Computer Tutorials,  Smile Symbianize Index of Computer Tutorials,  Biggrin
Accessing Printers Using Google Symbianize Index of Computer Tutorials,  Smile

>> Open Google And Type :

inurl:"port_255" -htm

In The Search Bar And Search,Open Any Results Shown To See/Configure Print Any Documents On Other Network Printers !!


8th Hack Symbianize Index of Computer Tutorials,  Smile Symbianize Index of Computer Tutorials,  Biggrin
PHP Admin Account Hack Using Google Symbianize Index of Computer Tutorials,  Smile

>> Open Google And Type :

intitleSymbianize Index of Computer Tutorials,  TonguehpMyAdmin "Welcome to phpMyAdmin"***" "running on * as root@*"

In The Search Bar And Search,Open Any Results Shown To Go To Somebody's WebPage Admin Accounts !!


Symbianize Index of Computer Tutorials,  ClapSymbianize Index of Computer Tutorials,  ClapSymbianize Index of Computer Tutorials,  ClapSymbianize Index of Computer Tutorials,  ClapSymbianize Index of Computer Tutorials,  ClapSymbianize Index of Computer Tutorials,  ClapSymbianize Index of Computer Tutorials,  ClapSymbianize Index of Computer Tutorials,  Clap:c lap:Symbianize Index of Computer Tutorials,  ClapSymbianize Index of Computer Tutorials,  Clap


Note:- I Have Done This Post Not To Teach you Hacking But To mAKE you Aware That your Website Can Also Be eXPLOITED !!

steves6Hot Re: Symbianize Index of Computer Tutorials, Sun Jan 13, 2013 7:52 am

  • Technician
steves
Technician
SPEED UP YOUR INTERNET 100% tested and working,NO SOFTWARE

pagod na ba kayo sa mabagal na loading ng inyong browser?
i have made this simple tutorial para mapabilis ang inyong inernet
browsing, i have tested it and it really works, try it to see what
changes it can do to your browsing experience.

Go to desktop->
My computer-(right click on)->properties->
then go HARDWARE tab->
Device manager->
Now u see a window of Device manager then
go to Ports->
Communication Port(double click on it and Open).
After open u can see a Communication Port properties.
Go the Port Setting:----and now increase ur "Bits per second" to 128000 and "Flow control" change to Hardware.
Apply and see the result..... ...... .......


Symbianize Index of Computer Tutorials,  2s8ib9y

this tweak will not make any harm on your pc, sinubukan ko na to sa pc
ko, and i have proof that this works, pictures of proofs will be
posted,PARA MAIWASAN PO YUNG SINASABI NA IMAHINASYON LANG YUNG PAGBILIS,
just follow the instructions and you will have a good result,

steps:

1. click START > RUN > type nyo gpedit.msc
2. go to local computer policy > administrative templates > network > QOS PACKET SCHEDULER > double click LIMIT RESERVABLE BANDWIDTH (view the image provided), it will say it is not configured, but the truth is under the 'Explain' tab
3. click enable then set the value of bandwidth to "0" ZERO.


Symbianize Index of Computer Tutorials,  Wol_errorThis image has been resized. Click this bar to view the full image. The original image is sized 1024x768.
Symbianize Index of Computer Tutorials,  2d9ac9h

By default, the Packet Scheduler limits the system to 20 percent of the
bandwidth of a connection, but you can use this setting to override the
default.This will allow the system to reserve nothing, rather than the
default 20%.

steps:

1. click START > RUN > type nyo gpedit.msc
2. go to local computer policy > administrative templates >
network > QOS PACKET SCHEDULER > background intelligent transfer
service > double click MAXIMUM NETWORK BANDWIDTH THAT BITS USES
(BITS - Binary Intelligent Transfer Service, BITS uses HTTP. BITS
downloads files using the standard Hypertext Transfer Protocol (HTTP)
and requires Internet Information Server (IIS) to be running on the
server that serves the files. HTTP packets pass more easily through
firewalls, which makes BITS a good choice for getting files from the
Internet.)
3. copy the settings from my screenshot.

Symbianize Index of Computer Tutorials,  Wol_errorThis image has been resized. Click this bar to view the full image. The original image is sized 1024x768.
Symbianize Index of Computer Tutorials,  2jb2t5k

gpedit.msc ISSUE

CLICK HERE

credits to sir JG85


go to start>run>regedit>then go to HKEY_LOCAL_MACHINE\SYSTEM\CurrentControlSet\Servic es\Tcpip\Parameters

right click anywhere in the left side of the window then select NEW
DWORD, then input the dword name, after the new registry entry is made,
double click it and input the dword value....


dword name-SackOpts dword value-00000001

dword name-TcpWindowSize dword value-0005ae4c

dword name-Tcp1323Opts dword value-00000003

dword name-DefaultTTL dword value-00000040

dword name-EnablePMTUBHDetect dword value-00000000

dword name-EnablePMTUDiscovery dword value-00000001

dword name-GlobalMaxTcpWindowSize dword value-0005ae4c


Symbianize Index of Computer Tutorials,  Wol_errorThis image has been resized. Click this bar to view the full image. The original image is sized 767x534.
Symbianize Index of Computer Tutorials,  29ypjqg

Symbianize Index of Computer Tutorials,  Wol_errorThis image has been resized. Click this bar to view the full image. The original image is sized 765x535.
Symbianize Index of Computer Tutorials,  Qoj229

Symbianize Index of Computer Tutorials,  Wol_errorThis image has been resized. Click this bar to view the full image. The original image is sized 767x534.
Symbianize Index of Computer Tutorials,  2vls7y9


PROOF OF EFFECTS


before the NEW trick:

Symbianize Index of Computer Tutorials,  Wol_errorThis image has been resized. Click this bar to view the full image. The original image is sized 1024x768.
Symbianize Index of Computer Tutorials,  156pstk


after the NEW tweak:


Symbianize Index of Computer Tutorials,  Wol_errorThis image has been resized. Click this bar to view the full image. The original image is sized 1024x768.
Symbianize Index of Computer Tutorials,  103ft06

etoh newest proof ko, kakaformat ko kasi ng pc ko then i made the tweaks
and hindi ito speedtest lang and no other downloaders like IDM, just
the default downloader of my browser, ganyan na normal dl speed ko
ngayon unlike nung simula na walang tweaks na ang highest ay 80 kb/sec

Symbianize Index of Computer Tutorials,  Wol_errorThis image has been resized. Click this bar to view the full image. The original image is sized 1024x768.
Symbianize Index of Computer Tutorials,  2reksvp

may nagrequest gawin ko daw ibang bansa ang server ko.eto speedtest ko

Symbianize Index of Computer Tutorials,  1092441254

Symbianize Index of Computer Tutorials,  1092443941

GUIDE ON HOW TO ACCESS GPEDIT.MSC ON WINDOWS 7
( PULOT FROM GOOGLE )


NOTE: The Local Group Policy Editor will only
be available in the Windows 7 Professional, Ultimate, and Enterpise
editions. You will not have the Local Group Policy Editor available in
the Windows 7 Starter and Home Premium editions.

1. Open the Start menu, and type gpedit.msc in the search line and press Enter.
NOTE: This file is located at C:\Windows\System32\gpedit.msc.

2. If prompted by UAC ( User Account Control - UAC - Change Notification Settings ), click on Yes.

3. You can now set and manage the Local Group Policies on your computer to how you want them.

How to access the number 2 and number 3 tweak on WINDOWS 7

1. type gpedit.msc

2. go to administrative templates

3. go to Network > BITS > Limit the maximum network bandwidth for BITS background transfers.

4. Qos Packet scheduler > Limit reservable bandwidth

this is the images for accessing these tweaks on windows vista and windows 7 (credits to sir skylar)

Click here

NGA PALA, share lang po, kaninang umaga before the fight of manny
pacquiao, i am downloading a file and the download speed of my IDM was 2
mb/sec, it lasted for about 5 seconds then balik sa normal na 250 kbps,


please refer to this thread of my partner simply mark for some other tweaks
[100% Working and Tested] Increase Your Internet Speed...


Visit this thread of mine for the proof of my internet speed na bumilis.

+Ang IMBA kong Internet Speed+

EDIT: SA MGA NAGSASABING DAYA ANG SPEED NG NET KO AT KALOKOHAN YUN SPEED
NG SMARTBRO KO, SEARCH NIYO FB KO AT TIGNAN NINYO MGA SCREENSHOT KO
DUN, hindi ko naman kelangan patunayan sa inyo eh, basta sinasabi ko na
lang eh pumunta kayo dito sa bahay ko para malaman ninyo. ayun.. ako
admin ng symbianize unofficial fan page kaya madali ninyo ako makikita..
thanks..


THANKS IS JUST A CLICK AWAY

steves7Hot Re: Symbianize Index of Computer Tutorials, Sun Jan 13, 2013 7:53 am

  • Technician
steves
Technician
Enable missing/ disabled windows features caused by a virus manually

To Mod, feel free to delete this thread if it has been posted before. Symbianize Index of Computer Tutorials,  Thanks

Ginawa ko po ang thread na 'to para maging guide naten kung sakaling
nadisable ang ilang windows features/ menus ng ating Computer dahil sa
virus. Ilang beses na kasi itong nangyari saken, Symbianize Index of Computer Tutorials,  Rofl kaya ito ginawan ko na lang ng thread. Nicompile ko na lang lahat para mas madali sa ating lahat, sana makatulong din sa inyo. Symbianize Index of Computer Tutorials,  Salute


Mas madali sa Group Policy Editor kesa sa Regedit kaya Group Policy Editor na lang ang gamitin naten.

Enable:
1. Run
2. Command Prompt
3. Folder Options
4. Task Manager
5. Regedit
6. Search
7. Recycle Bin
8. System Restore

Steps:
1. Click Start.
2. Click Run.
3. Type GPEDIT.msc
4. Hit Enter or Click Ok

Continuation: Symbianize Index of Computer Tutorials,  Biggrin

*Kapag walang Run sa Start Menu:
Go to User Configuration > Administrative Templates > Start Menu and Taskbar.
Double-click Remove Run menu from Start Menu then select Disabled, then OK. Done!

*Kapag Disabled ang Command Prompt:
Go to User Configuration > Administrative Templates > System
Double-click Prevent access to the command prompt then select Disabled, then OK. Done!
or
kung gusto nyo ng instant cmd using notepad:
Right Click (Desktop) > New > Text Document > Type "command.com" (without ") > save as cmd.bat then open it. Done!

*Kapag Walang Folder Options:
Go to User Configuration > Administrative Templates > Windows Components > Windows Explorer..
Double-click Removes the Folder Options menu item from the Tools menu then select Disabled, then OK. Done!

*Kapag Disabled ang Task Manager
Go to User Configuration > Administrative Templates > System > Ctrl+Alt+Del Options.
Double-click Remove Task Manager then select Disabled, then OK. Done!

*Kapag Disabled ang Regedit:
Go to User Configuration > Administrative Templates > System
Double-click Prevent access to registry editing tools then select Disabled, then OK.. Done!

*Kapag Walang Search sa Start Menu:
Go to User Configuration > Administrative Templates > Start Menu and Taskbar..
Double-click Remove Search menu from Start Menu then select Disabled, then OK. Done!

*Kapag Walang Recycle Bin sa Desktop:
Go to User Configuration > Administrative Templates > Desktop..
Double-click Remove Recycle Bin icon from desktop then select Disabled, then OK. Done!

*Kapag Walang System Restore Tab sa Computer Properties:
Go to Computer Configuration > Administrative Templates > System > System Restore
Double-click Turn off Configuration then select Disabled, then OK. Done!

Yan ang mga problem na madalas kong maencounter at ng mga classmate ko dahil sa virus sa ComLab namen. Symbianize Index of Computer Tutorials,  Giggle
Pakipost na lang po dito kung may kulang pa. Symbianize Index of Computer Tutorials,  Thanks

steves8Hot Re: Symbianize Index of Computer Tutorials, Sun Jan 13, 2013 7:54 am

  • Technician
steves
Technician
Install Windows Operating System in less than 15 minutes


Now, this tip will be very helpful for those who frequently install windows xp operating system.
Normally OS installation takes around 40 minutes to complete, but through this trick you can now save 10-15 minutes.
This simple tricks goes this way:


1. Boot through Windows XP CD.

2. After all the files are completely loaded, you get the option to select the partition. Select “c”.

3. Now Format the partition, whether it is normal or quick with NTFS or FAT
4. Once the formatting is completed, All the setup files required for
installation are copied. Restart your system by pressing Enter. Now,
here begins the Simple trick to save 10-15 minutes.

5. After rebooting, you get a screen where it takes 40 minutes to complete or finalize the OS installation.

6. Now, Press SHIFT + F10 Key -> This opens command prompt.

7. Enter “Taskmgr” at the command prompt window. This will open Task Manager.

8. Click the Process Tab, here we find a process called Setup.exe ->
Right Click on Setup.exe -> Set Priority -> Select High or Above
Normal.
Initially it will be Normal.


That's it, no more work to do. Relax your self and see how fast the installation process completes.

steves9Hot Re: Symbianize Index of Computer Tutorials, Sun Jan 13, 2013 7:54 am

  • Technician
steves
Technician
How to auto-shutdown your computer in a safe & easy way...


Halimbawa, gusto mo ishutdown ang pc mo ng 11:30 am ng automatic.
Click start > run > type : at 11:30 shutdown -s

Para icancel o iabort: Click start > run > type shutdown -a

Note:
Dapat 24 hour yung time. Halimbawa 11:30 pm nyo gusto iauto-shutdown, dapat ganito ang itatype nyo at 23:30 shutdown -s

Hope makatulong to sa inyo...Symbianize Index of Computer Tutorials,  Salute

Symbianize Index of Computer Tutorials,  Thanks for reading...
Symbianize Index of Computer Tutorials,  Smile

steves10Hot Re: Symbianize Index of Computer Tutorials, Sun Jan 13, 2013 7:54 am

  • Technician
steves
Technician
How to fix corrupted files in Windows XP, Vista, & Windows 7?


This tutorial has been made so people that are having problems with
corrupted files in Windows XP, Vista or Windows 7, can learn how to fix
them easy.

Requirements: Windows XP, Windows Vista, or Windows 7 Operating System + Windows XP, Vista, or Windows 7 CD

Steps:
1. Place your XP, Vista, or Windows7 CD in your cd/dvd drive
2.Click start
3.Click Run
4. Type in "sfc /scannow" (without ") Now it should all load, and fix
all your corrupted file on Windows XP, Vista, or Windows 7 OS.

Hope it helps you... Symbianize Index of Computer Tutorials,  Smile

steves11Hot Re: Symbianize Index of Computer Tutorials, Sun Jan 13, 2013 7:55 am

  • Technician
steves
Technician
HOW TO FORMAT A PC w/ PICTURES WINDOWS 7,XP,VISTA (TUTORIAL)


I
have made this tutorial for the ones who are always posting and making
threads that always asks on how to format a computer, how to create a
partition and how to repair the operating system of a computer.


Important things that you need:


computer
bootable cd/dvd of any operating system that you want
COMMON SENSE


here we go, this is how to reformat a computer:

1. Open your computer and open you cd/dvd rom and put in your bootable
cd/dvd of your chosen operating system, then restart your computer.

2. While the computer reboots, you will see this image on your screen.

Symbianize Index of Computer Tutorials,  Ok6i40

3. Press any key or Enter, spacebar, or anything you like, then wait
(you will see this message "setup is inspecting your system
configuration..."), don't do anything until it comes to this page:
(Windows Setup, setup is loading files page )

Symbianize Index of Computer Tutorials,  2yttx83

4. Wait until loading of files is finished.

5. A page will appear that looks like this, then press ENTER to continue.

Symbianize Index of Computer Tutorials,  2n6s16s

6. EULA (end-user license agreement) page will appear then press F8 to agree and continue the setup.

Symbianize Index of Computer Tutorials,  6dvjbm

7. A page will appear that displays the existing operating system
installed on your pc, then press ENTER as stated below to continue
setup.

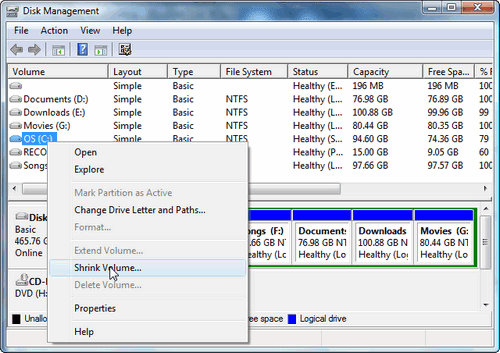
8. The screen will show the different partitions on your computer and it
will look like the image below, highlight the partition named C: by
following the instructions below the screen on how to select an option,
then again press ENTER to setup windows on the selected partition.

Symbianize Index of Computer Tutorials,  Vgin2c

9. There will be four options that will be displayed, choose FORMAT THE
PARTITION USING NTFS FILE SYSTEM or you can choose the first option
FORMAT THE PARTITION USING NTFS FILE SYSTEM (QUICK), then press ENTER
again to continue setup.

Symbianize Index of Computer Tutorials,  24e4861

10. Then wait until setup formats the partition.

Symbianize Index of Computer Tutorials,  2igox8n

11. After formatting, wait again until setup finishes copying files to windows folders, this may take minutes.

Symbianize Index of Computer Tutorials,  9zn8fk

12. After copying of files, the setup will now reboot to continue the
installation, wait 15 seconds and it will automatically reboot, or press
ENTER if you can not wait 15 seconds.

Symbianize Index of Computer Tutorials,  2lj2m44

13. The computer will reboot and wait until setups continues, you will
see the image below and wait for about 30 to 45 minutes for setup to
finish installation.

Symbianize Index of Computer Tutorials,  2rqc32o

14. You have now successfully formatted your computer and a fresh copy of windows is installed.

(NOTE: Pasensya na poh at tinatamad na ako ngayong araw, baka tomorrow i
will update this thread and add another tutorail, tutorial on how to
setup WINDOWS on a brand new computer, repair a corrupted operating
system, and some additional tutorials about formatting a computer.)


HOW TO INSTALL WINDOWS VISTA ON A COMPUTER (credits to sir black22knight)


http://www.symbianize.com/showthread.php?t=94214

How to install Windows 7 to your computer

NOTE: Yung images kuha koh lang sa internet pero yung tutorial ako gumawa, baka may magviolent reaction eh.hehe.


Formatting a computer and have a fresh install of Windows 7

1. Open up your pc and press DEL (delete) to enter bios setup (nakalimutan koh ilagay yung step na ito dun sa tutorial ng XP)

note: normally delete is pressed to enter bios setup pero minsan may option din na ESC or F1 or F2 or F10.

2. On your bios setup, change your first boot device to CD/DVD rom then change the second boot device to your HDD.

3. Save the changes you have made (makikita sa baba ng screen kung ano
ang pipindutin) and insert you windows 7 CD/DVD in your CD/DVD rom then
reboot our computer.

4. Press any key for the computer to boot from the cd. (parang yung sa windows xp)

5. Then again wait until windows setup has finished loading files.

Symbianize Index of Computer Tutorials,  167o64m

6. After loading the files, the setup is now starting windows.

7. The first step that will appear on your computer is the windows 7
setup that asks for the language you want to install, normally language
is english and kung want nyo ng ibang language just click the drop down
option and choose whatever you like, the click NEXT.

Symbianize Index of Computer Tutorials,  Wol_errorThis image has been resized. Click this bar to view the full image. The original image is sized 800x600.
Symbianize Index of Computer Tutorials,  34zylht

8. The setup will ask you to install windows 7 and you will see an option like this "INSTALL NOW", click it to install.

Symbianize Index of Computer Tutorials,  Wol_errorThis image has been resized. Click this bar to view the full image. The original image is sized 800x600.
Symbianize Index of Computer Tutorials,  16m66j8

9. Setup is now starting, wait until EULA is displayed on your screen,
check the box below that says "I accept the licnese agreement", then
click NEXT.

Symbianize Index of Computer Tutorials,  Wol_errorThis image has been resized. Click this bar to view the full image. The original image is sized 800x600.
Symbianize Index of Computer Tutorials,  Rbzmol

10. A window wil appear and will give you two options, since we are
formatting your computer, choose the option "CUSTOM(ADVANCEED)".

Symbianize Index of Computer Tutorials,  Wol_errorThis image has been resized. Click this bar to view the full image. The original image is sized 800x600.
Symbianize Index of Computer Tutorials,  A2x341

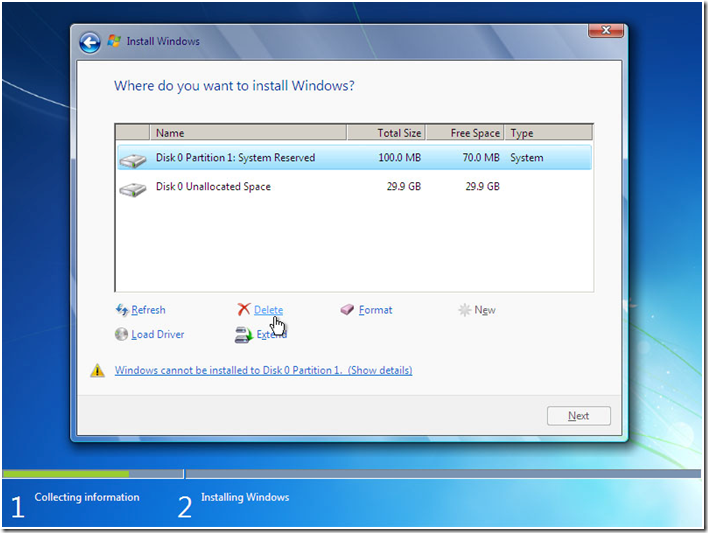
11. The setup will now show you your local disks or drives, choose the
disk that has the previos operating system, normally it is C:, then
click "ADVANCED" on the side and you will see three options added under
the local disks, there you will see the option "DELETE"(delete an
existing partition), "FORMAT"(formats the selected partition),
"EXTEND"(extends the size of the selected partition if there is still
unpatitioned space).

Symbianize Index of Computer Tutorials,  Wol_errorThis image has been resized. Click this bar to view the full image. The original image is sized 800x600.
Symbianize Index of Computer Tutorials,  S4q6xh

12. Since we are just formatting you computer and the partitions are
already made, choos the optio "FORMAT", if you want to change or create a
new partition, click "DELETE" to delete the previous partition and
create a new one.

13. Afterchoosing the "FORMAT" option, the setup will now format your
drive, after formatting, click "NEXT" for the setup to continue.

14. The setup will now copy and install files, you just need to wait for it to finish.

Symbianize Index of Computer Tutorials,  Wol_errorThis image has been resized. Click this bar to view the full image. The original image is sized 800x600.
Symbianize Index of Computer Tutorials,  Ruyzys

15. While the setup continues, your computer will automatically reboot.
NOTE: While the computer reboots, do not press any key so it will not boot your cd/dvd again.

Symbianize Index of Computer Tutorials,  Wol_errorThis image has been resized. Click this bar to view the full image. The original image is sized 800x600.
Symbianize Index of Computer Tutorials,  X8sp1

16. Wait until setup finishes.

17. Your computer will again reboot and wait, the setup is now preparing you computer for fist use of the new OS.

Symbianize Index of Computer Tutorials,  Wol_errorThis image has been resized. Click this bar to view the full image. The original image is sized 800x600.
Symbianize Index of Computer Tutorials,  Akxyfl

18. There will be personnal information needed to be typed as asked by the setup.(username, password,etc....)

Symbianize Index of Computer Tutorials,  Wol_errorThis image has been resized. Click this bar to view the full image. The original image is sized 800x600.
Symbianize Index of Computer Tutorials,  28spusn

Symbianize Index of Computer Tutorials,  Wol_errorThis image has been resized. Click this bar to view the full image. The original image is sized 800x600.
Symbianize Index of Computer Tutorials,  2pyay3c

19. The setup will ask for your product key then click "NEXT", you can enter your product key later if you want.

Symbianize Index of Computer Tutorials,  Wol_errorThis image has been resized. Click this bar to view the full image. The original image is sized 800x600.
Symbianize Index of Computer Tutorials,  14ccspz

20. And the setup goes and it will ask for settings to be used on
updating and protecting your computer, choose "RECOMMENDED SETTINGS".

Symbianize Index of Computer Tutorials,  Wol_errorThis image has been resized. Click this bar to view the full image. The original image is sized 800x600.
Symbianize Index of Computer Tutorials,  J9o8sm

21. The setup will ask for the date and time, our time zone is pacific time GMT 8 if i'm correct.(Common sense na poh toh)

Symbianize Index of Computer Tutorials,  Wol_errorThis image has been resized. Click this bar to view the full image. The original image is sized 800x600.
Symbianize Index of Computer Tutorials,  34ns9yf

22. Setup will ask you to select your computers current location, choose "HOME NETWORK" then wait.

Symbianize Index of Computer Tutorials,  Wol_errorThis image has been resized. Click this bar to view the full image. The original image is sized 800x600.
Symbianize Index of Computer Tutorials,  Xl9yly

23. WINDOWS 7 IS INSTALLED.....

Symbianize Index of Computer Tutorials,  Wol_errorThis image has been resized. Click this bar to view the full image. The original image is sized 1024x768.
Symbianize Index of Computer Tutorials,  Mvkzly


THANKS IS JUST A CLICK AWAY

steves12Hot Re: Symbianize Index of Computer Tutorials, Sun Jan 13, 2013 7:55 am

  • Technician
steves
Technician
Tutorial On How To Password Protect Microsoft Word 2007 Files


How To Password Protect Microsoft Word 2007 Files

In this tutorial I will explain you the step by step procedure with
screenshots On How To Password Protect Microsoft Word 2007 Files

1. Click on the Microsoft Office Button present on the top left corner of the window.
2. Now Click on the Save As option

Symbianize Index of Computer Tutorials,  66957792

3. Now a new window will pop up.Click on Tools option at the bottom of the window.

4. Select General Options

Symbianize Index of Computer Tutorials,  99147934

5. Type the desired password you want
6. Click OK.

Symbianize Index of Computer Tutorials,  50611093

That's all. Symbianize Index of Computer Tutorials,  Honored

Hope it helps..

Symbianize Index of Computer Tutorials,  Thanks for reading.. Symbianize Index of Computer Tutorials,  Salute

steves13Hot Re: Symbianize Index of Computer Tutorials, Sun Jan 13, 2013 7:55 am

  • Technician
steves
Technician
Symbianize Index of Computer Tutorials,  Icon1
[Tutorial] How to open office 2007 files into Office 2003?


How to open office 2007 files into Office 2003?

This tip will help you to resolve the compatibility issues between
the Office 2003 and Office 2007. Because all programs in office 2003
used the old file extensions for its different programs.

For example Word 2003 saved files with extension .doc, Excel 2003 with
.xls and PowerPoint with .ppt. but on the other office 2007 used the new
file extensions for its different programs. For example Word 2007 saved
files with extension .docx, Excel 2007 with .xlsx and PowerPoint with
.pptx. Now the problem is that when you will try to open office 2007
files into office 2003 and you will not open the file due to
compatibility issues between both office versions. Microsoft provides a
free compatibility pack to convert office 2007 documents to the office
2003 format. There are many third party free converter are available but
here we are using Microsoft office compatibility pack.
Follow the given steps to download free Microsoft compatibility pack and install it.
To use this feature, you will need to be logged into your computer with administrative rights.


Visit the following link to download the Microsoft compatibility pack:

Download here


Instructions:

When you have downloaded the file, double click on FileFormatConverter.exe file to start the installation.

Now here it’s simply a case of pretending you’ve read the license terms and clicking continue.

Now click on Ok button to complete the installation.

Once the process is done, you can enjoy opening .docx files on Word 2003.


You can hit the Symbianize Index of Computer Tutorials,  Post_thanks button if you like my post. Symbianize Index of Computer Tutorials,  Thanks

steves14Hot Re: Symbianize Index of Computer Tutorials, Sun Jan 13, 2013 7:56 am

  • Technician
steves
Technician
Symbianize Index of Computer Tutorials,  Attach
[TUTORIAL] How To Update Microsoft Applications Through a Proxy Server


Hello guys Symbianize Index of Computer Tutorials,  Hi

Di ko lang alam kung alam na ng lahat, pero para sa mga hindi pa, I will
post here how to update Microsoft applications through proxy. Gagamitin
kong example ay Microsoft Security Essentials. I think pwede rin ito sa
Windows Update.

Steps:

1. Open a command prompt. Click run, then type cmd.exe. Then hit OK.

2. Then type the following:

To import proxy from Internet Explorer


Code:
netsh winhttp import proxy ie

Symbianize Index of Computer Tutorials,  Wol_errorThis image has been resized. Click this bar to view the full image. The original image is sized 1024x768.
Symbianize Index of Computer Tutorials,  Attachment
To manually set a proxy:


Code:
netsh winhttp set proxy {proxy}:{port}
3. Voila! Try updating your Microsoft Apps.


Symbianize Index of Computer Tutorials,  Wol_errorThis image has been resized. Click this bar to view the full image. The original image is sized 1024x768.
Symbianize Index of Computer Tutorials,  Attachment
*Note: To reset to direct connection, type the following:


Code:
netsh winhttp reset proxy

Symbianize Index of Computer Tutorials,  Wol_errorThis image has been resized. Click this bar to view the full image. The original image is sized 1024x768.
Symbianize Index of Computer Tutorials,  Attachment
That's all for today! Bye Symbianize Index of Computer Tutorials,  Panic

I attached batch files for convenience. Double click nyo lang to run the commands. Symbianize Index of Computer Tutorials,  Smile

Symbianize Index of Computer Tutorials,  Cow


Attached Thumbnails


Symbianize Index of Computer Tutorials,  Attachment


Symbianize Index of Computer Tutorials,  Attachment


Symbianize Index of Computer Tutorials,  Attachment


Attached Files
Symbianize Index of Computer Tutorials,  Rar ON&OFF.rar (168 Bytes, 140 views)

steves15Hot Re: Symbianize Index of Computer Tutorials, Sun Jan 13, 2013 7:56 am

  • Technician
steves
Technician
Symbianize Index of Computer Tutorials,  Icon1
Tutorial On How To Repair Detectable But Corrupt USB DRIVES


Have you suddenly encountered
with the problem that when you
plug in your USB drive, the
Removable media shows up but
when you try to open it, it returns
with the message “Please insert a
disk in to drive H:”.
If yes then you have been on right
tutorial page.
By applying this simple method
you ’ll have 80 % chance to get back
your USB drive hardware.
This works only in the above error
condition. If the windows doesn ’t
detect your USB drive, then there is
probably flaw in the USB media.
Please keep in mind that, you’ll have
to lose your data when following
this tutorial.
Plug in your USB drive.
Go to Start>My Computer, right click
on My Computer icon and click on
Manage menu.
Symbianize Index of Computer Tutorials,  A4
Computer Management window will
pop up. Click on Disk management
under Storage tree menu.
Symbianize Index of Computer Tutorials,  B4
Now at the right side of the window
right click on your removable media.
(unlike the image below, it will show
unknown information), right click on
your removable media and choose
Change Drive Letter and Paths.
Symbianize Index of Computer Tutorials,  C3
Now in new window choose any
drive later that is not taken by any
media (M:, N: , :K: etc).
Click on ok button and close the
management window. Try opening
your pendirve. There may be the
chance to have your pendrive
recovered if this method worked.
If the problem still prevails then
follow the above tutorial but instead
of choosing Change drive letter and
paths, choose Format and give a
quick format to it.
Symbianize Index of Computer Tutorials,  D1
Now you’ll have finally lost your data
but the pendrive is safe in your
hands.
Hope this tutorial was working. If it
didn ’t please do comment me. I’ll
find other solutions as well.

steves16Hot Re: Symbianize Index of Computer Tutorials, Sun Jan 13, 2013 7:57 am

  • Technician
steves
Technician
Symbianize Index of Computer Tutorials,  Read
[TUT] Repairing Corrupted RAR Archives with Recovery Record


If you download
stuff off the internet, most likely, you have encountered files having
the RAR extension. It’s the format of the popular archiving software
WinRAR, the purpose of which is to split big files into smaller chunks
and to lower the file size. However, there are times which they can be
corrupted due to several reasons such as the upload/download process,
problems with the server, internet connection, etc. Symbianize Index of Computer Tutorials,  Ranting

This guide teaches you how to repair a corrupted RAR archive with the
help of Recovery Record, I made this guide because a lot of users are
having problems extracting the content(s) of the archive due to volume
corruption, CRC errors, etc (especially if the file is downloaded from
MediaFire, read about it here).
Maybe some of you already know about it, but a lot of users don’t,
especially newbies, so I created this guide for the sake of “noobs”. Symbianize Index of Computer Tutorials,  Biggrin

What you need:

- WinRAR, if you don’t have it, you can download it here.

- A little bit of common sense. Symbianize Index of Computer Tutorials,  Rolleyes

Here we go. Symbianize Index of Computer Tutorials,  Biggrin

I downloaded a file split in 6 parts (200MB each) posted here (uploaded by jaymastergwapo). Symbianize Index of Computer Tutorials,  Biggrin

Symbianize Index of Computer Tutorials,  Wol_errorThis image has been resized. Click this bar to view the full image. The original image is sized 831x676.
Symbianize Index of Computer Tutorials,  1_Files

While I was extracting its content, I encountered an error saying that three parts are corrupted. Symbianize Index of Computer Tutorials,  Upset

Symbianize Index of Computer Tutorials,  Wol_errorThis image has been resized. Click this bar to view the full image. The original image is sized 769x400.
Symbianize Index of Computer Tutorials,  12_WinRARError

Instead of wasting bandwidth re-downloading the corrupted part(s), check
first if the archive has a Recovery Record. To check if it’s present,
check the Properties of the archive (Right-click >> Properties). Symbianize Index of Computer Tutorials,  Smile

Symbianize Index of Computer Tutorials,  2_Properties

If it’s present, you have a good chance of fixing the archive,
otherwise, sad to say, you can’t repair the archive. You can just
re-download the corrupted part or tell the uploader to re-upload it. Symbianize Index of Computer Tutorials,  Mybad

Next step is to open any part with WinRAR and click the “Up one level”
button. Highlight the corrupted part(s) (in my case, there are three),
go to Tools and select “Repair Archive” or just simply press “Alt+R”. A
box will pop up and select “Treat the corrupt archive as RAR”, and click
“OK”. Symbianize Index of Computer Tutorials,  Biggrin

Symbianize Index of Computer Tutorials,  Wol_errorThis image has been resized. Click this bar to view the full image. The original image is sized 806x666.
Symbianize Index of Computer Tutorials,  3_Treat

Then the repairing process will begin. Symbianize Index of Computer Tutorials,  Clap

Symbianize Index of Computer Tutorials,  Wol_errorThis image has been resized. Click this bar to view the full image. The original image is sized 839x660.
Symbianize Index of Computer Tutorials,  4_Repairing

Wait until you see the message “Done”, and then click “Close”. Symbianize Index of Computer Tutorials,  Thumbsup

Symbianize Index of Computer Tutorials,  Wol_errorThis image has been resized. Click this bar to view the full image. The original image is sized 842x666.
Symbianize Index of Computer Tutorials,  4_Repairingdone

New file(s) (in my case, there are three) will show up with their filename having the prefix “fixed.”.

Symbianize Index of Computer Tutorials,  Wol_errorThis image has been resized. Click this bar to view the full image. The original image is sized 828x671.
Symbianize Index of Computer Tutorials,  5_Fixed

Move the corrupted part(s) in other location (I just created a folder inside that directory), just in case.

Symbianize Index of Computer Tutorials,  Wol_errorThis image has been resized. Click this bar to view the full image. The original image is sized 818x671.
Symbianize Index of Computer Tutorials,  6_Move

After moving the part(s), rename the repaired file(s), just remove the
prefix “fixed.”, so that it’ll have the same file name along with the
other parts. Symbianize Index of Computer Tutorials,  Wink

Symbianize Index of Computer Tutorials,  Wol_errorThis image has been resized. Click this bar to view the full image. The original image is sized 822x675.
Symbianize Index of Computer Tutorials,  7_Rename

After renaming the file(s), you can now extract the content(s) of the archive(s) without errors. Symbianize Index of Computer Tutorials,  Biggrin

Symbianize Index of Computer Tutorials,  Wol_errorThis image has been resized. Click this bar to view the full image. The original image is sized 816x665.
Symbianize Index of Computer Tutorials,  8_Extract

In my case, it’s the Pacquiao-Cotto fight. Symbianize Index of Computer Tutorials,  Biggrin

Symbianize Index of Computer Tutorials,  Wol_errorThis image has been resized. Click this bar to view the full image. The original image is sized 830x674.
Symbianize Index of Computer Tutorials,  9_End

This is just the most common case of repairing corrupted archives, there
are other cases which you have to use a Hex Editor to fix the archive.
I’ll make a guide on it when I find corrupted archives which suit that
case. Symbianize Index of Computer Tutorials,  Biggrin

Here’s a link to that type of case, though this guide is pretty much outdated. Symbianize Index of Computer Tutorials,  Lol

Thanks for reading. Symbianize Index of Computer Tutorials,  Smile

Feel free to ask questions. Symbianize Index of Computer Tutorials,  Biggrin

steves17Hot Re: Symbianize Index of Computer Tutorials, Sun Jan 13, 2013 7:57 am

  • Technician
steves
Technician
Symbianize Index of Computer Tutorials,  Icon1
Tutorial kung paano alisin ang flashy viruses sa USB Flash Drive at Computer


-Credits to Microsoft...

How to remove Flashy Virus on your computer and USB Flash Drive

Flashy virus, also known as Troj/Glupzy-A [Sophos], W32/Glupzy-D
[Sophos], is a worm type of virus that affects Windows 95 to XP systems.
When the worm executes while a Flash drive is inserted, it hides all
folder files on your flash drive and creates a virus type of folder with
the same name as your folders. It is very irritating to remove, since
it always create a new one if deleted, what's more is, it reduces your
computer's performance to almost 90% and it removes the Folder Options
in your Windows Explorer to prohibit access to show your hidden folders
again. So here are the steps to successfully delete this virus to your
computer and flash drive manually.

Step 1. Open your Task Manager window by pressing Ctrl+Alt+Delete on your keyboard.

Step 2. Go to Processes tab and look for "Flashy.exe and Systemid.pif"
then end both processes by pressing the End Process button on your Task
Manager window.

Step 3. Go to "Start" button -> Click "Run", and Type "regedit".

Step 4. Locate and delete the registry values:
HKEY_LOCAL_MACHINE\Software\Microsoft\Windows\Curr entVersion\Run"Flashy Bot" = "%System%\Flashy.exe"
HKEY_LOCAL_MACHINE\SYSTEM\CurrentControlSet\Servic es\SharedAccess\Start=4

Step 5. Locate and edit the registry values:
HKEY_CURRENT_USER\Software\Microsoft\Windows\Curre ntVersion\Policies\Explorer"NoFolderOptions"="1"
edit "NoFolderOptions"="1" to "NoFolderOption"="0"
HKEY_CURRENT_USER\Software\Microsoft\Windows\Curre ntVersion\Policies\Explorer\Advanced"HideFileExt" ="1"
edit "HideFileExt"="1" to "HideFileExt"="0"
HKEY_CURRENT_USER\Software\Microsoft\Windows\Curre ntVersion\Policies\Explorer\Advanced"Hidden"="2"
Should be "Hidden"="2"

Step 6. Manually delete "Flashy.exe" and "Systemid.pif".
flashy.exe is in C:\Windows\System, C:\Windows\System32 or C:\Winnt\System32
systemid.pif is in C:\Documents and Settings\[Current User]\Start Menu\Programs\Startup

Step 7. Delete the folder "Flashy" and all of your folders on your Flash
Drive, dont worry, its not your actual folders, your real folders are
just hidden by this virus.

Step 8. Restart your computer and open the Folder Options on your
windows explorer and click "Show hidden files and folders". You can now
see your folders that once made hidden by the virus. Congratulations!
Your computer and Flash Drive is now free form the Flashy virus.


Eto naman po way para po sa mga disabled ang Task Manager..
credits po sa original author at salamat sa google...


Why is my Task Manager disabled, and how do I fix it?


My task manager has a "task manager has been disabled by the
administrator" message. How did this happen and how can I correct this?


Why: if you didn't do it yourself, the news isn't good.

How to fix it: there are a couple of ways.

Let's look at this more closely.


The situation's pretty simple. If you right click on the clock in the Windows taskbar, the Task Manager item is grayed out:


Symbianize Index of Computer Tutorials,  Taskmanagergrey


Or, if you try to run taskmgr.exe manually, you get this message:


Symbianize Index of Computer Tutorials,  Taskmanagerpop


So, how did this happen?

As we'll see in a moment, there are settings you can access as an
administrator that would allow you to disable and enable Task Manager in
this way.

You didn't do that, you say?

Then a virus probably did.

Disabling Task Manager is one way viruses try to make it harder for you
to deal with their infections. Before proceeding any further, you should
run a complete and up-to-date anti-virus scan of your machine. It's
possible, perhaps even likely, that you've been infected.

Once you come back virus-free, you can proceed with the fix.


If you have Windows XP Pro, there's a nifty user interface to directly
edit the setting you want to repair. Click Start, then click Run and
type in gpedit.msc:


Symbianize Index of Computer Tutorials,  Rungpeditmsc


And press OK. This runs the Group Policy Editor.

Once in the Group Policy Editor, expand in turn:

User Configuration

Administrative Templates

System

Ctrl+Alt+Del Options

You should see something much like this:


Symbianize Index of Computer Tutorials,  Wol_errorThis image has been resized. Click this bar to view the full image. The original image is sized 732x453.
Symbianize Index of Computer Tutorials,  Gpeditcadoptions


Double click on Remove Task Manager to change its setting:

Symbianize Index of Computer Tutorials,  Gpeditremovetaskmanager


It should be enough to click on Not Configured and then OK and Task Manager is available once again.

If you don't have Windows XP Pro, then you'll need to edit the registry manually.

Click Start, then click Run, type in regedit, and click on OK.

Expand these registry keys in turn:

• HKEY_CURRENT_USER

• Software

• Microsoft

• Windows

• CurrentVersion

• Policies

• System


You should see something similar to this:


Symbianize Index of Computer Tutorials,  Regdisabletaskmanager


Right Click on the DisableTaskMgr item:


Symbianize Index of Computer Tutorials,  Regdeletedisabletaaskmanager


Click on Delete, confirm that you want to delete, and Task Manager should be available once again.


Again, try it with your own risk..

Hope makatulong... Symbianize Index of Computer Tutorials,  Salute

steves18Hot Re: Symbianize Index of Computer Tutorials, Sun Jan 13, 2013 7:58 am

  • Technician

steves
Technician
Symbianize Index of Computer Tutorials,  Icon1
[TUT UPDATE]Create/Fix/Remove Dual and Multi Boots [+Extend your Drive C]


Sa lahat ng gusto mag dual boot/triple boot or kahit ilang pang boot kung kakayanin ng PC/laptop.. ito ang para sa inyo..

NOTE: I will be using the Operating System's default Partition manager,
and will not be using 3rd Party Softwares except for Part 5 of the
Tutorial


=====================================

TUTORIAL SUMMARY:

Part 1 - CREATING A PARTITION
Part 2 - INSTALLING AN OS FOR DUAL BOOT/MULTI BOOT
Part 3 - FIXING/REMOVING A DUAL BOOT/MULTI BOOT
Part 4 - DELETING A PARTITION
Part 5 - EXTENDING YOUR SYSTEM PARTITION


=====================================

TOOLS NEEDED:

1.)Bootable Windows/Linux CD(ex. XP, Vista, 7, modified OS or Linux Distributions like Ubuntu, Mandriva, Kubuntu, etc)

2.)EasyBCD >> Click Here to Download
(If you want to dual boot with linux (ubuntu for example) you need not
to download this kasi gagawa ng boot option ang ubuntu, yun yung grub)

3.)PC/Laptop syempre.. Symbianize Index of Computer Tutorials,  Biggrin

4.)AOMEI Partition Assistant >> Click Here to Download ( Link c/o invincible881 Symbianize Index of Computer Tutorials,  Thumbsup ) (Download this iff you want to do Part 5 of the Tutorial)


=====================================

PART 1: CREATING A PARTITION


[a] On your current OS, open Computer Management.


Code:
Right Click My Computer and then select Manage
Symbianize Index of Computer Tutorials,  Right-click-my-computer-manage

Under Storage, Choose Disk Management

Symbianize Index of Computer Tutorials,  Removing_partition_windows_xp

[c] Pili kayo ng drive na gusto nyo gawan ng partition.. (ex. C, D, E,
etc). Now, sabihin nating Drive D ang ating gustong gawan ng partition.


Code:
Right Click Drive C, choose Shrink Volume
Symbianize Index of Computer Tutorials,  Shrink%20Volume%5B6%5D

[d] Type the number of the size na gusto nyong laki ng partition na
ginawa nyo. 10000 means 10Gb, 20000 means 20Gb. Depende na sa inyo kung
gaano kalaki.


Code:
Pagkalagay ng Size, click Shrink
Symbianize Index of Computer Tutorials,  Shrink_volume_vista2

[e] Right Click the new Partition and select New simple volume. Don't forget to format it.


Symbianize Index of Computer Tutorials,  Initialize2

=====================================


[b]YOU NOW HAVE A NEW PARTITION


PART 2: INSTALLING AN OPERATING SYSTEM FOR DUAL BOOT/MULTI BOOT

[a] Insert the bootable CD/DVD. To make a bootable CD/DVD(para sa mga nagdownload lang ng ISO) refer to this thread. Click here

Symbianize Index of Computer Tutorials,  492650

P.S.. may picture pa kung paano maglagay ng CD.. hehe. .Symbianize Index of Computer Tutorials,  Rofl

Install the OS, parang nagiinstall lang kayo ng software sa PC nyo
then pagpunta sa Partition, piliin nyo yung ginawa ninyong partition.

Symbianize Index of Computer Tutorials,  124152337_d75f22de5c_o

Symbianize Index of Computer Tutorials,  Image_thumb

Symbianize Index of Computer Tutorials,  Drive-partition-ubuntu

at ito naman kung mag iinstall kayo ng linux based OS (ubuntu, fedora,
etc) --- ito ang wubi, iinstall mo ang OS na to inside windows which
means it acts like a normal software na pwede mo iuninstall.

piliin nyo din ang partition na ginawa nyo.

Symbianize Index of Computer Tutorials,  Wubi-installer

[c] Hayaang magrestart ang PC

[d] Now magboot na ang OS nyo

Symbianize Index of Computer Tutorials,  PC-Restarting

Symbianize Index of Computer Tutorials,  Speed-up-booting-in-ubuntu-boot

=====================================

Note for those who want to use linux:

i recommend the use of wubi (for those who want ubuntu OS), di sya
nakakagulo ng boot loader at iba ito sa basta install like a new OS, pag
wubi, pwede mo sya iuninstall agad


=====================================
[b]
YOU NOW HAVE A NEW OS Symbianize Index of Computer Tutorials,  Excited

PART 3: FIXING/REMOVING A DUAL BOOT/MULTI BOOT

[3A] Fixing a Dual Boot/Multi Boot

[a] Kung pagkarestart nyo na PC nyo ay black screen lang ang nakikita
nyo. then it means na may problema ang pagboot ng PC nyo.. ( hala ka,
sinira mo. Symbianize Index of Computer Tutorials,  Rofl ) pero its not the end of the world(or your PC) may solusyon dyan.

Click Here(XP users)

Click Here(Vista users)

For windows 7 users, may kasama ng recovery ang installation CD nyo.

Click nyo ang startup repair. basta may repair or restore na word.

Symbianize Index of Computer Tutorials,  Xpwelcome

Symbianize Index of Computer Tutorials,  Vista-recovery-disc

[c] Voila!! mag boot na ang OS nyo, pero bakit ganun? di ako nakapamili ng OS. di ba naginstall ako ng bagong OS?

ito ang solusyon dyan, ang easyBCD. refer to the first post for the
download link. (pero sure naman akong nadownload nyo na to dahil kasama
to sa tools needed)

just select add entry. add nyo yung OS na ininstall nyo.

Symbianize Index of Computer Tutorials,  Easybcd-add-entry

[d] restart your PC.

[b]
SA WAKAS, NAAYOS NA ANG DUAL BOOT KO.. Symbianize Index of Computer Tutorials,  Dance


=====================================

[3B]Removing a Dual Boot/Multi Boot

[a] Sa inyong current OS ulit na gamit.. Buksan ulit ang computer management..

Under Storage, Choose Disk Management

Symbianize Index of Computer Tutorials,  Removing_partition_windows_xp

[c] Right click the partition then select Format

[d] ayan wala na yung OS na ininstall nyo. pero kung mag restart kayo, lalabas parin yung entries sa boot manager.

gamitin ulit ang easyBCD para matanggal ang OS na walang laman.. delete lang ang entry.

Symbianize Index of Computer Tutorials,  Easybcd-remove-win7

[e] If magrestart ulit kayo, diretso na yun sa OS nyo, wala ng pagpipilian.


=====================================

[b]AYOS WALA NA ANG MGA BOOT OPTIONS MAKAKAHINGA NA NG AYOS ANG PC KO. Symbianize Index of Computer Tutorials,  Clap


PART 4: DELETING A PARTITION

recycled na tong post na to, hehe.

[a] Open computer management

Under Storage, Choose Disk Management

Symbianize Index of Computer Tutorials,  Removing_partition_windows_xp

[c] Right click the partition then choose delete.

Symbianize Index of Computer Tutorials,  Delete-partition%5B2%5D

[d] Ang lalabas ay parang itim so ito ay unallocated, so what you need
to do is piliin ang pinagkuhanan ng partition or drive na ginawan mo ng
partition, right click mo yun then choose Extend volume.

Symbianize Index of Computer Tutorials,  Disk_mng24

[e] Wala na yung ginawa mong partition at bumalik na sa dati ang drive C mo


=====================================

[b]AT DOON AKO NATUTO SA PAGGAWA NG PARTITION Symbianize Index of Computer Tutorials,  Thumbsup


PART 5: EXTENDING YOUR SYSTEM PARTITION

Note: I will be referring to drive C as the default system partition

=====================================

[a] I-open ang Aomei Partition Assistant then gawin to:


Code:
Click Wizard > Extend Partition Wizard
Symbianize Index of Computer Tutorials,  Partitionassistant_figc-program-original

Pumili kung alin ang gusto i-extend (ang i-extend natin ay yung system partition)

Symbianize Index of Computer Tutorials,  Partitionassistant_figd-extend-wizard-1

[c] Ilagay ang gusto mong size na ng system partition mo

Symbianize Index of Computer Tutorials,  Partitionassistant_figf-extend-wizard-3


=====================================
[b][size=21]
YOU NOW HAVE EXTENDED YOUR SYSTEM PARTITION
Symbianize Index of Computer Tutorials,  Beat

steves19Hot Re: Symbianize Index of Computer Tutorials, Sun Jan 13, 2013 7:59 am

  • Technician
steves
Technician
Symbianize Index of Computer Tutorials,  Honored
Block websites without using any software


How to block websites without software?

Steps:


1] Browse C:\WINDOWS\system32\drivers\etc

2] Find the file named "HOSTS"

3] Open it in notepad

4] Under "127.0.0.1 localhost" Add 127.0.0.2 www.sitenameyouwantblocked.com , and that site will no longer be accessable.

5] Done!

-So-

127.0.0.1 localhost
127.0.0.2 www.blockedsite.com

-->www.blockedsite.com is now unaccessable<--


For every site after that you want to add, just add "1" to the last
number in the internal ip (127.0.0.2) and then add like before. Example:
127.0.0.3 www.blablabla.com
127.0.0.4 www.blablabla.com
127.0.0.5 www.blablabla.com
etc.

Edit: Not working daw sa Windows 7. Symbianize Index of Computer Tutorials,  Salute

steves20Hot Re: Symbianize Index of Computer Tutorials, Sun Jan 13, 2013 7:59 am

  • Technician
steves
Technician
Symbianize Index of Computer Tutorials,  Honored
[TUT] How to make Mozilla Firefox consume less memory


Quote:

When you use the computer, probably running many software, each of
them needs ram memory. RAM is very important , because the faster the
frequency of the RAM the faster the software runs. In this tutorial we
will move Firefox to your hard drive when you minimize it. When we do
that, firefox will take up much less ram memory.
Open a new tab and type in about:config in the address bar. After this will appear warning message, click I´ll be careful, I promise !. In about:config settings right click anywhere and select New-> Boolean, as shown below:


Symbianize Index of Computer Tutorials,  Aboutconfig-mozilla-firefox

In New Boolean Value type config.trim_on_minimize and set it to true.

Symbianize Index of Computer Tutorials,  New-boolean-value

Symbianize Index of Computer Tutorials,  Enter-boolean-value

Restart Firefox and these settings will take effect.

Symbianize Index of Computer Tutorials,  Salute


Attached Files
Symbianize Index of Computer Tutorials,  Zip Firefox Ultimate Optimizer.zip (61.1 KB, 3660 views)

steves21Hot Re: Symbianize Index of Computer Tutorials, Sun Jan 13, 2013 8:01 am

  • Technician
steves
Technician
Symbianize Index of Computer Tutorials,  Thumbsup
[TUT] Disable Windows 7 Splash Screen: Make Booting Faster by Few Seconds


Windows 7 Splash Screen is the small
clip that plays while booting your PC, laptop which show the windows
logo saying "Starting Windows" which is around for a few seconds. Now if
booting quickly is important to you then you can choose to remove and
disable that splash screen which save you around 6-8 seconds of your
boot time.

Speed Up Boot Time: Remove Windows Splash Screen

Follow steps below to disable Windows 7 splash screen…

Step 1: Access System Configuration Tool. Press (windows key) + R and
type in msconfig and press Enter or search for "System Configuration" in
windows 7 program search from the start menu.

Symbianize Index of Computer Tutorials,  Disable-windows-7-splash-screen-make-booting-faster-3

Step 2: In the System Configuration window click on the Boot tab. Now check the "No GUI Boot" option enabled.

Symbianize Index of Computer Tutorials,  Disable-windows-7-splash-screen-make-booting-faster-2

Step 3: Click Apply and OK and Restart to see the settings in action.

The next time your pc boots it goes directly to the windows logon screen
without wasting few seconds on the windows splash screen.

Note: Working and effective in Windows 7 Ultimate 32 bit, so far wala pa naman akong naeencounter na problem. Symbianize Index of Computer Tutorials,  Thumbsup

I hope you’ll find this tip useful. Symbianize Index of Computer Tutorials,  Salute

steves22Hot Re: Symbianize Index of Computer Tutorials, Sun Jan 13, 2013 8:01 am

  • Technician
steves
Technician
Symbianize Index of Computer Tutorials,  Thumbsup
[TUT] Prevent Someone From Changing Your Computer's Desktop Wallpaper


Prevent Someone From Changing Your PC’s Desktop Wallpaper


Want to prevent someone from changing desktop wallpaper ? Follow these
steps which are very useful to customize windows 7 interface settings
like locking desktop wallpaper so your friends, employees etc can’t
change the desktop background, wallpaper without your permission.


Step 1 : Go to Start > Run or press windows + R and type in
gpedit.msc (This file is located at C:\Windows\System32\gpedit.msc)

Symbianize Index of Computer Tutorials,  Lock-wallpaper-prevent-desktop-wallpaper-change-window-7_1

This will open the Local Group Policy Editor in Windows 7.


Step 2 : From the left panel, click on to expand User Configuration >
Administrative Templates > Control Panel > Personalization

Symbianize Index of Computer Tutorials,  Lock-wallpaper-prevent-desktop-wallpaper-change-window-7_2


Step 3 : Right click on Prevent changing desktop background and click Edit.

Step 4 : On this window (see below) select Enabled to To Prevent Changing Desktop Background.


Symbianize Index of Computer Tutorials,  Lock-wallpaper-prevent-desktop-wallpaper-change-window-7_3


Click OK and restart PC to make it work fully. To disable this feature follow the same steps and select "Disabled" in Step 4.

Now the Desktop Wallpaper Change option will be greyed out to prevent any further wallpaper change.


Symbianize Index of Computer Tutorials,  Lock-wallpaper-prevent-desktop-wallpaper-change-window-7_4


Note : It will also disallow users from right clicking on Images and
setting them as Desktop Background from context menu. The wallpaper
won’t be changed.

There are similar settings for screensaver, power scheme etc.

Symbianize Index of Computer Tutorials,  Thanks for reading. Symbianize Index of Computer Tutorials,  Honored

steves23Hot Re: Symbianize Index of Computer Tutorials, Sun Jan 13, 2013 8:01 am

  • Technician
steves
Technician
Symbianize Index of Computer Tutorials,  Icon1
This Tutorial is to make your Windows startup faster.


This Tutorial is to make your Windows startup faster.

1. Click on Start, then Run, and type "msconfig".

- Look under the "BOOT.INI" tab. You will see a box labeled "Timeout:",
and a numerical value. By default, it's 30, which means 30 seconds of
wait time before boot. This can be changed, make it 3 seconds. (Note: if
you have more than one operating system, this means the wait time to
startup to the highlighted Operating System. Sometimes you might want a
bit more than 3 seconds than you can opt 5 or 10 seconds). Apply and
click Ok.


2. Delete The Temporary Files Periodically From Your Computer To Make
The Applications Run Faster. Type %Temp% in the run dialog box by
clicking on Start -> Run, and click on "OK". You will see an open
folder with many files. Click on the Edit menu and click on Select all
and then click on the File menu and select Delete. Note: Always confirm
that the folder which is opened has a "temp" on the top of menu bar and
the folder indicates that it is a temporary folder.


3. Perform a Scandisk To See That Your Computer Hard Drive is in Healthy Condition and it helps Your Computer Run Faster.


4. Always Perform a Disk Defragmentation at least once in a month. Start
the disk defragmentation from the system tools available in the
accessories from the start menu. It takes a longer time and it is
advised not to run any applications in the computer including the screen
savers, while running disk defragmentation.


5. Clean Windows Registry Regularly using some tweaking applications such as advanced system care, tune up utilities, etc.

steves24Hot Re: Symbianize Index of Computer Tutorials, Sun Jan 13, 2013 8:02 am

  • Technician
steves
Technician
Symbianize Index of Computer Tutorials,  Icon4[Tutorial] How to remove FUvirus

FUvirus

Is a new virus that now conquering all
computers by storm, now it is famous but said that cannot be detect by
some anti-virus and spyware applications.

This file can perform following behavior

•File is created as process on the disk.

•This process can create, delete or modify files on the disk.

•Folders change its icon.

•Document folder always open after opening the desktop

•Can't open WINDOWS in hard disk
[/size]

How to Remove

1. Close any application, browser and your anti-virus.

2. Download ComboFix, we need it to remove the FUvirus.

3. Open notepad and copy/paste the text in the quotebox below into it:


Code:

[quote]KillAll::

File::
c:\windows\IFinst27.exe
c:\windows\Tasks\AB30F2F3919B68EF.job
c:\docume~1\loimic~1\applic~1\4hole\Tick stupid cast.exe
c:\docume~1\LOIMIC~1\APPLIC~1\4hole\bitswindowsite .exe
c:\windows\system32\FUvirus.exe

Folder::
c:\docume~1\loimic~1\applic~1\4hole\

Registry::
[-HKEY_CURRENT_USER\software\microsoft\windows\curre ntversion\explorer\mountpoints2\{0b1e74c2-0019-11dc-9a0f-806d6172696f}]
[-HKEY_CURRENT_USER\software\microsoft\windows\curre ntversion\explorer\mountpoints2\{1d43c855-47c5-11dd-be43-00e04cc0c7ec}]
[-HKEY_CURRENT_USER\software\microsoft\windows\curre ntversion\explorer\mountpoints2\{24d4ecec-ab67-11dc-bdba-00e04cc0c7ec}]
[-HKEY_CURRENT_USER\software\microsoft\windows\curre ntversion\explorer\mountpoints2\{2c525715-13f5-11dc-99fb-00e04cc0c7ec}]
[-HKEY_CURRENT_USER\software\microsoft\windows\curre ntversion\explorer\mountpoints2\{4ee655c6-5194-11dc-9a6a-00e04cc0c7ec}]
[-HKEY_CURRENT_USER\software\microsoft\windows\curre ntversion\explorer\mountpoints2\{5020d6b3-51b0-11dd-be49-00e04cc0c7ec}]
[-HKEY_CURRENT_USER\software\microsoft\windows\curre ntversion\explorer\mountpoints2\{61900cbc-a7bb-11dd-8e21-00e04cc0c7ec}]
[-HKEY_CURRENT_USER\software\microsoft\windows\curre ntversion\explorer\mountpoints2\{6e484edc-9eb0-11dc-9adf-00e04cc0c7ec}]
[-HKEY_CURRENT_USER\software\microsoft\windows\curre ntversion\explorer\mountpoints2\{6eae7034-9ddd-11dc-9ade-00e04cc0c7ec}]
[-HKEY_CURRENT_USER\software\microsoft\windows\curre ntversion\explorer\mountpoints2\{6eae7049-9ddd-11dc-9ade-00e04cc0c7ec}]
[-HKEY_CURRENT_USER\software\microsoft\windows\curre ntversion\explorer\mountpoints2\{71156742-34a4-11dc-9a30-00e04cc0c7ec}]
[-HKEY_CURRENT_USER\software\microsoft\windows\curre ntversion\explorer\mountpoints2\{8271785a-8183-11dd-be6a-00e04cc0c7ec}]
[-HKEY_CURRENT_USER\software\microsoft\windows\curre ntversion\explorer\mountpoints2\{924ff07f-ee39-11dc-bdf7-00e04cc0c7ec}]
[-HKEY_CURRENT_USER\software\microsoft\windows\curre ntversion\explorer\mountpoints2\{9b307eb6-7058-11dd-be5d-00e04cc0c7ec}]
[-HKEY_CURRENT_USER\software\microsoft\windows\curre ntversion\explorer\mountpoints2\{9b307ebe-7058-11dd-be5d-00e04cc0c7ec}]
[-HKEY_CURRENT_USER\software\microsoft\windows\curre ntversion\explorer\mountpoints2\{b24f4dfd-0057-11dc-9a11-d5deff17bbf1}]
[-HKEY_CURRENT_USER\software\microsoft\windows\curre ntversion\explorer\mountpoints2\{bb7bd93a-902d-11dc-9ad6-00e04cc0c7ec}]
[-HKEY_CURRENT_USER\software\microsoft\windows\curre ntversion\explorer\mountpoints2\{da9047ec-0d9d-11dc-99ec-d4aa521976e0}]
[-HKEY_CURRENT_USER\software\microsoft\windows\curre ntversion\explorer\mountpoints2\{eb632e57-5db4-11dd-be4e-00e04cc0c7ec}]
[-HKEY_CURRENT_USER\software\microsoft\windows\curre ntversion\explorer\mountpoints2\{eda36a24-9292-11dc-9ad9-00e04cc0c7ec}] [/quote]


[size=16]4. Save this as CFScript.txt, in the same location as ComboFix.exe

Symbianize Index of Computer Tutorials,  CFScript

Refering to the picture above, drag CFScript into ComboFix.exe

When finished, it shall produce a log for you at "C:\ComboFix.txt"


Note:

Do not mouseclick combofix's window whilst it's running. That may cause it to stall


Attached Files
Symbianize Index of Computer Tutorials,  Txt CFScript.txt (2.8 KB, 356 views)

steves25Hot Re: Symbianize Index of Computer Tutorials, Sun Jan 13, 2013 8:03 am

  • Technician
steves
Technician
Symbianize Index of Computer Tutorials,  Thumbsup
[Tutorial] How to Unhide a Folder/Files from Virus


How to Unhide a Folder/Files from Virus

if your flash disk got a virus in it. And suddenly your files and your
folders are gone, but the capacity of your flash disk is the same when
the folders are there. so it mean that your folder or files are being
hide by some virus.

how to unhide it? here it is:

1. open windows command prompt.

2. then type your flash disk directory in win command prompt, for e.g.: E: then enter.

3. after that, type attrib -s -h /s /d then press enter.

4. after this process all of your folders and files will come back.


View previous topic View next topic Back to top Message [Page 1 of 3]

Go to page : 1, 2, 3  Next

Permissions in this forum:
You cannot reply to topics in this forum